Bring Your Storybooks to Life: A Step-by-Step AR Interactive Book Tutorial
Learn how to turn your storybook into an interactive AR experience with this detailed Kivicube WebAR platform tutorial. No coding required—create augmented reality reading experiences in minutes.
Do you want your storybooks to “come alive”? Augmented reality reading (AR) is transforming traditional reading experiences, letting characters leap off the page and interact with readers.
What Is an Augmented Reality Storybook?
An augmented reality storybook uses webAR technology to overlay animation, sound, and interactive elements onto printed pages, allowing readers to scan images and experience digital storytelling directly in their mobile browser — no app download required.
Why augmented reality reading matters?
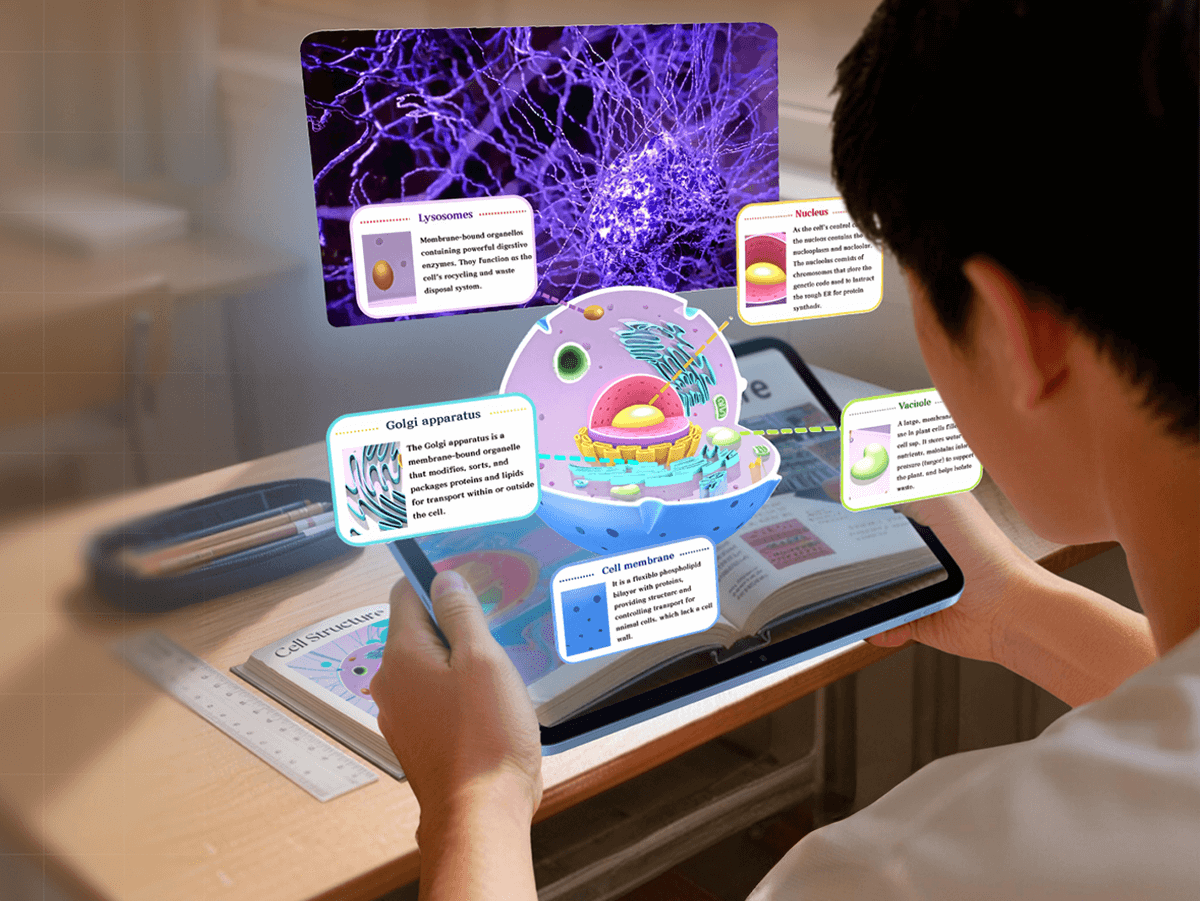
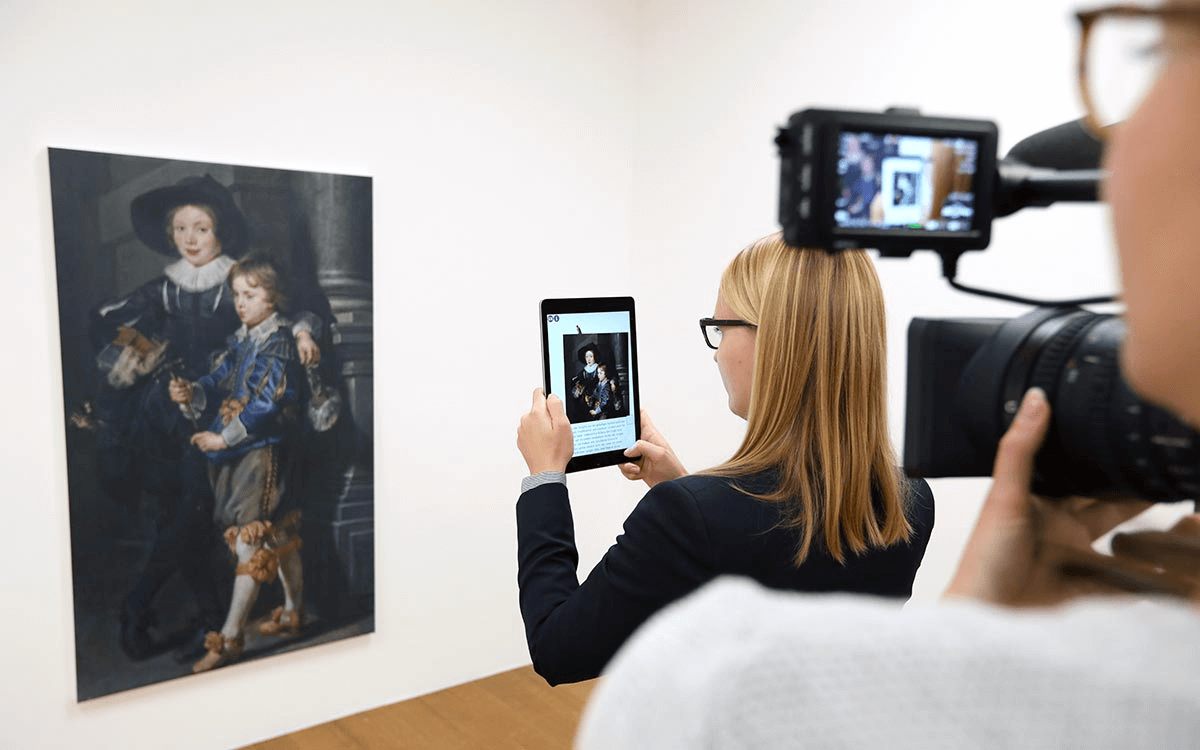
Before we dive into the how-to, it helps to understand why augmented reality storybooks are becoming such an important format. AR can turn static books into immersive portals that enhance engagement, deepen comprehension, and make storytelling more interactive. For a broader look at how AR is reshaping reading across genres — from children’s picture books to science and art — check out “When Stories Leap Off the Page: How AR Is Reshaping the Future of Reading.”
Two Ways to Build Your Augmented Reality Reading Experience
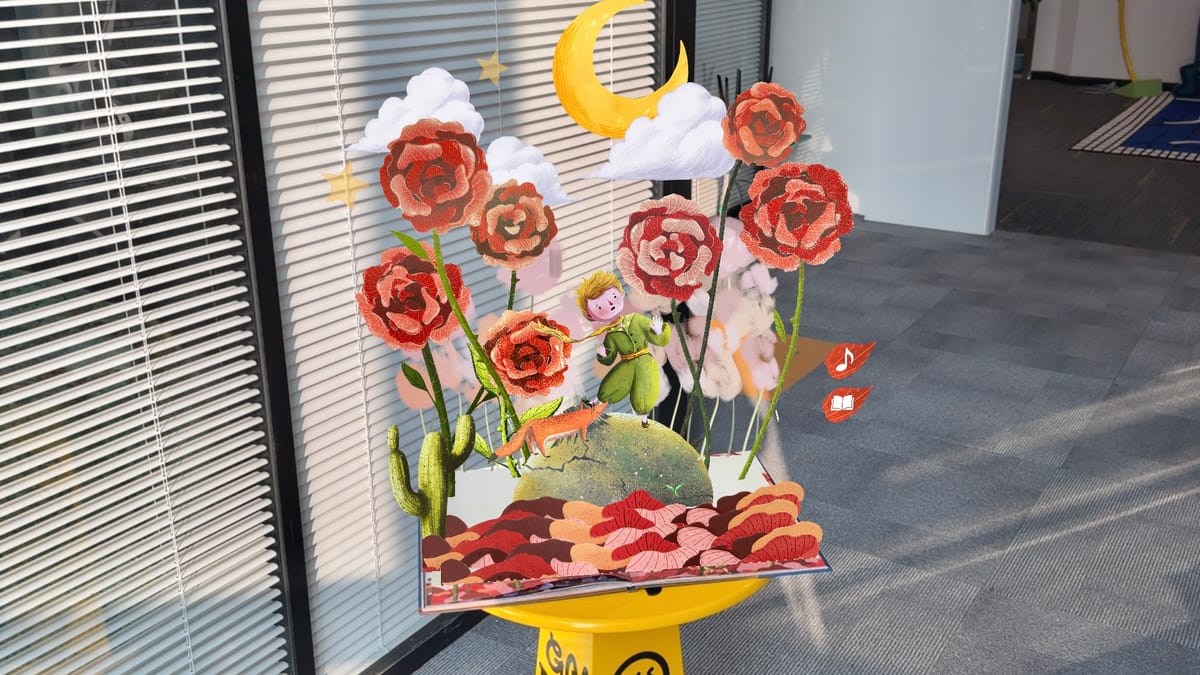
In this tutorial, we’ll show you how to use Kivicube, a powerful WebAR platform, to turn a classic book like The Little Prince into a fully immersive AR storybook—all without writing a single line of code. Whether you want to quickly reuse a template or start completely from scratch, this guide will get you there.
Before diving in, here’s a quick overview of the two main approaches so you can pick the one that fits your workflow:
The Quickest Way: Turn Your Storybook into AR with a Kivicube Template
Kivicube’s templates are a standout feature—they let you build on the work of experienced creators, reusing pre-set interactions and animation logic instantly.
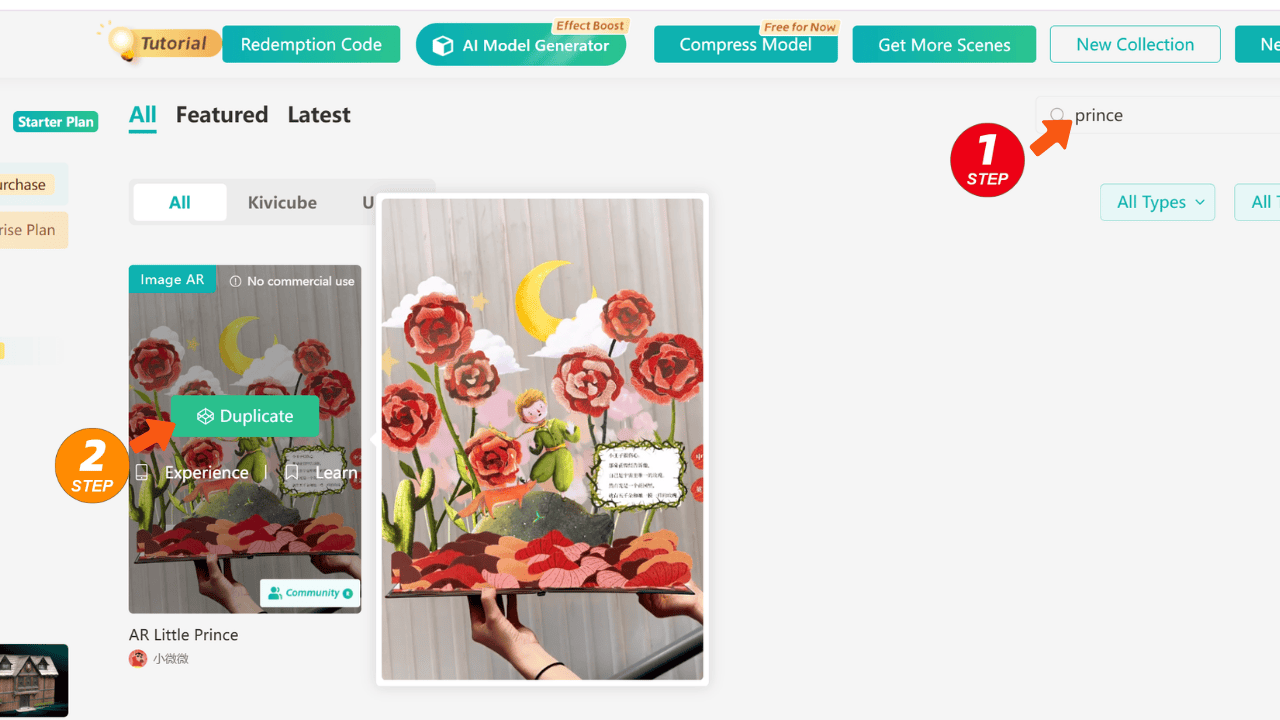
Prepare & Find a Template
- Log in to Kivicube and enter your dashboard.
- If it’s your first time, create a Collection (a folder to manage your AR scenes).
- Use the search bar in the top-right corner and type "Prince" to find the Little Prince AR storybook template.
- Click Duplicate to copy it into your Collection, then name your new scene.
Replace Key Content
- Enter the Kivicube scene editor after duplicating the template.
- In the Target panel on the right, upload your own storybook page as the target image, then drag it onto the grid editor.
Pro tip: Keep your phone parallel to the page, avoid glare or heavy bends for the best AR recognition.

If you want your AR storybook to have more stable and reliable tracking, especially for a smoother augmented reality reading experience, you can check out Kivicube’s detailed docs on how to create a strong and stable AR image target.
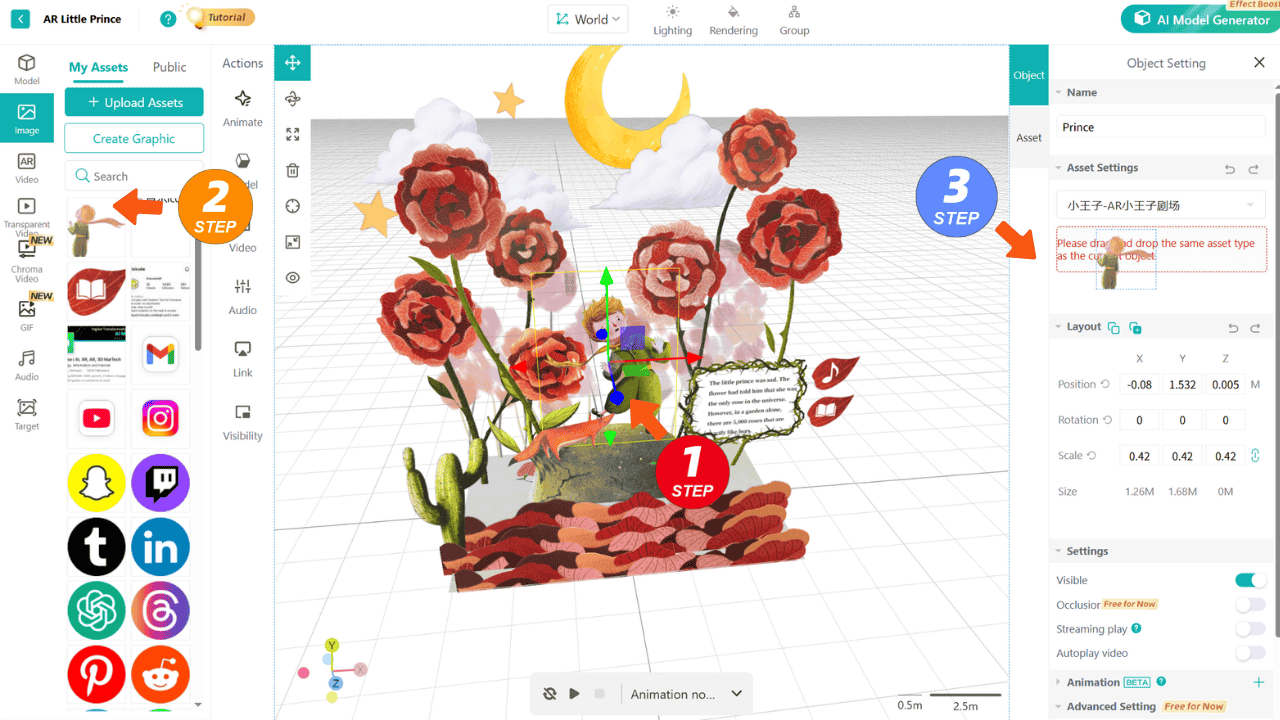
- Replace other assets in the scene: all animated elements like the Little Prince or the rose are from the template.
- Simply select the asset you want to replace and drag in your prepared image, video, or 3D model. Kivicube currently supports direct replacement of the same asset type (image for image, video for video).
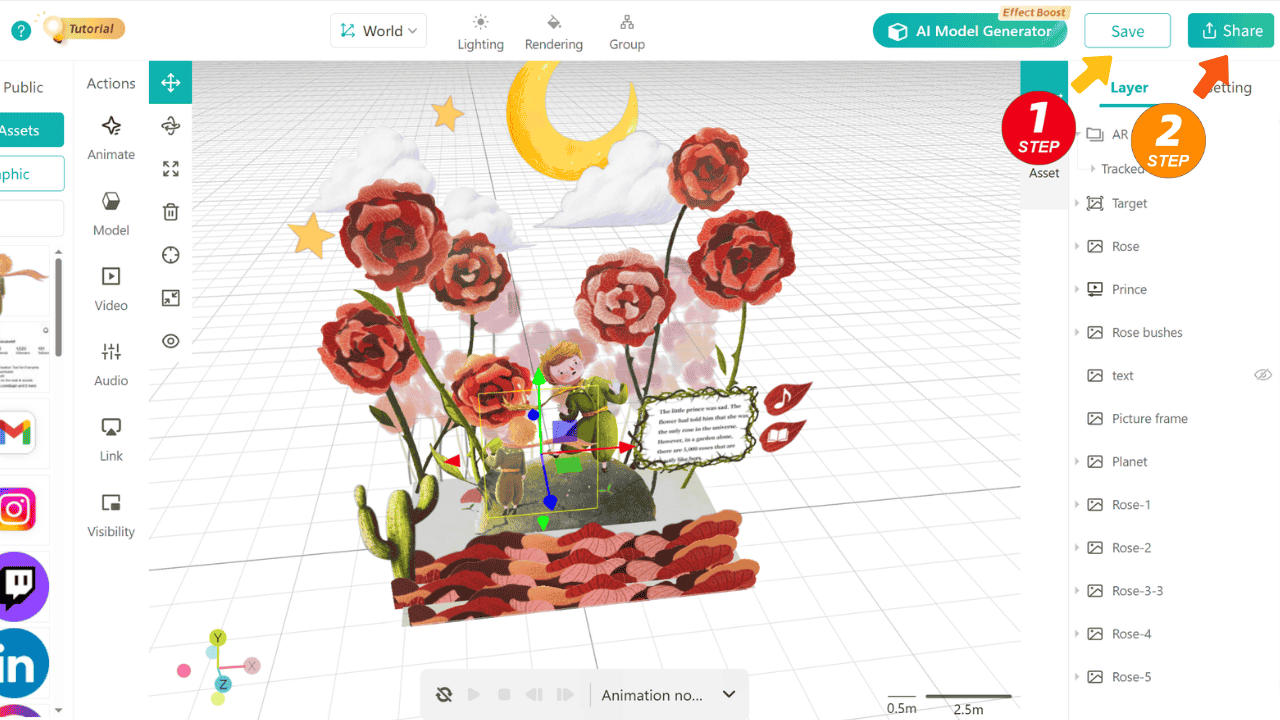
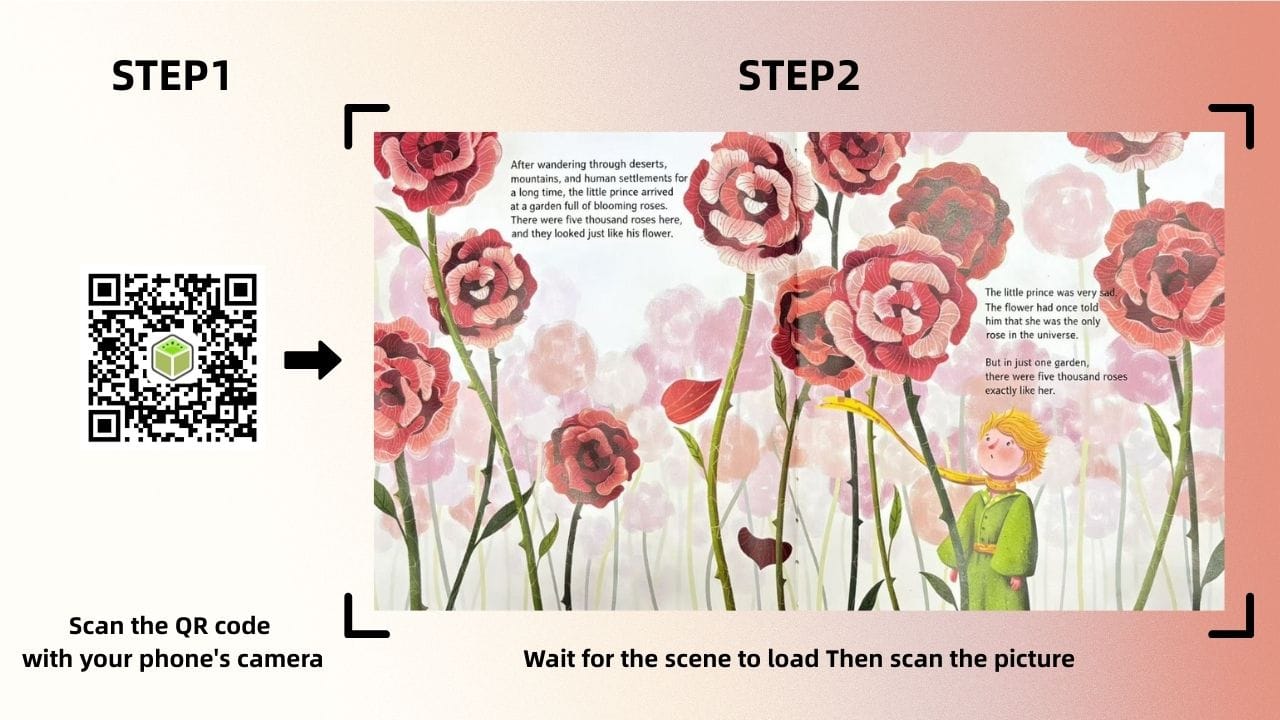
Publish & Experience
- Once everything is replaced, click Save, then Share → Web.
- A QR code will be generated—scan it with your phone and watch your AR interactive storybook come to life instantly.
The Creative Way: Start from Scratch to Fully Customize Your AR Storybook
If you want complete control over every detail, building from scratch is the way to go. It also helps you understand the WebAR platform creation logic.
Step 1: Create a Scene & Prepare Assets
- In your Collection, click New Scene +, select Image AR, name it, and upload your target image. This opens a blank editor.
- Prepare assets: export characters, backgrounds, and other elements from Procreate or Photoshop as PNGs (transparent background). For 3D models, export as GLB.


Step 2: Upload & Arrange Assets
- Click Image on the left panel and upload your files.
- Drag each asset onto the grid editor and use the transform tools or coordinates panel to adjust position, size, and rotation.
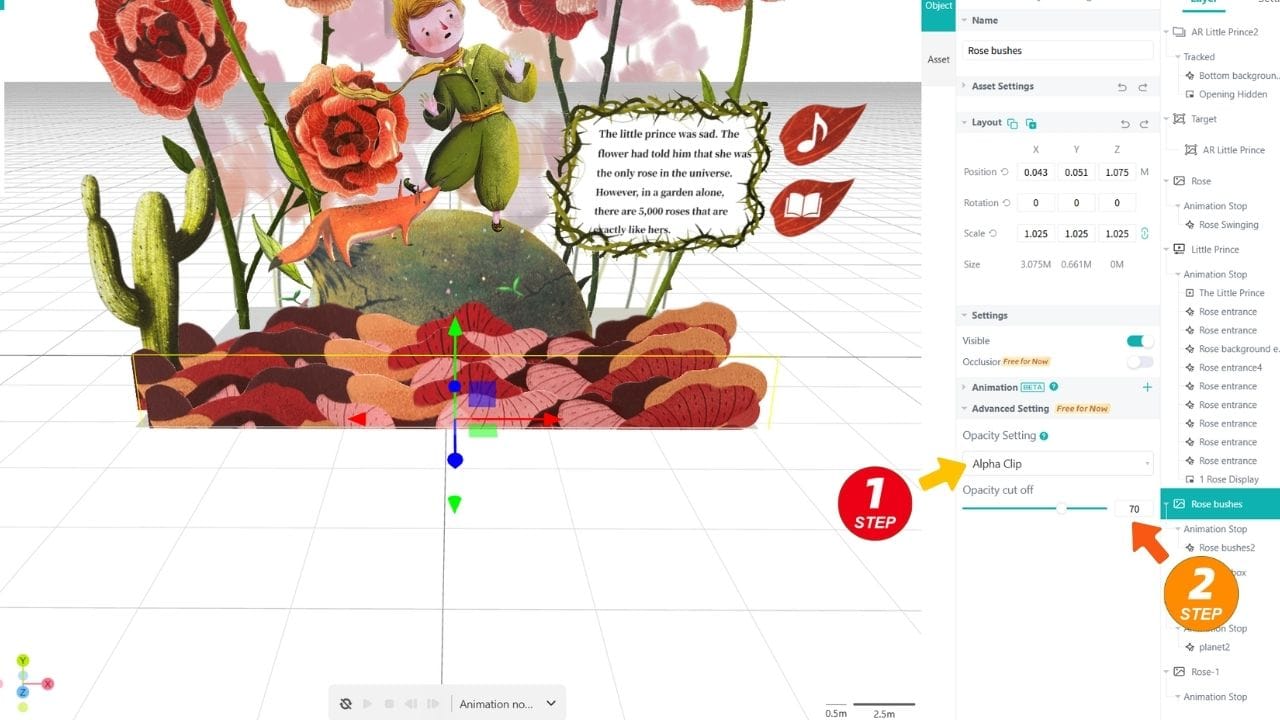
- Layer management tip: To prevent images from overlapping in 3D space, enable Alpha Clip for your PNGs and set Opacity Cutoff to 70. Rotate your view to verify. Note: semi-transparent gradient images may not work well with this.
Step 3: Animate Your Assets
Static layout is just the start—animation brings augmented reality reading to life.
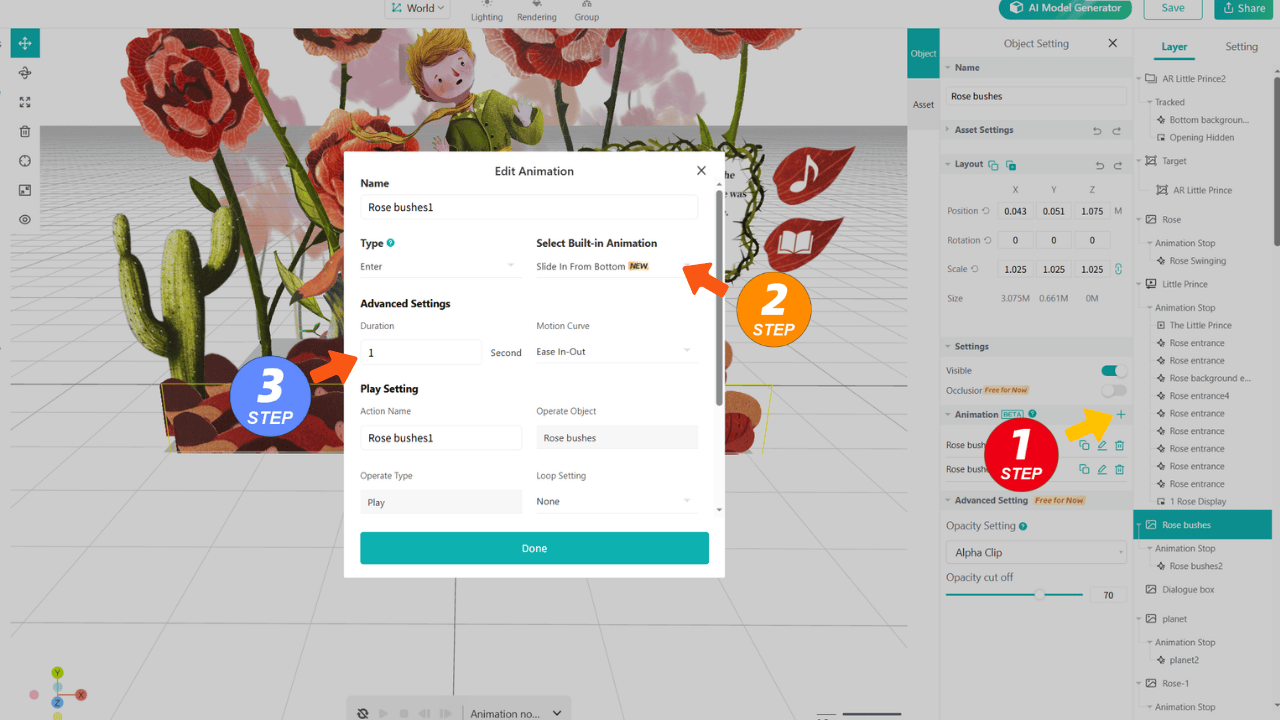
- Entry Animation: Select the rose bush, click Animation → +, choose an entrance animation (e.g., Slide In From Bottom), and set Trigger When recognition image is detected.
- Sequential Animation: Make roses bloom layer by layer by setting different durations (1s, 1.2s, 1.4s) for each layer.
- Looping Animation: Add a second animation (Emphasize → Float Up-Down) and enable Infinite Loop, triggered after the entry animation. Now the roses are floating gracefully after appearing.
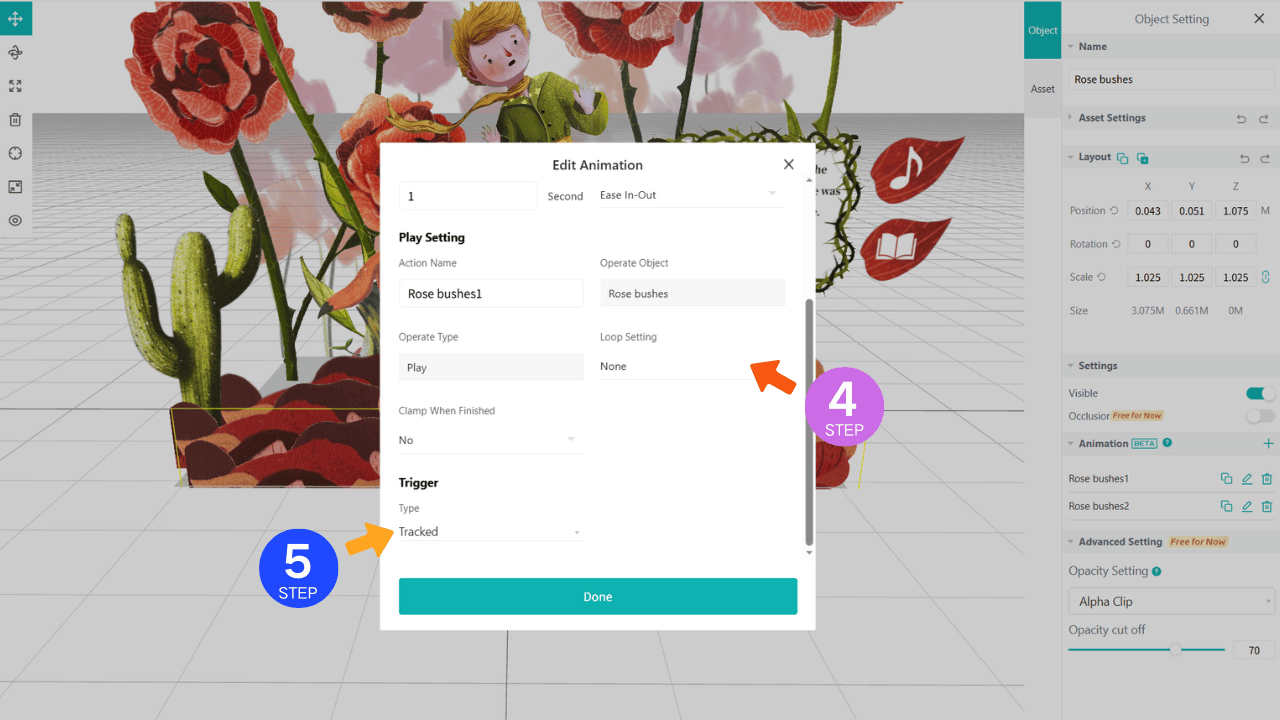
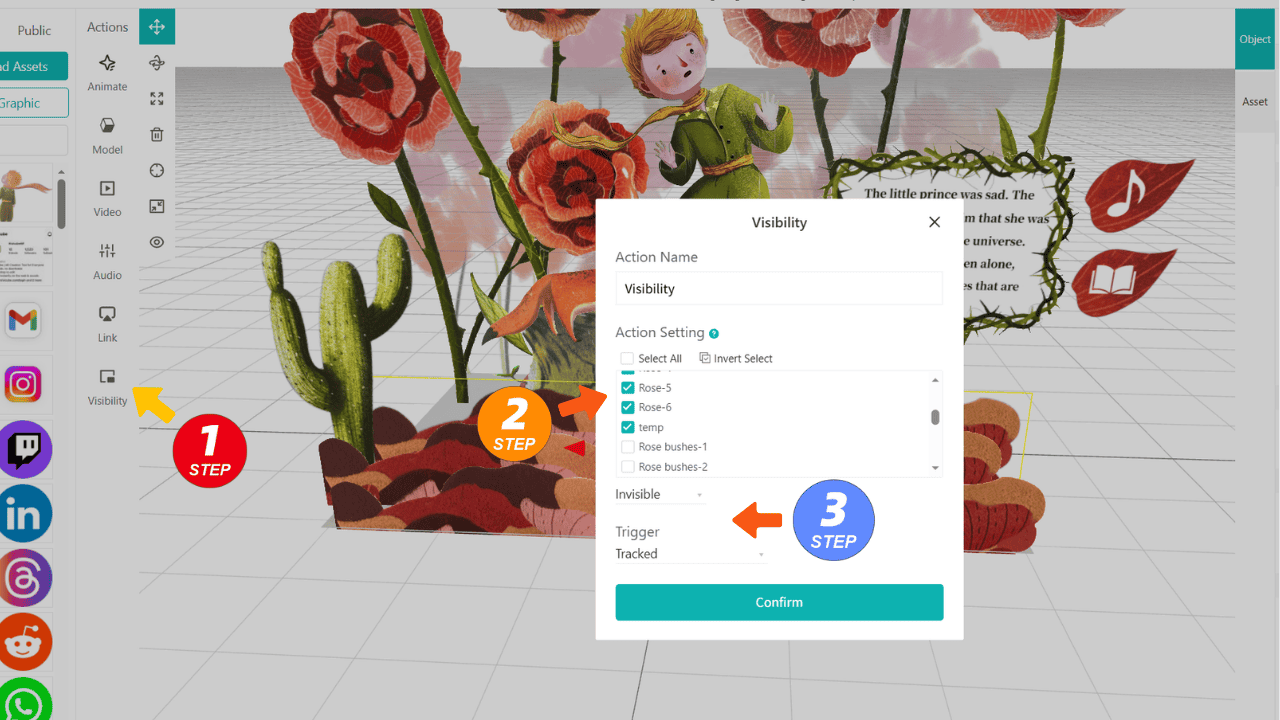
Step 4: Control Story Pace with Visibility
Kivicube shows all assets by default. To control the order:
- Set all assets except the rose bush to Invisible, with Trigger as Tracked. Only the rose shows at first.
- Then, make the Little Prince and background Visible, triggered after the rose bush entry animation.
- This creates a simple narrative sequence for your AR storybook.
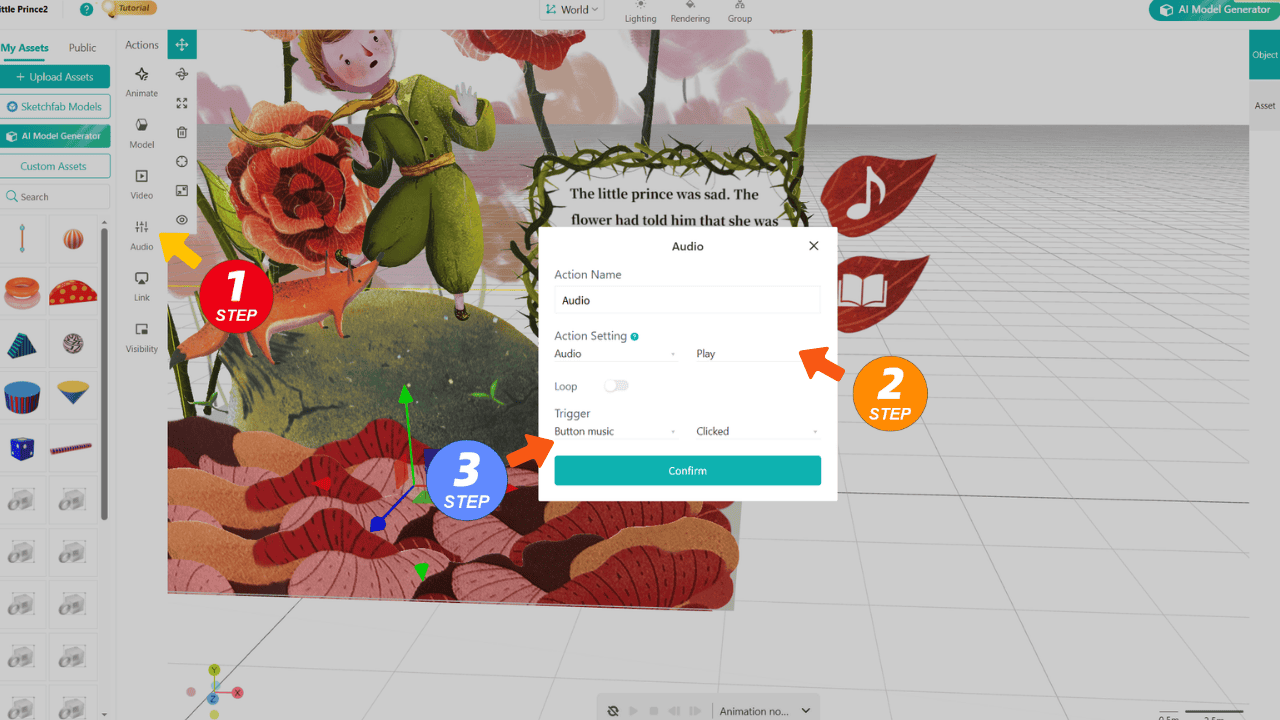
Step 5: Add Interactivity
- Pop-up dialogue: Place a book icon button and a hidden text popup. Set the text popup to Visible when the button is clicked.
- Background audio: Upload a Little Prince narration clip. Set its Action Trigger to play when the music icon is tapped.
Step 6: Final Publishing
- Click Save → Share → Web to generate the experience link.
- Scan it with your phone—your hand-crafted, fully animated, and interactive AR storybook world appears vividly before your eyes!
Summary
By following this tutorial, you’ve learned two core ways to create an AR interactive storybook using Kivicube, a leading WebAR platform.
- Quick Template Method: Perfect for rapid testing and reusing professional interaction logic.
- From-Scratch Method: Gives you complete creative control, perfect for detailed augmented reality reading experiences.
Now it’s your turn—bring your story off the page and into a rich, immersive AR world using Kivicube. Let your creativity and stories step into a new dimension!