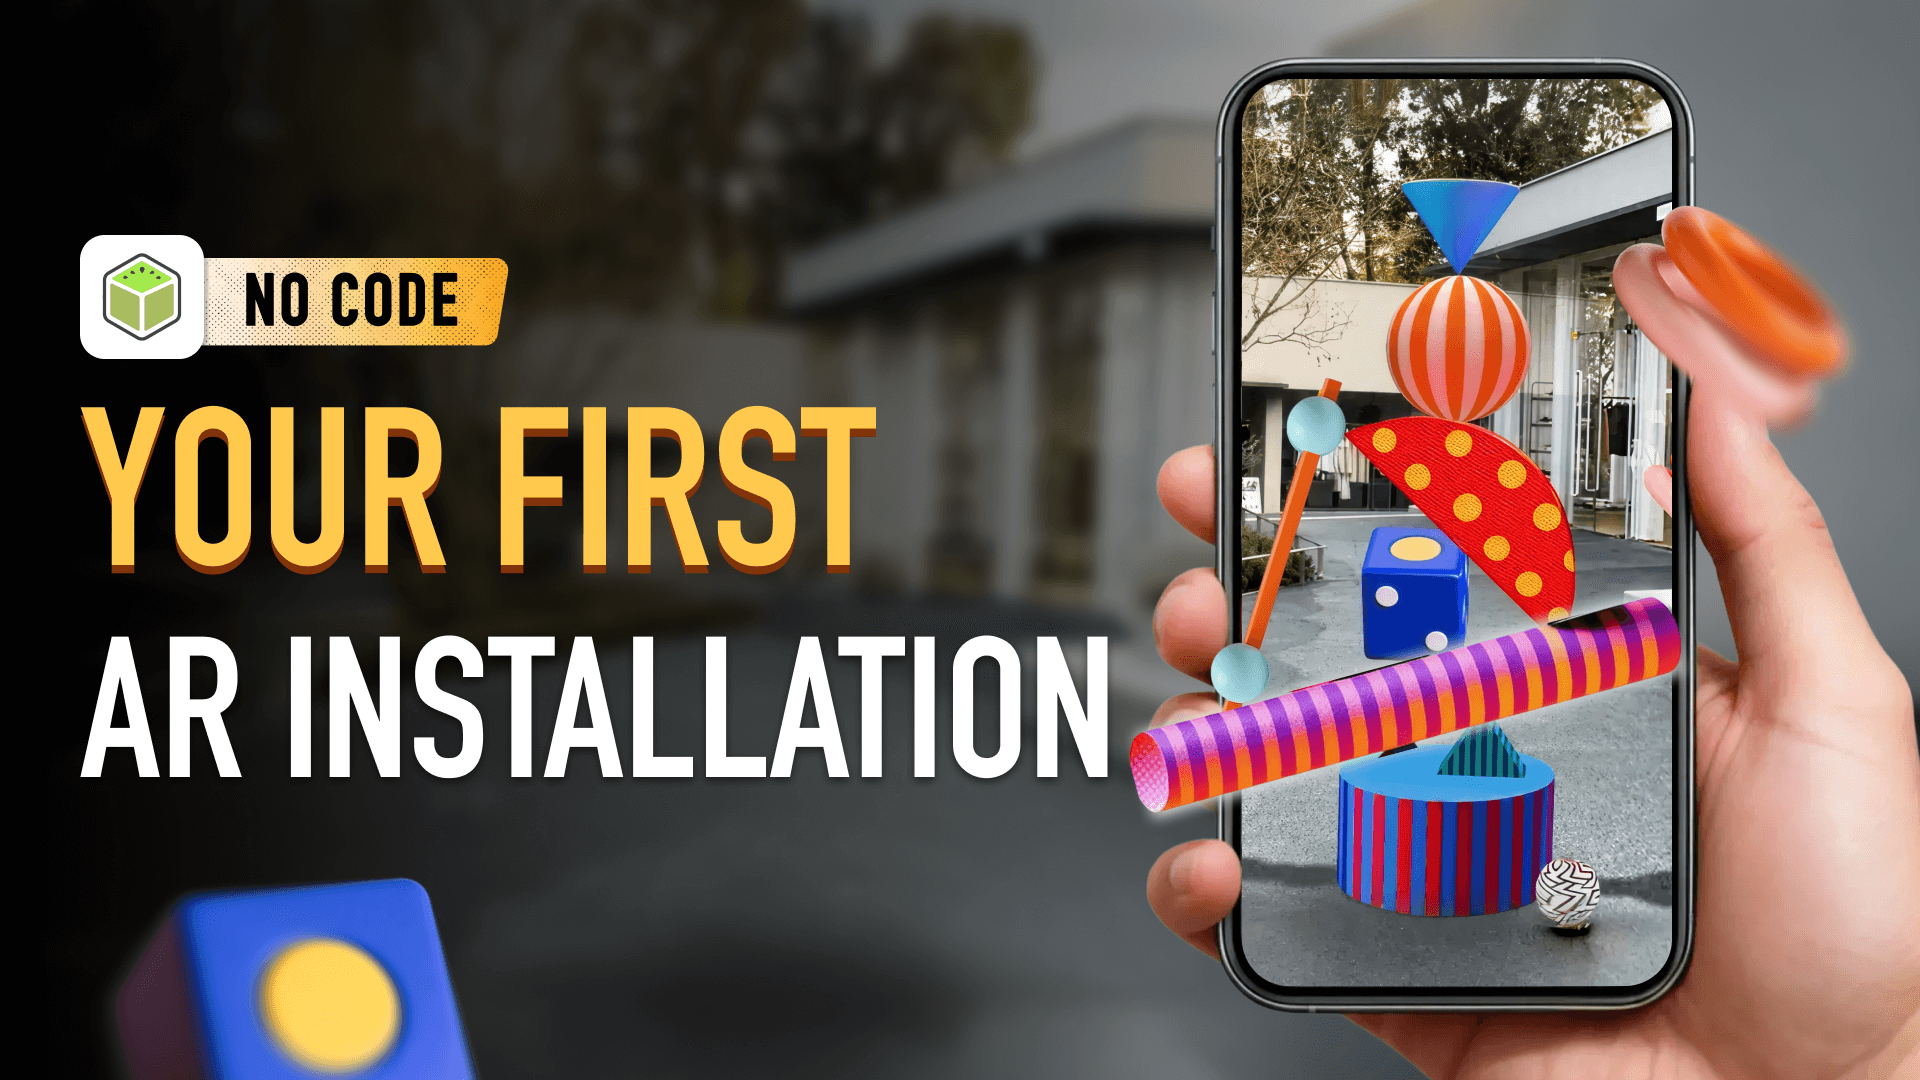
Create an AR Art Installation in Minutes Using WebAR (No Code Required)
Augmented reality is no longer limited to apps or technical teams. With modern webAR, anyone can build immersive experiences that run directly in the browser — no downloads, no coding.
In this step-by-step guide, you’ll learn how to create a browser-based AR art installation using Kivicube, a no-code augmented reality platform.
Whether you're working on creative projects, marketing campaigns, or AR learning experiences, this workflow is fast and accessible.
Why WebAR Is Changing AR Creation
Traditional AR required native apps, developer resources, and long production cycles.
WebAR removes those barriers. Instead of asking users to install an app, webAR experiences open instantly through a link or QR code.
This reduces friction and increases engagement — especially for education, retail, and interactive exhibitions.For creators and brands, this means:
- Launch AR projects faster
- Cut down development costs
- Reach more users with no barriers
This is where Kivicube stands out as practical augmented reality software built for speed and simplicity.
Step-by-Step: How to Create an AR Art Installation
Below is the exact workflow demonstrated in the tutorial.
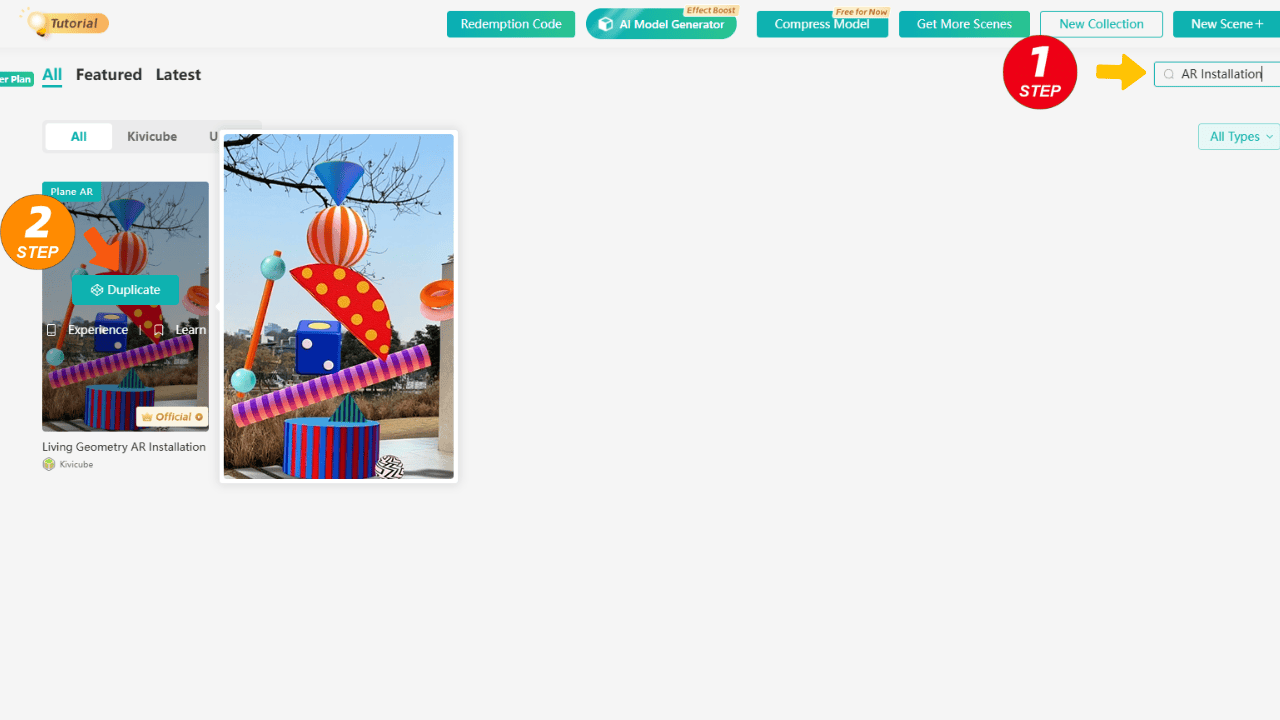
Step 1: Sign up and choose a template
Start by logging into Kivicube. Welcome to Kivicube’s template library.
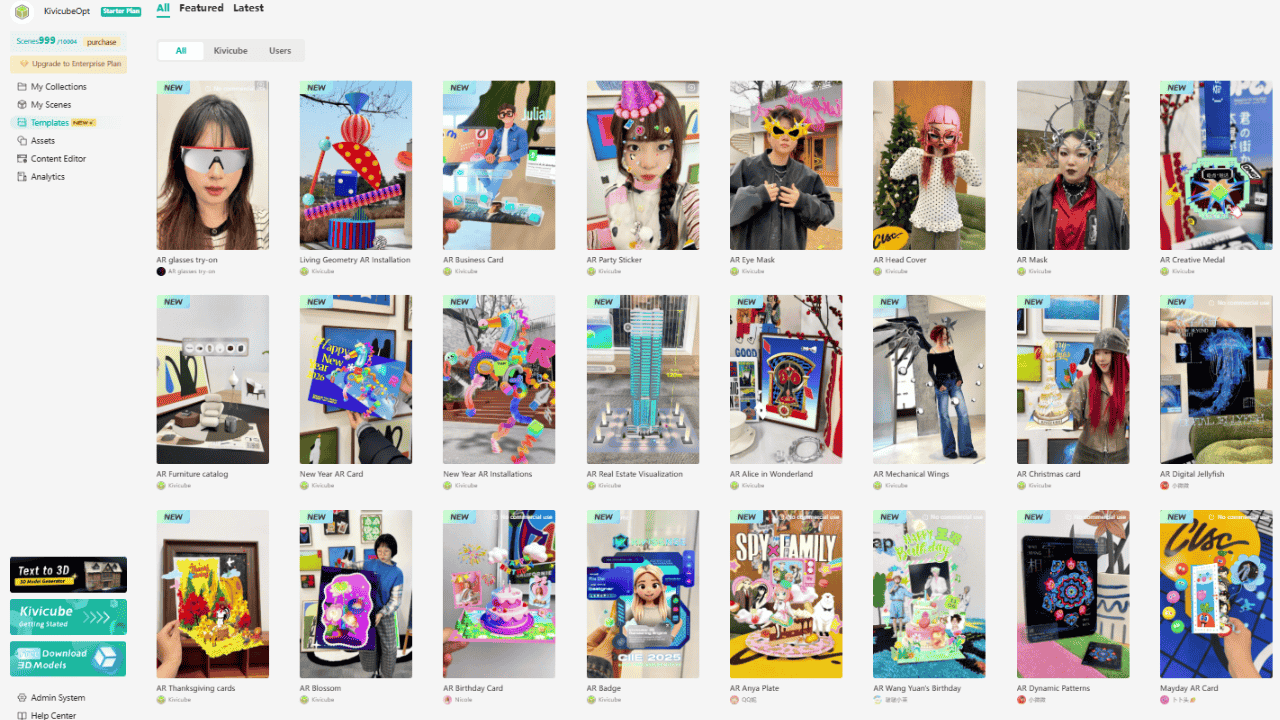
You can search by keywords or tags to find the template you want. Just duplicate it, swap out the assets, and you’ll have your own AR creation.
Templates save time and are ideal for:
- Beginners exploring AR learning
- Marketers launching campaigns quickly
- Designers testing spatial concepts
Step 2: Create an AR installation from scratch
If you’d rather skip the template and create freely, just follow along, and we’ll build it step by step.
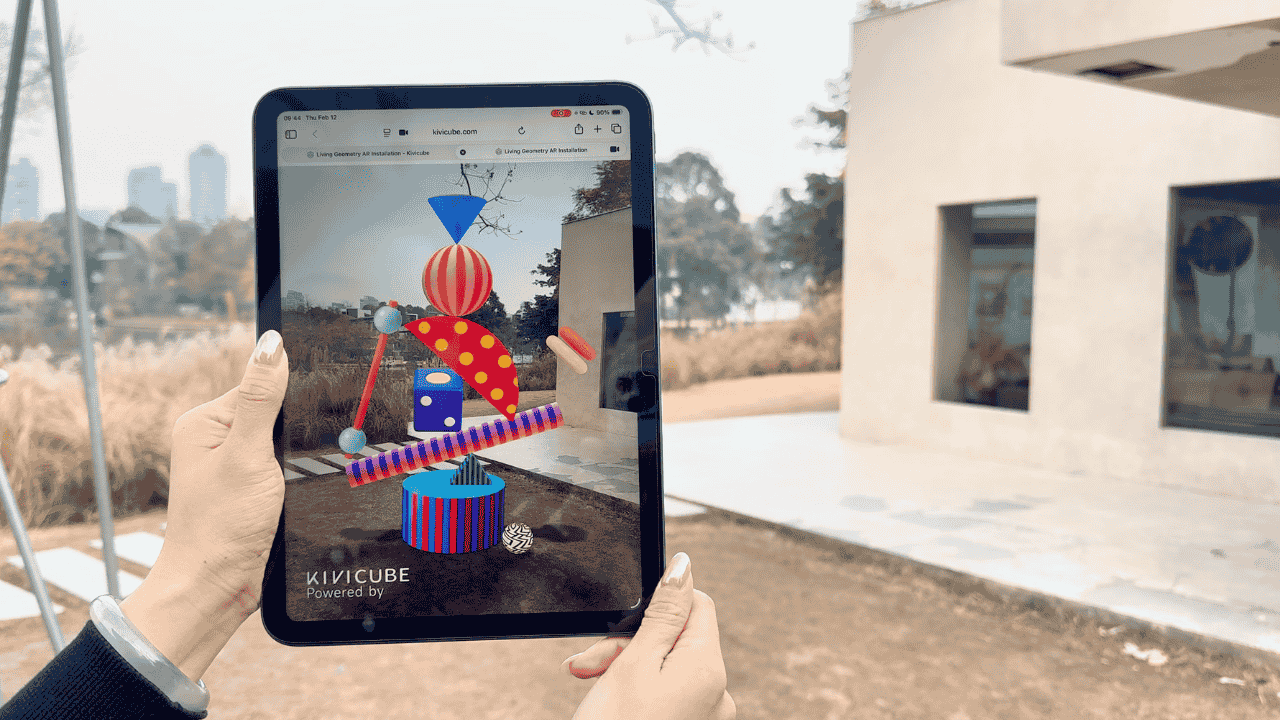
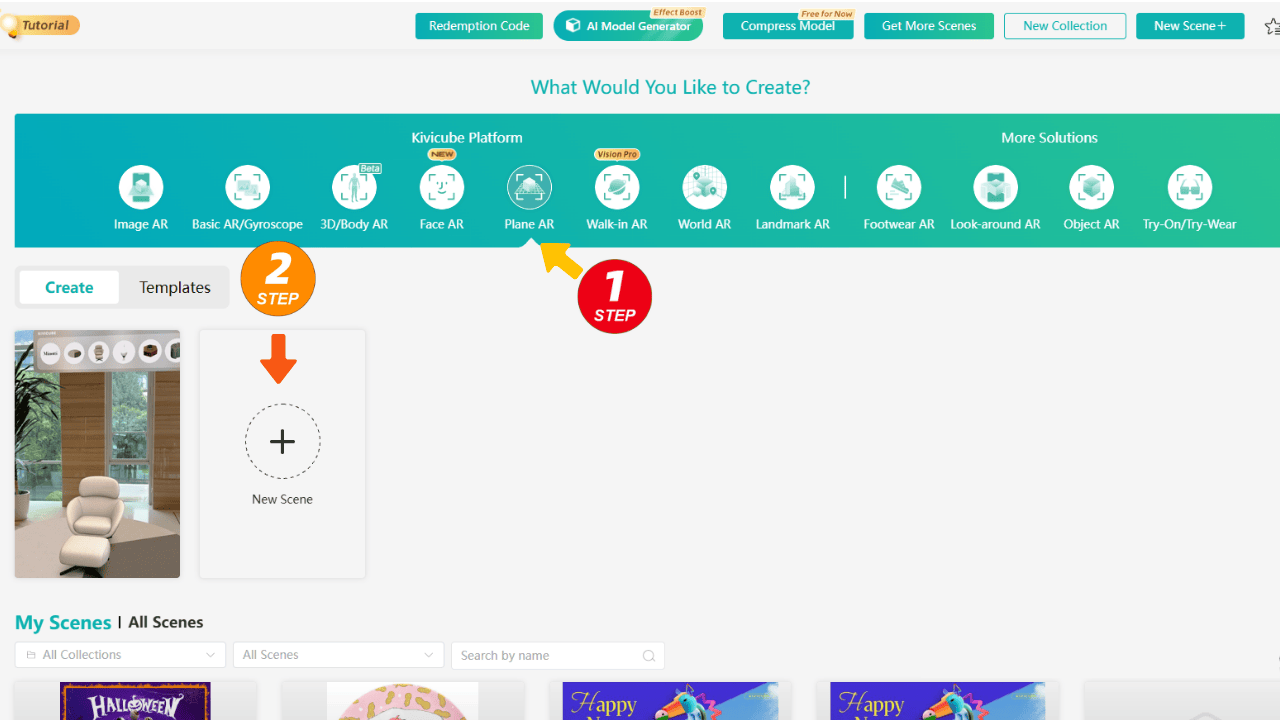
Choose Plane AR, create a New Scene.
Plane AR lets users place digital objects onto flat surfaces such as desks, floors, and tables.
This makes your installation feel grounded in real space, creating a much more immersive result for art projects or interactive exhibitions.
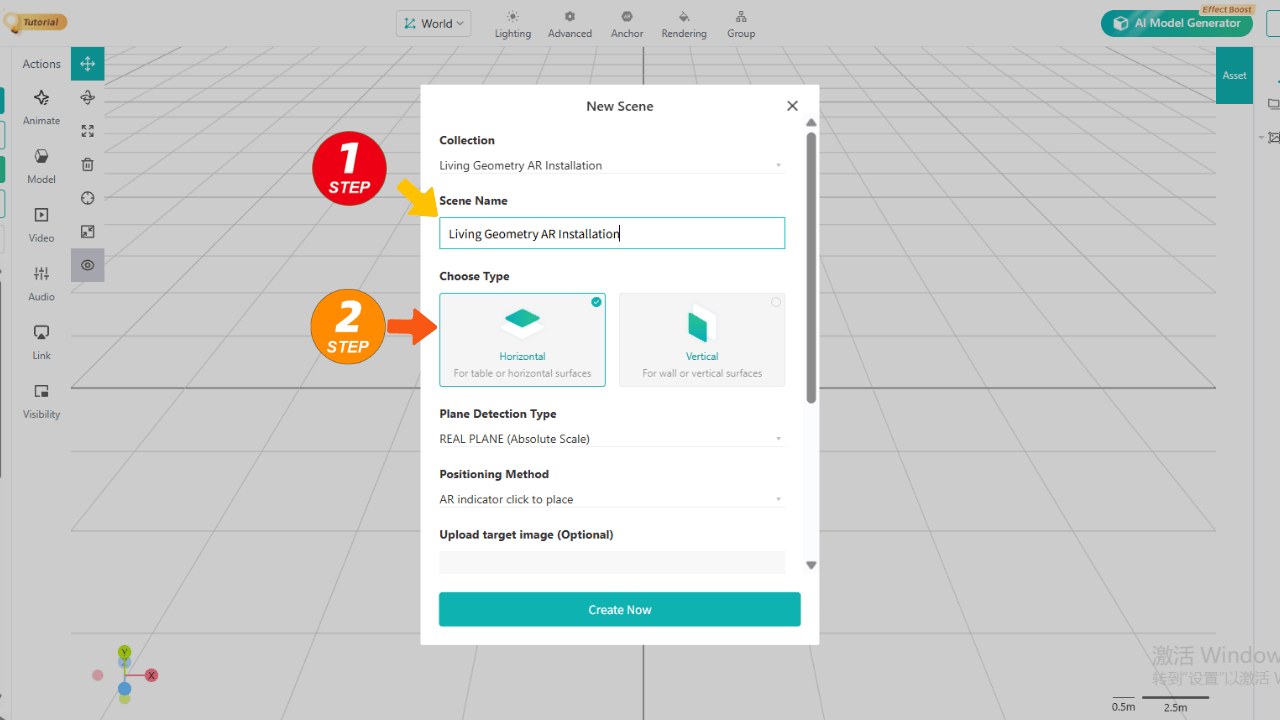
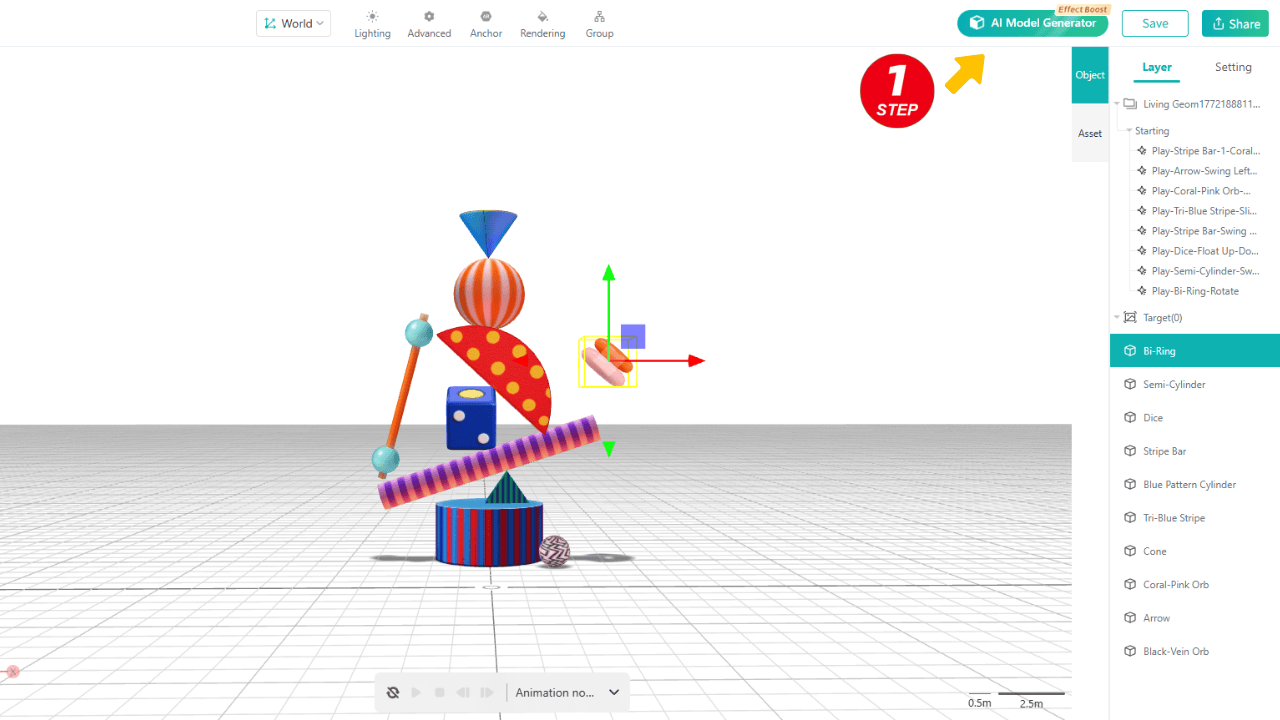
Name your scene, select Horizontal under Type, and you're ready to begin crafting your "Living Geometry AR Installation."
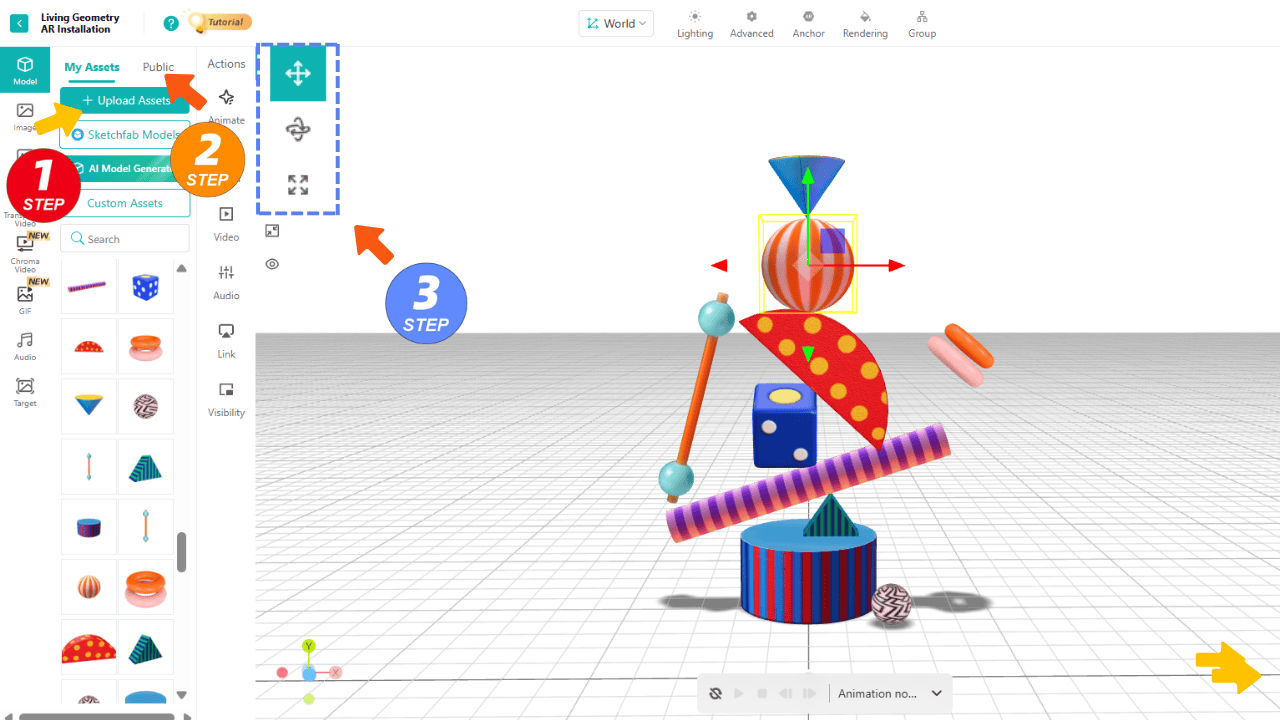
Upload your custom assets to your asset library or use built-in resources from the public assets library on the left panel.
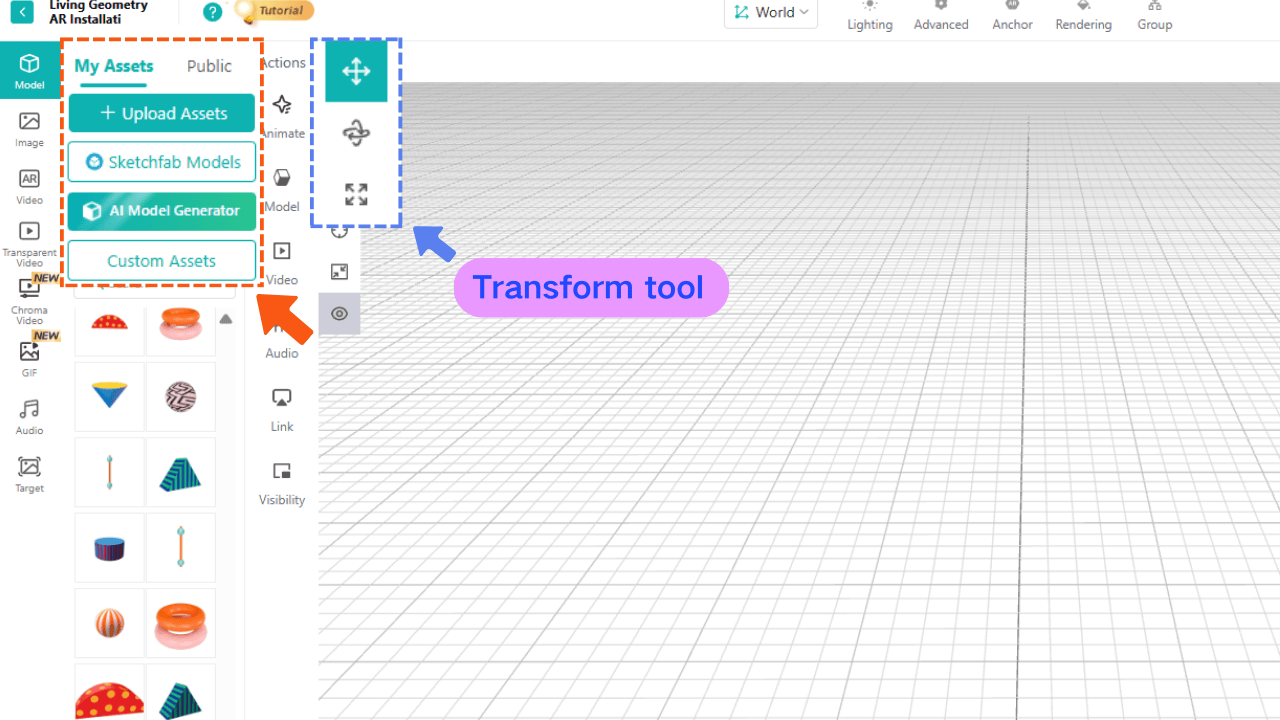
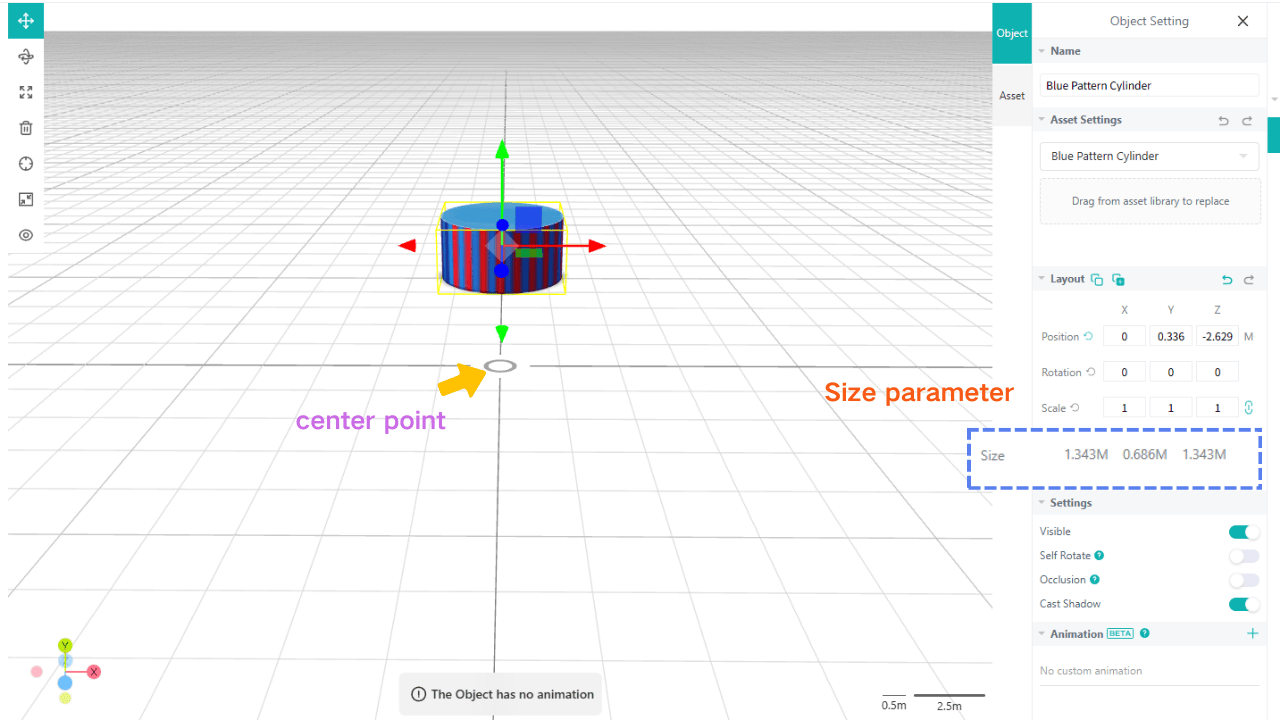
Use the transform tool at the top left of the grid editor to adjust the position, size, and rotation.
Two key tips:
- The center point in the editor represents your phone's camera position. For an optimal AR experience, place models about 2.5 meters in front of it.
- The Size parameter determines the model's actual scale in the real world.
Step 3: Add animation or motion
Static objects are fine. Moving objects are memorable.
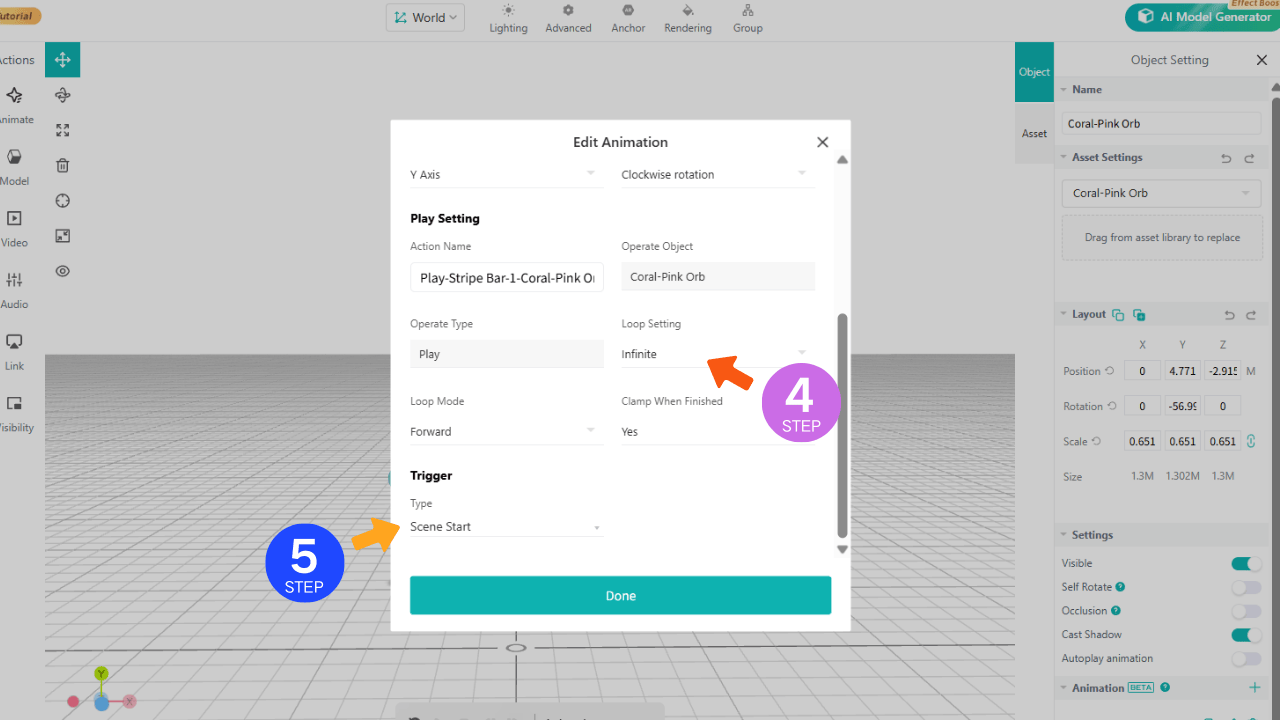
You can use the built-in animation settings to make your models move.Here’s how to set up a rotating coral-pink orb:
- Click the + next to Animation and name your animation
- Choose Rotate under Emphasize
- Adjust the animation duration in Advanced Settings. The smaller the value, the faster the rotation.
- Check Infinite under Loop Setting for continuous play
- Set the trigger to Scene Start

The same logic applies to other models. Motion increases engagement and makes the AR installation feel alive.
Step 4: Use the AI Model Generator (Optional)
If you don’t have ready-made 3D assets, use Kivicube’s built-in AI Model Generator.
This helps creators prototype faster, experiment with styles, and redu ce production time. For educators building AR learning content, this significantly lowers the barrier to entry.
All you need to do is export each layer from your design file.
Open the AI Model Generator on the top right of the scene editor.
Select Image to 3D, upload your layers, and click Generate Now.Wait a moment — your model is ready.

Step 5: Publish and share
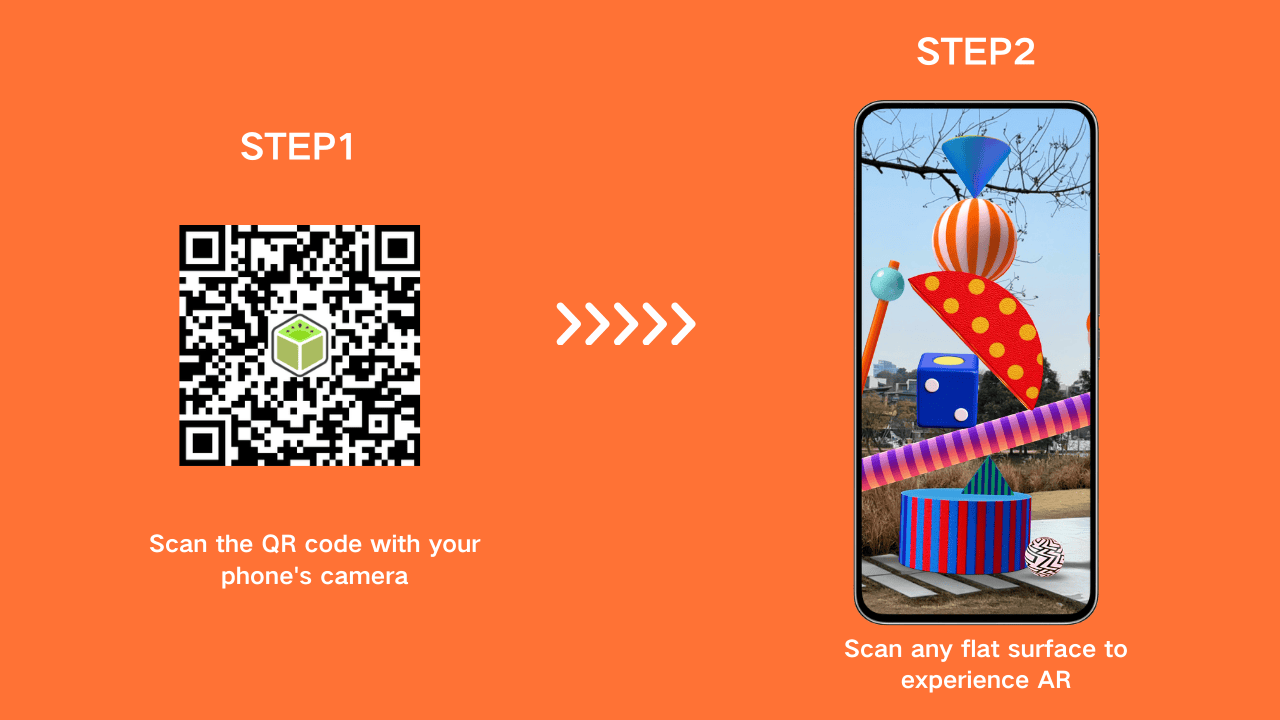
Click Save & Share at the top right then you’ll receive a webAR link and a QR code.
Users can open the experience directly in their mobile browser — no app installation required.
You can embed it on a website or share it via social media.
This browser-based accessibility is what makes webAR such a powerful format.
Your complete AR installation is now ready! We’ve also created a detailed video tutorial for this workflow. If you prefer learning by video, you can watch it here.
Step-by-step tutorial:How to create your first AR installation
Why Use Kivicube for WebAR Projects?
Many augmented reality software tools are built for developers.Kivicube is built for creators, educators, and marketers.Key advantages:
- No Coding Required: Everything is drag-and-drop. No technical background needed.
- Fast Deployment: Projects can go live in minutes.
- Cross-Device Compatibility: Experiences run in standard mobile browsers.
- Cost Efficient: No need to build or maintain a native app.
For teams exploring scalable, practical AR solutions, this balance of accessibility and capability is critical.
Use Cases Beyond Art Installations
While this tutorial focuses on an AR art installation, the core workflow translates seamlessly to countless use cases — including AR learning modules, interactive museum displays, product visualization, retail previews, and digital exhibitions.
Master the fundamentals of plane-based webAR, and you’ll be able to adapt this approach to nearly any industry with ease.

Discover more inspiring cases on our YouTube channel!
Final Thoughts
Creating augmented reality experiences used to require developers and dedicated apps.
Today, webAR makes it possible to design and launch interactive content directly from a browser.
With Kivicube, you get professional-grade augmented reality software that simplifies the entire process — from asset upload to publishing.
If you're exploring AR learning, marketing campaigns, or immersive art projects, this workflow gives you a practical starting point without technical complexity.
Ready to build your own webAR experience?Start experimenting and turn any flat surface into an interactive space!