Make Your Car Idea a Reality: A Step-by-Step Tutorial to Create AR Cars in Minutes
In the past, we could only see the details of car models at the car dealership or check the real car models themselves, which can be time-consuming and inconvenient.
However, you can turn your car ideas or photos into digital content, which not only helps intuitively show the car model online but also share them on multiple platforms with just one click.
Now, try to show your car model online simply by digitizing it using Kivicube for the interactive car viewing experience. No code or app required.
Create an AR Car Scene with Kivicube
Kivicube is one of the most powerful AR creation platforms online, offering multiple highly customizable options. If you prefer visual content, fortunately, we’ve created an easy-to-follow tutorial video that intuitively displays how to create an AR car experience using Kivicube. Watch the video below to see the process from start to finish.
Click Here to Learn How to Create an AR Car Scene with Ease
2 Methods to Build an AR Car: How-to Guide
How to create an AR car without coding? No matter your experience level, you can either use a ready-made template or build a fully customized AR car scene from scratch with Kivicube. Feel free to choose the one that best suits you.
Method 1: Create Augmented Reality Cars Directly with a Template
Using the given AR car templates is a straightforward and convenient method to make an augmented reality car within minutes even if you have no AR design experience. Here are the detailed steps to make it.
Before your work
Please prepare the assets before starting:
● The 3D model file for your car model assets.
● The 2D images for the other background assets.
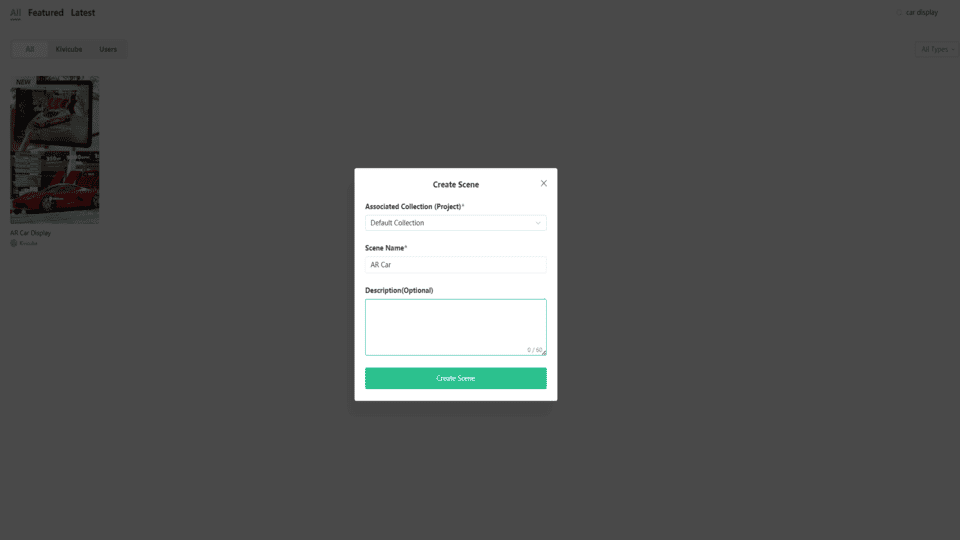
Step 1. Open the AR Car Template and Try It for Your Own Augmented Reality Car
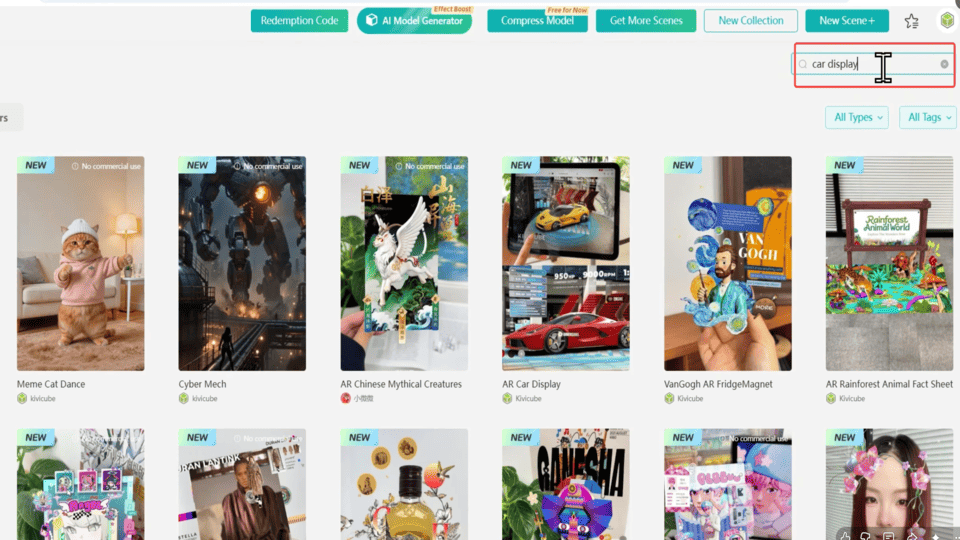
To get started, open Kivicube and log in. Click the “Templates” button, type “car display” to search for the AR car template in the top-right corner of the dashboard.
Click “Duplicate” to make your own AR car scene with the template.
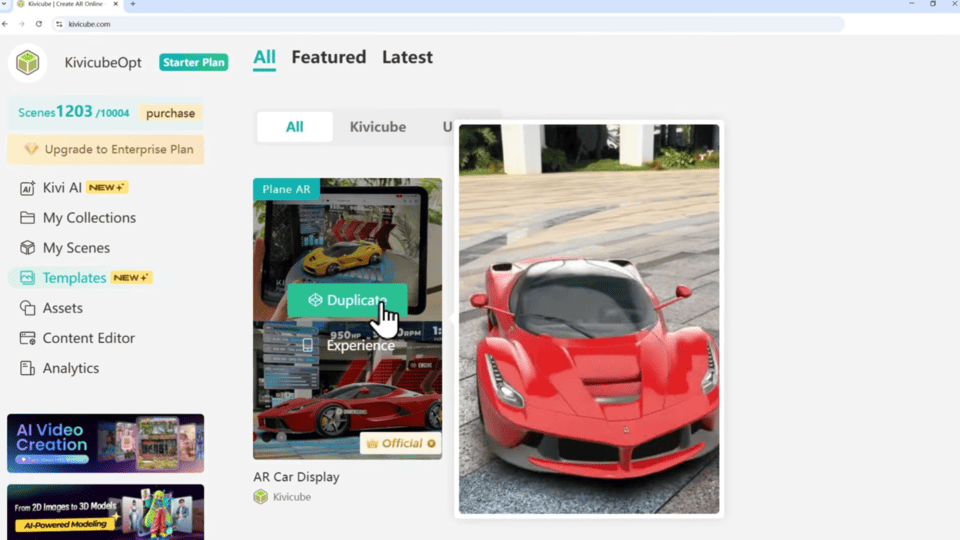
In the popped window, enter the scene name you want, then you’ll get into the ready-made scene.
Step 2. Edit Your AR Car with Ease
When you get into the scene editor, hit “Upload Assets” to add your own assets.
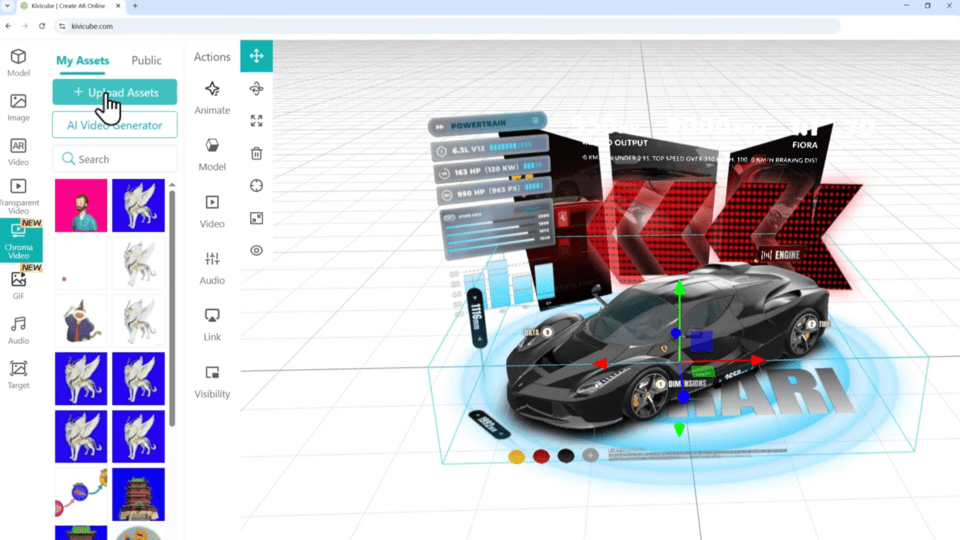
☞ Note: Please make sure to choose a model for your 3D assets and image for your 2D assets.
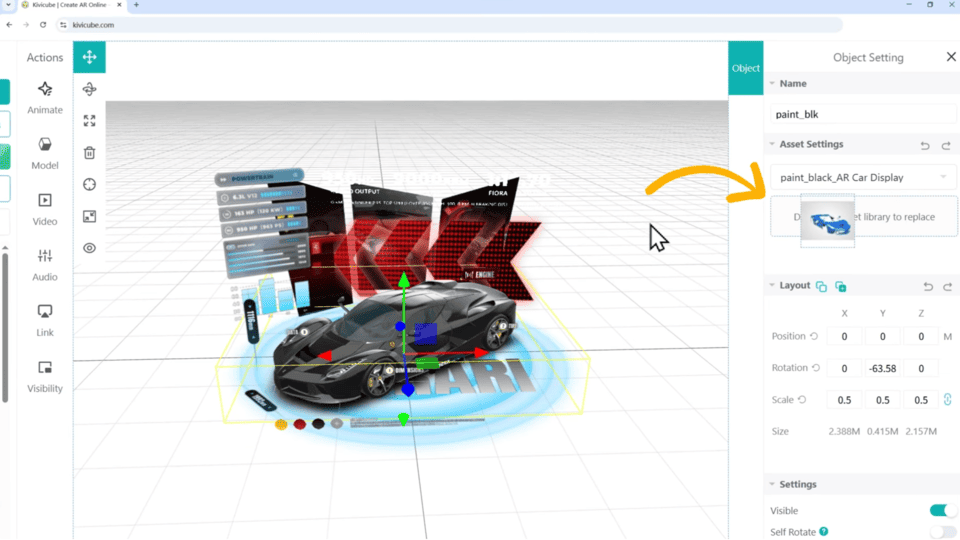
Select any part you tend to replace and drag and drop the files to the right column to change it out. (model to model & image to image. )
Step 3. Save and Share the AR Car Scene
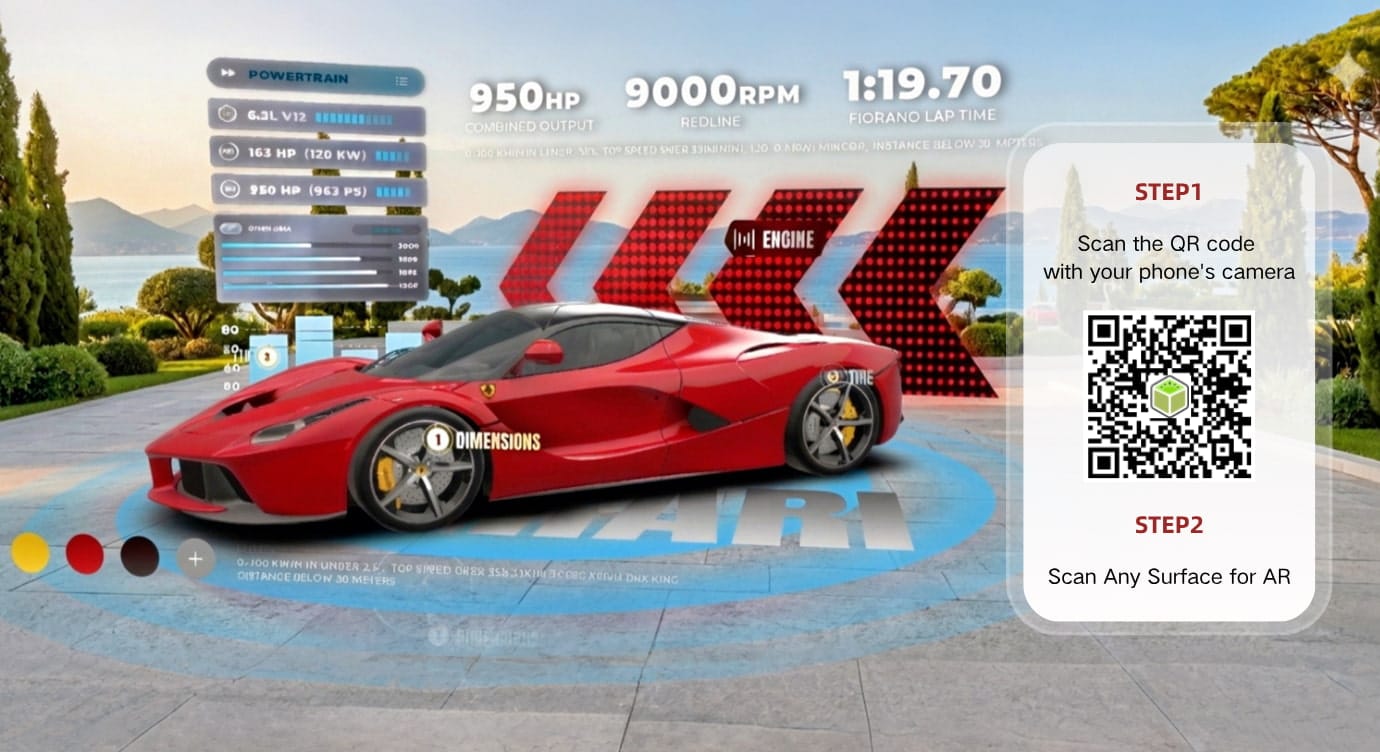
Hit “Save” to save your augmented reality car creation and share it with the generated QR code.
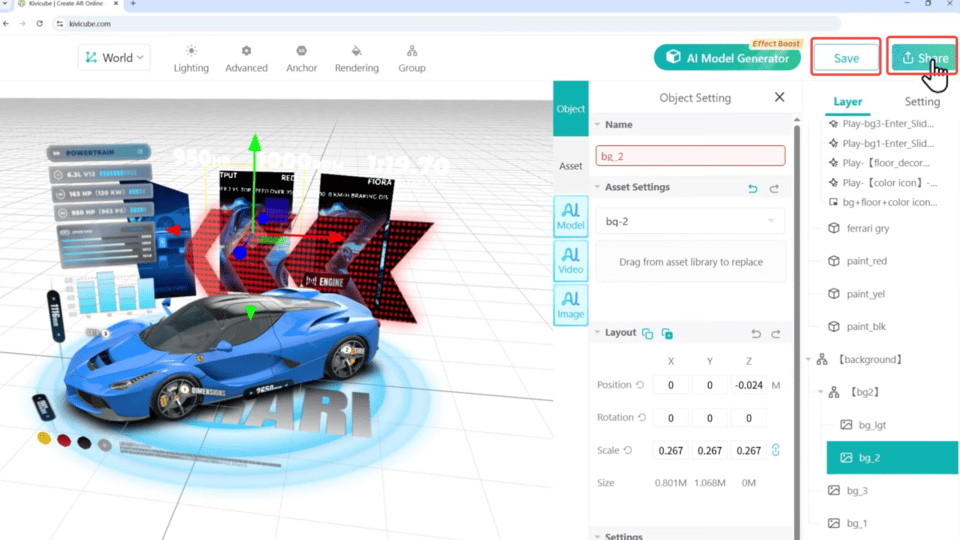
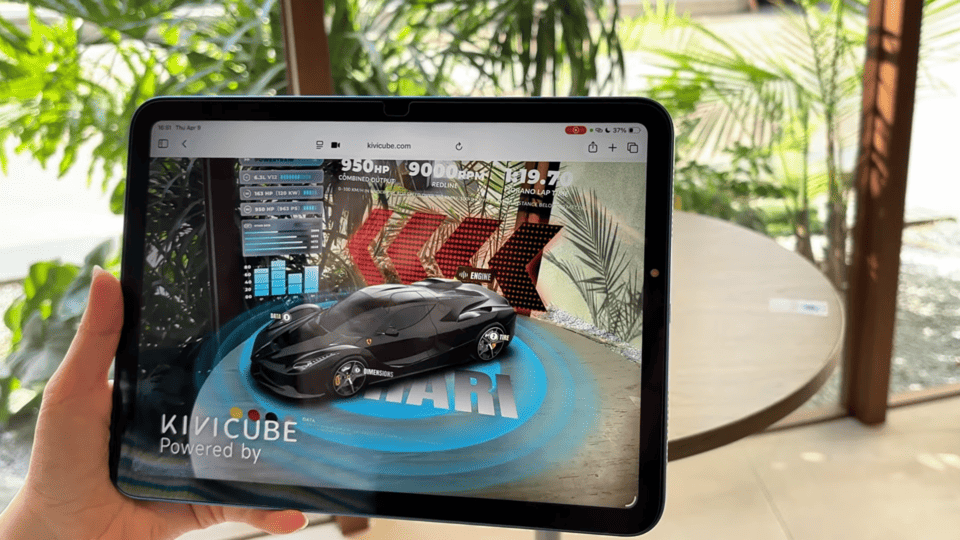
By scanning the QR code, anyone can put the AR car scene to the flat surface.
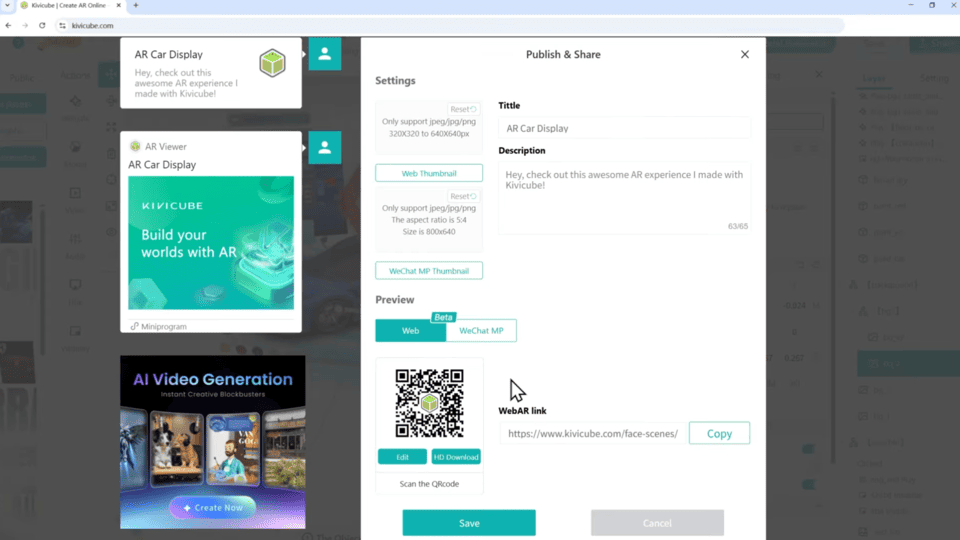
No extra setup is required for the magic AR car experience.
Method 2. Customize an AR Car Scene from Scratch
Creating an AR Car scene from scratch is perfect for experienced users. The Kivicube platform offers maximum creative freedom with highly customizable options.
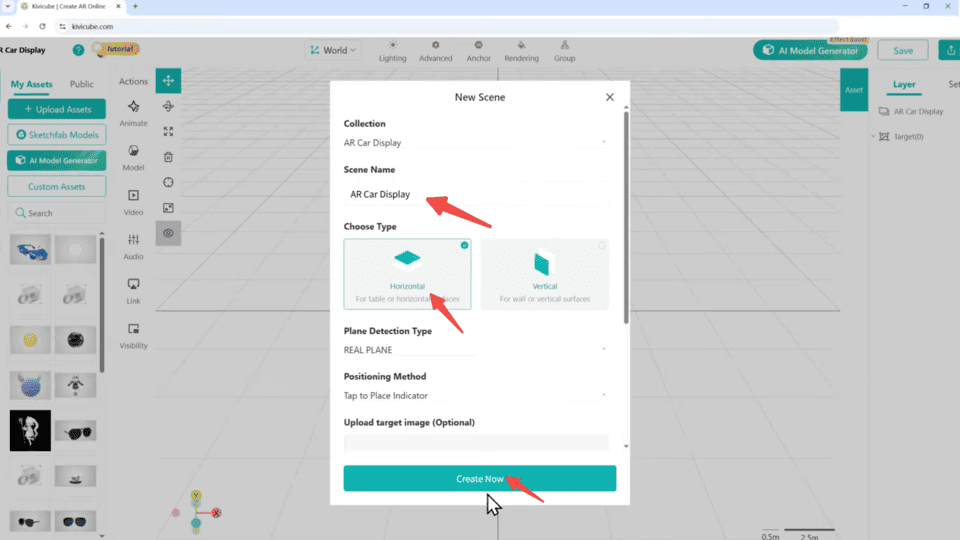
Step 1. Create a New Scene
Click “New Scene+” and then “Plane AR” to create a new AR scene.
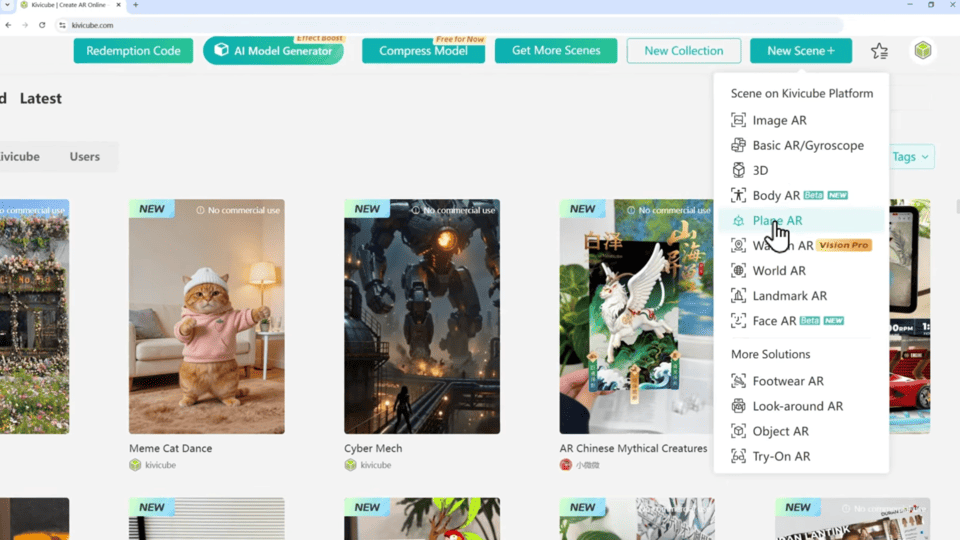
In the popup, choose the collection and name your new AR scene. Set the type as Horizontal, then hit “Create Now”. Now you have a place for creation.
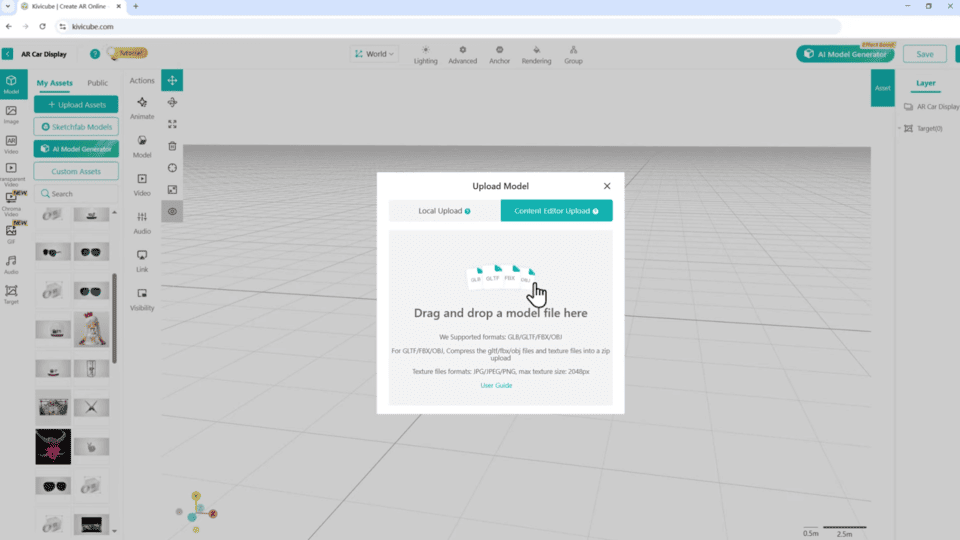
Step 2. Upload All Your Assets
Click “Model” and “Upload Assets” to add the 3D car model resources. There’re 2 ways to upload the model. To get the best result, we recommend the “Content Editor Upload” with which you can adjust the details of the target models, such as material, light and rendering.
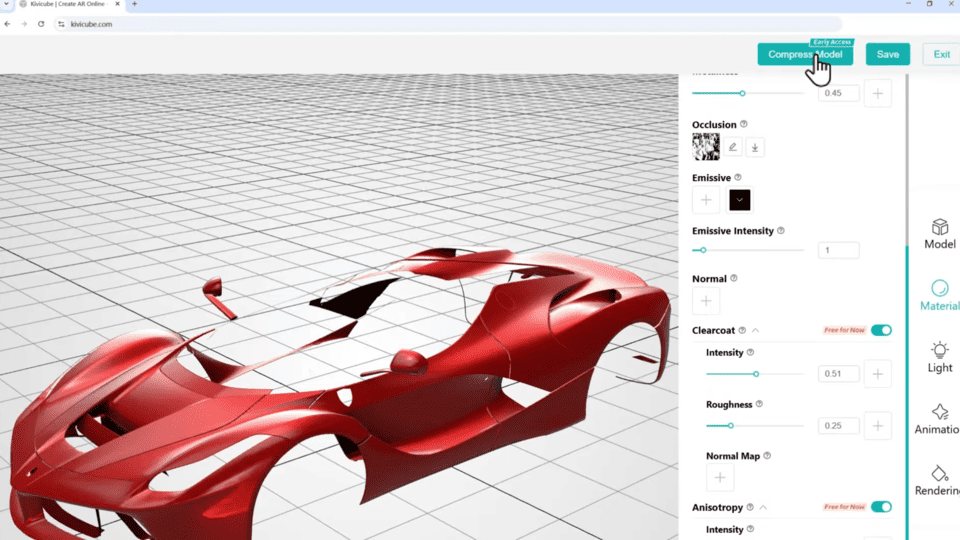
Hit “Model” at the right column to check the model property, the appearance of exclamation marks shows the items substandard. Then you can click “Compress Model” to turn it into the standard one, click “Compress Model”, “Save” and “Exit”. Your car is now in the scene.
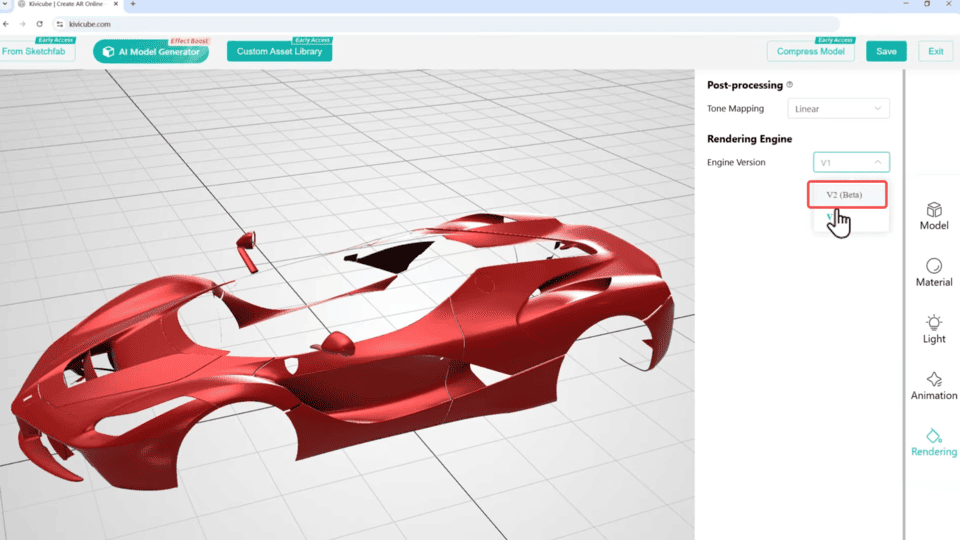
☞ Tip: Want realistic and high-end materials? Go to the “Rendering” tab and change it to V2 for more advanced options.
Just like model assets, now add the other assets simply by hitting “Image” and “Upload Assets” in turn.
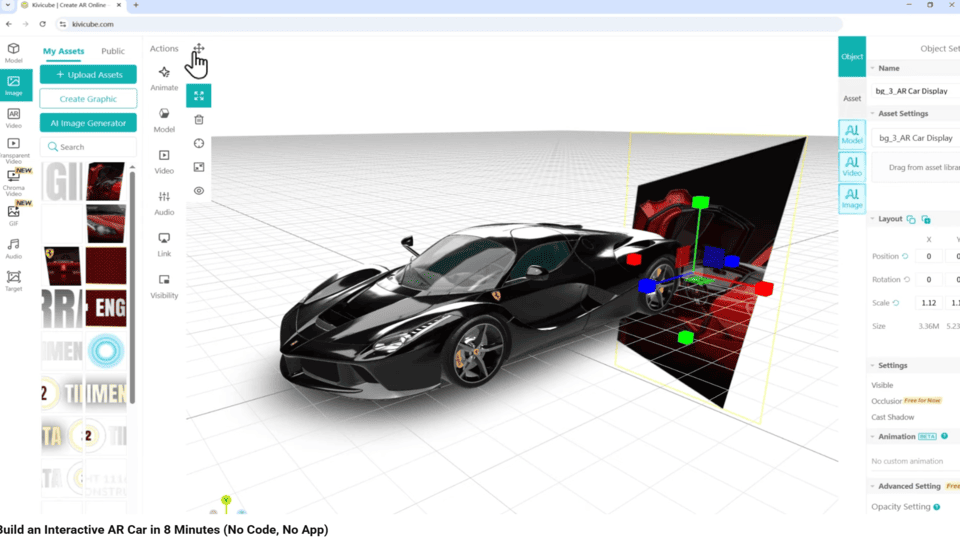
Step 3. Position Your AR Car and Adjust the Layout
When all the assets are uploaded, drag and drop the items you want to the grid editor. Then you can use transform tools, such as Translate, Rotate and Scale, to Instantly get them into position.
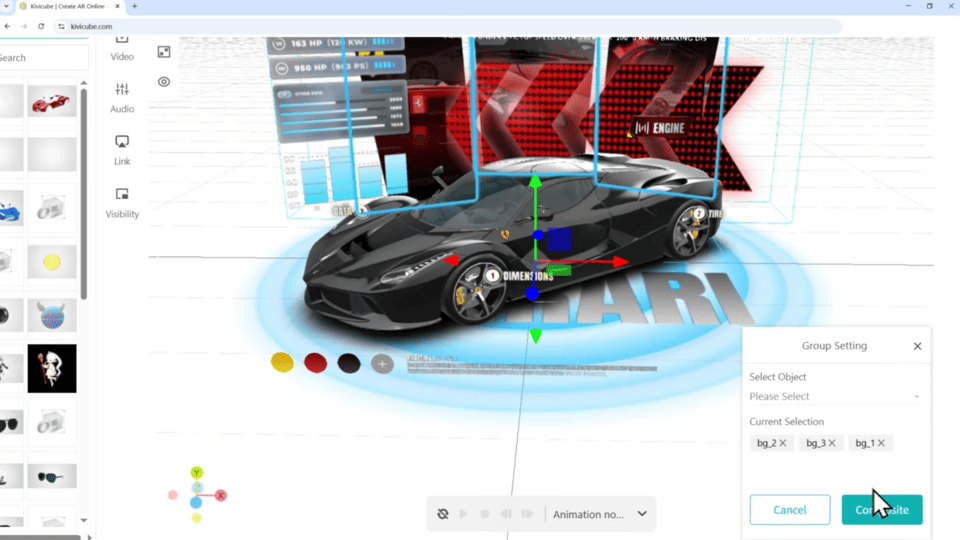
Feel a bit crowded with the assets in the scene? Don’t worry, turn to the “Group“ tab at the top. Select the assets that are related and click “Composite” to group them together. Then you can move or rotate the assets together as one piece.
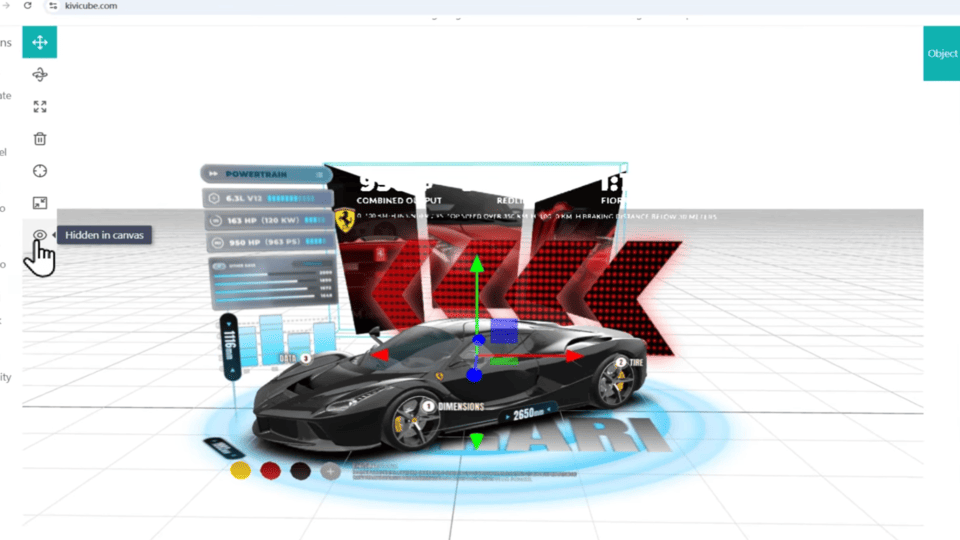
If there’s an obstacle when you’re working, just hit the eye icon in the left column to hide them temporarily.
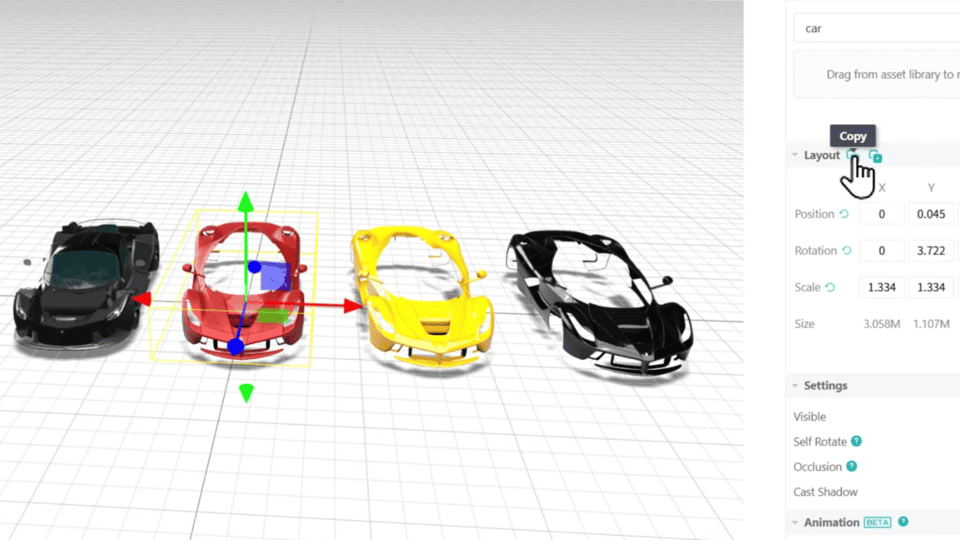
☞ Tip: If you set the car shell, chassis or other items as separate parts, you can select your finished model, and click the copy button next to Layout to get its coordinates. Then choose the remaining pieces and hit paste to perfectly align them.
Step 4. Set Lighting of Your AR Car Model
Next, go to the Lighting tab at the top of the editor, by switching it to high quality and modifying the setting, you’ll get realistic shadows.
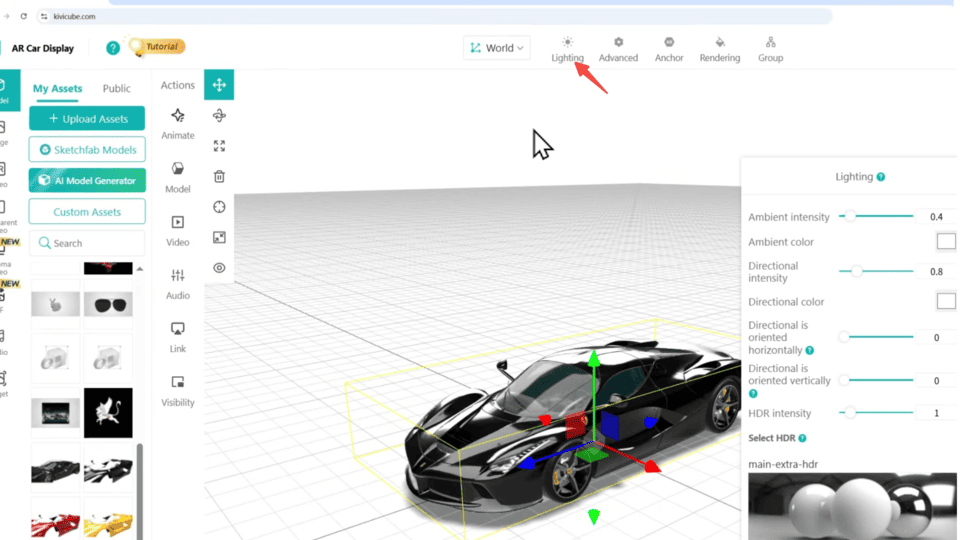
Also, you can pick one of the built-in environments or hit “Upload New HDR” to use your own customized lighting map.
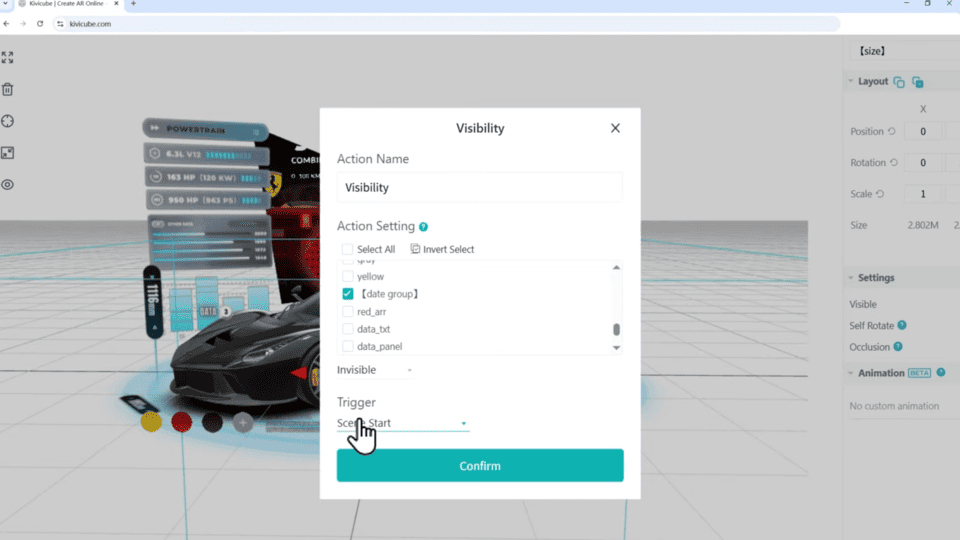
Step 5. Set Visibility in the AR Car Scene
By default, all assets are visible in Kivicube. So if you want certain items to appear at a specific time, simply click the “Visibility” button and select the assets you want to hide as invisible, then choose “Scene Start” as the trigger. All the unwanted assets are then hidden.
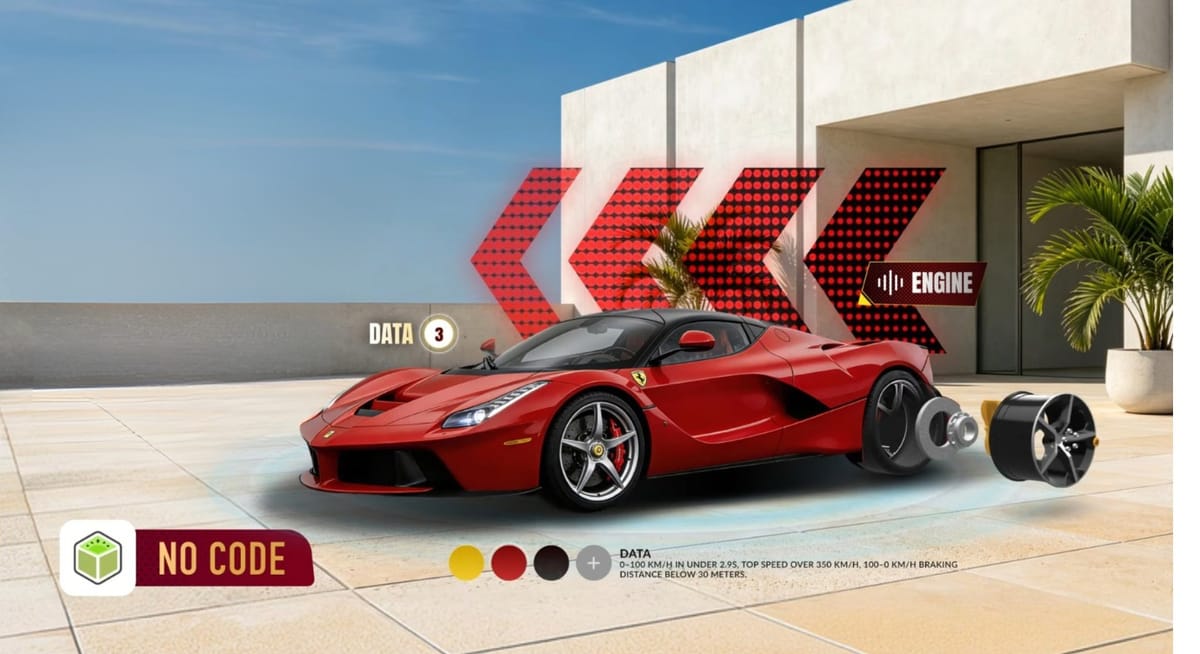
To show the dimension of the car, turn to Visibility setting, set it to visible and set the trigger as one click button. Now, you’ve created a toggle for the car’s specs.
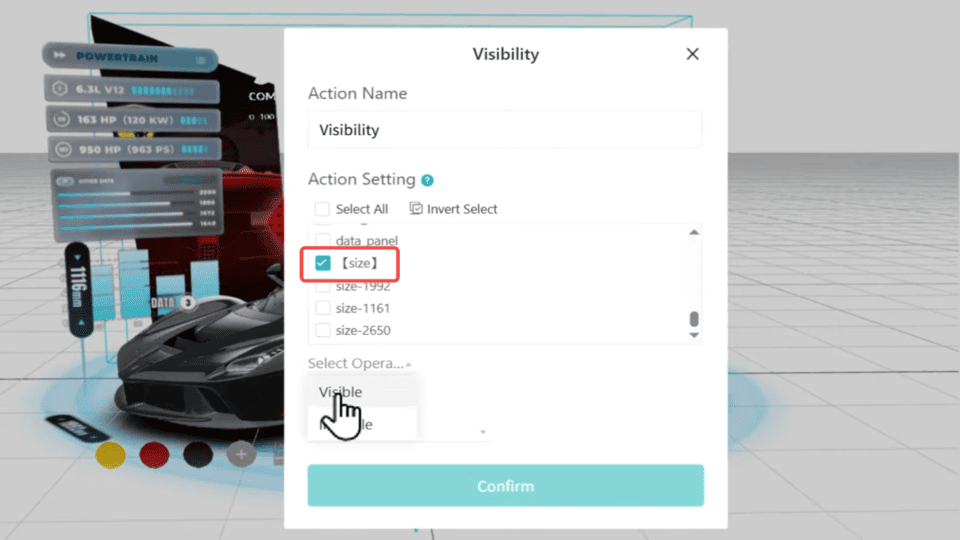
You can also try this method to show the engine data. However, when the data overlaps the background, you need some additional adjustment - In the Visibility setting, select “Engine info” and make it visible, meanwhile, set the background and the previous dimension assets as invisible.
Also, if you want to change colors of the car, you can set Visibility to show the specific color shell you want while hiding the others when a color button is hit.
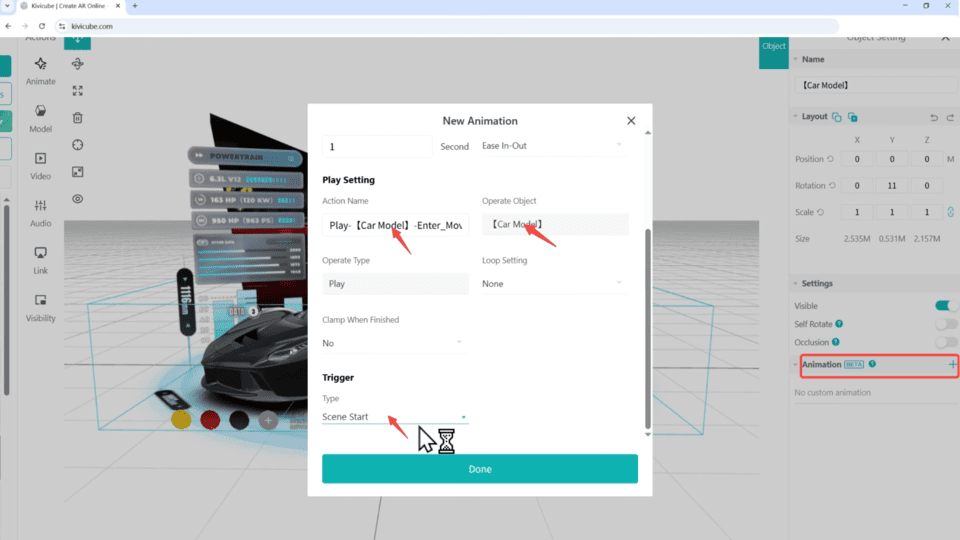
Step 6. Add Animation Effects and Audio
To make your AR car scene more interactive and engaging, you can try to add some animation effects. Click the target model and hit the "Animation +” button at the right column. Then you can choose the animation you want, set it to play and finally trigger it with the button 2.
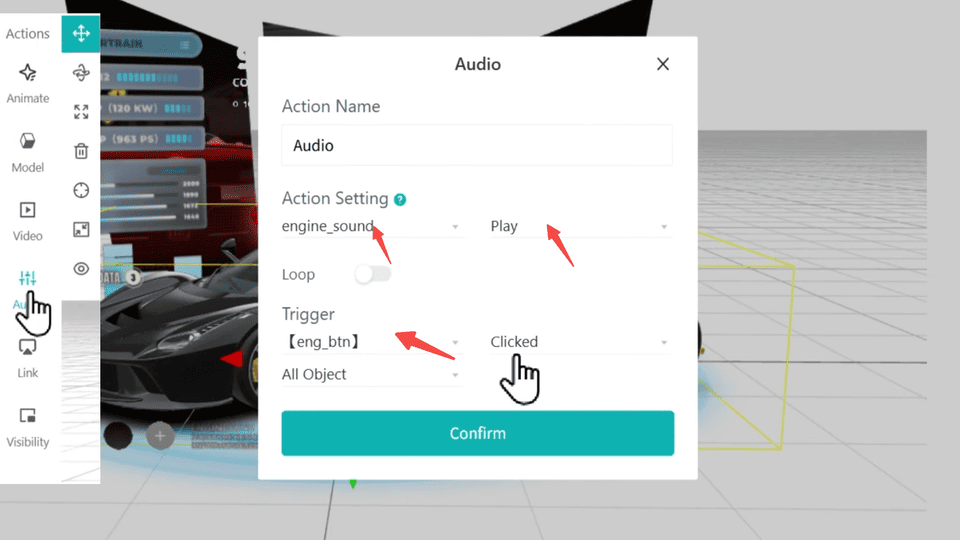
Adding sound is just as simple as you can see. Go to the Audio button, select your engine clip, set it to play, and trigger it with the engine button. That’s all.
Preview the Augmented Reality Car Scene
Turn to “My Creation” and click “Preview” to generate the QR Code.
Scan the QR code with mobile devices, everyone can enjoy the interactive AR car scene experiences.
FAQs about AR Car Creation
Do I need experience to create an AR car?
No. This guide can help you add augmented reality technology for cars with no any skill required.
Is Kivicube an AR app you need to download?
No. The Kivicube is an AR creation platform, so users can directly design their AR scenes online without downloading.
Can I embed the AR Car Experience into my site or app?
Absolutely! Since Kibicube is an web-based AR creation platform, it allows the users to add the AR creation in their websites and apps in clicks.
The Bottom Line
Visiting a car dealership can be time-consuming. With Kivicube, you can instantly transform car models into digital AR experiences. Follow this tutorial to create your own AR car scenes in minutes and share them online with ease.