English
Appearance
The 3D Canvas is your main canvas for building AR scenes. You can drag assets from the library into the workspace and perform layout design, interaction setup, and animation creation.
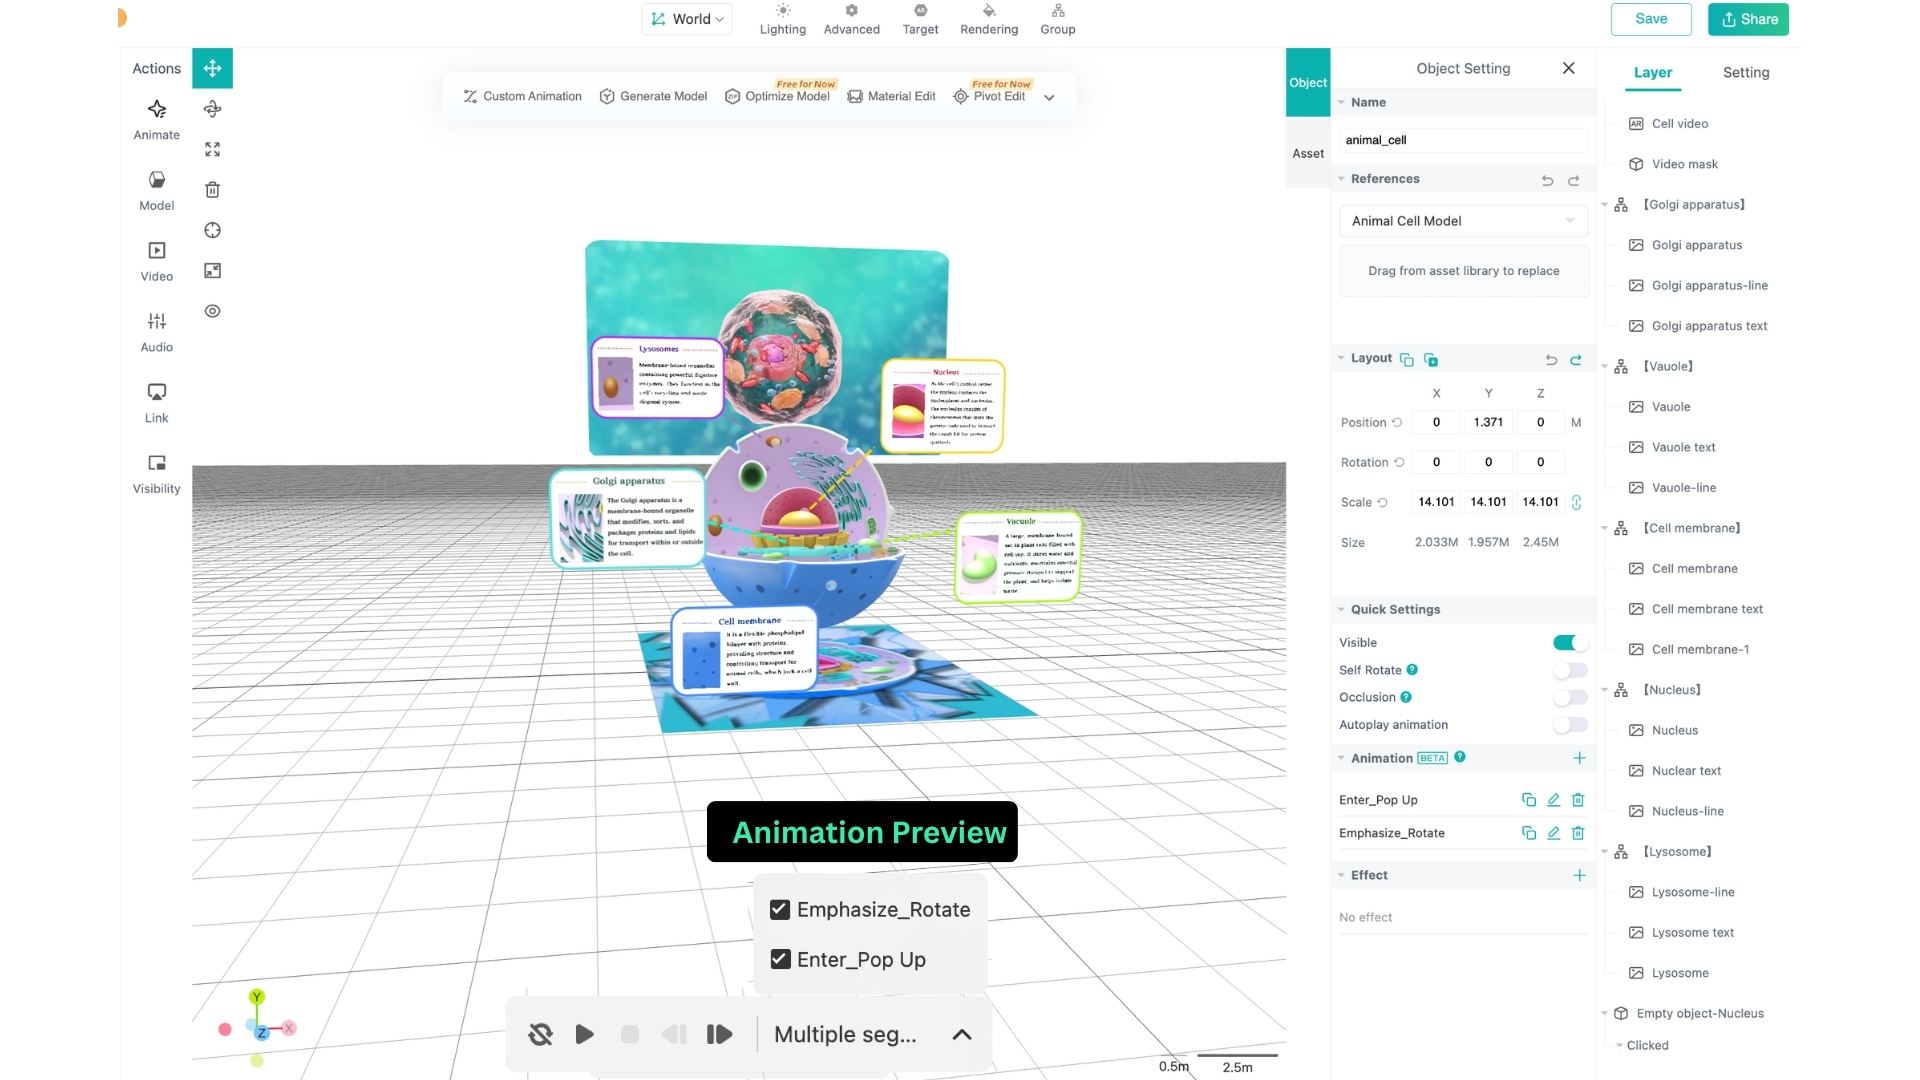
Select an asset in the canvas and click the Play button below to preview its animation. If multiple animations are applied, you can select other animations to preview them.
Kivicube provides several toolbars to support different types of operations within the 3D Canvas.
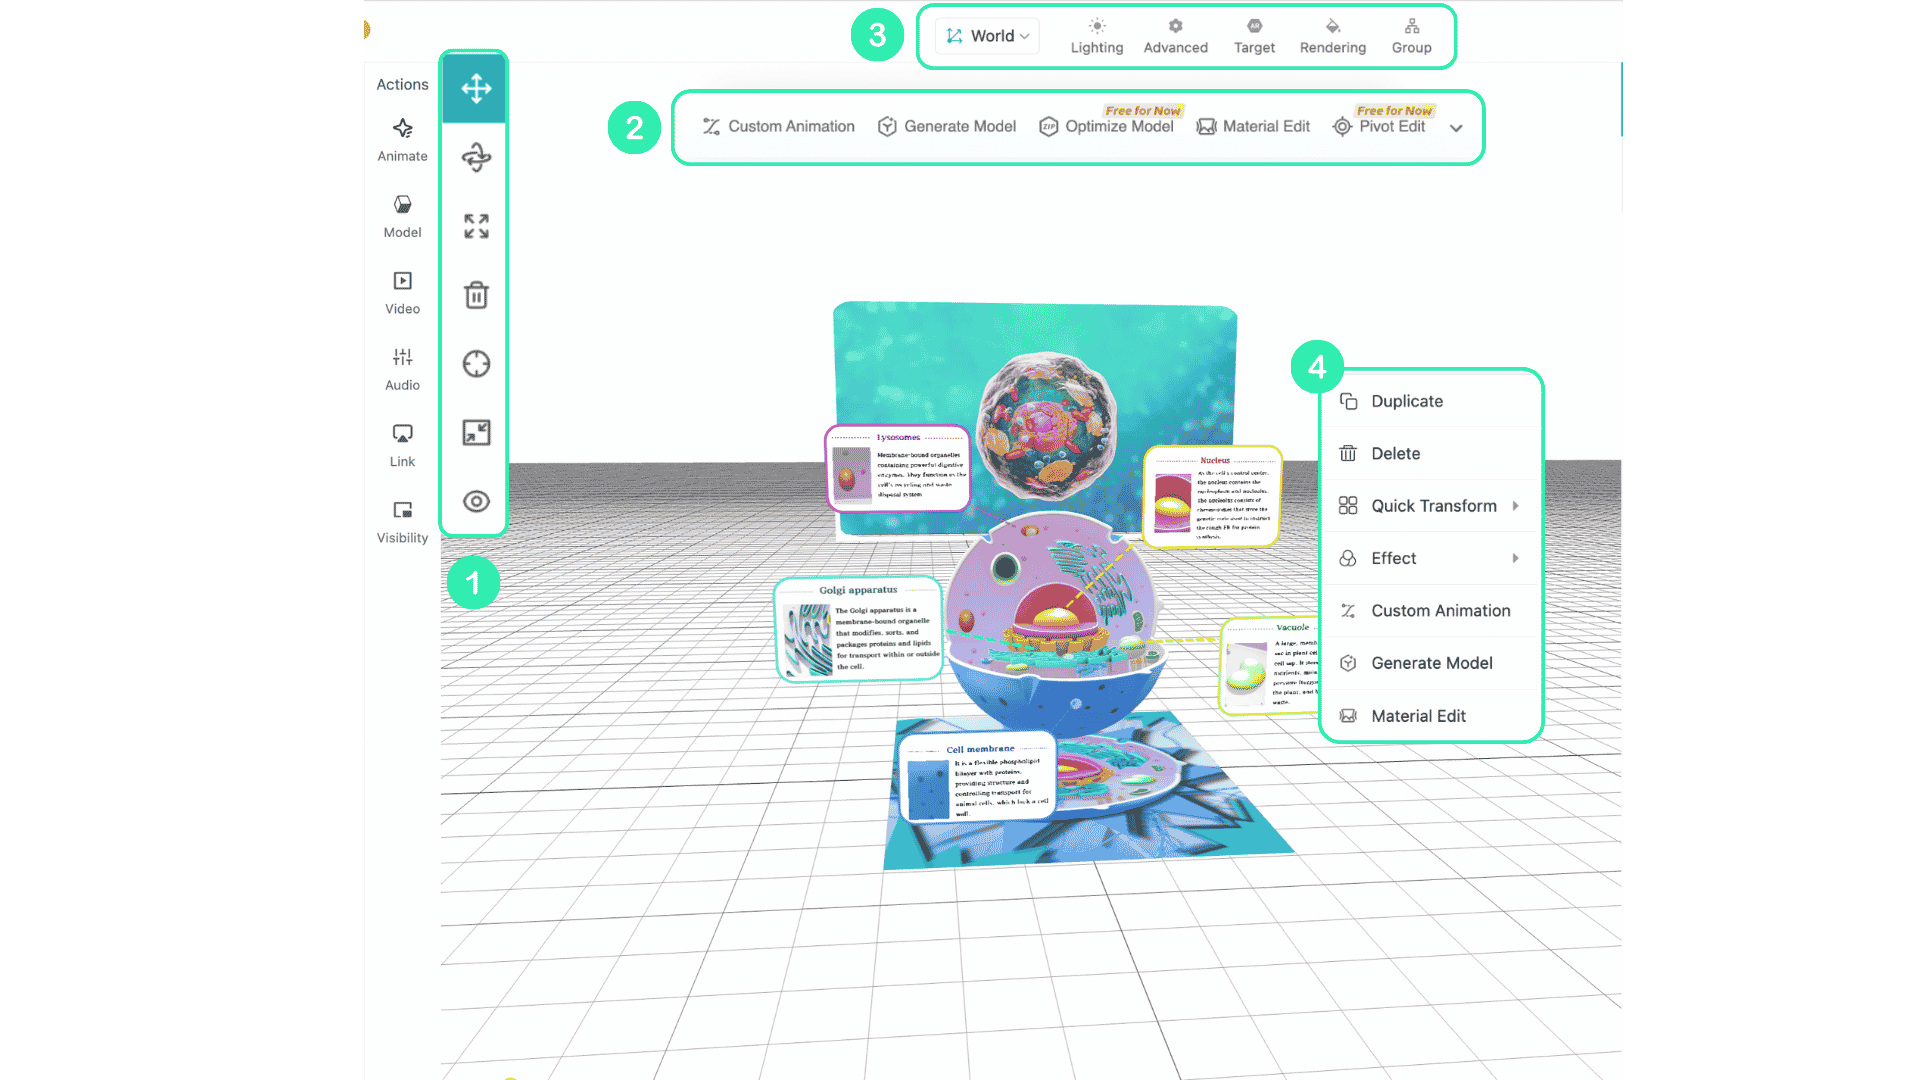
To remove an asset, you can either click Deletein the toolbar or press the delete key on your keyboard.
The Reset button returns the canvas view to its default state, which is especially useful if you have zoomed in for precise adjustments.
You can also switch between Portrait and Full Screen modes.
When your scene becomes complex, you can hide selected assets using Hidden in Canvas.
The Floating Toolbar appears above the canvas when an asset is selected. From here, you can quickly access Kivi AI to generate images, models, or videos to speed up your workflow.
It also provides common asset-level operations such as trimming transparent pixels, adjusting the model’s pivot point, compressing models, applying effects, and adding animations.
The Top Toolbar is used for higher-level controls. It allows you to adjust lighting, switch AR tracking algorithms, change rendering engine versions, enable or disable hybrid tracking (for example, combining image tracking with gyroscope), and group assets.
The Right-click Toolbar allows you to quickly duplicate or delete assets. It also includes Quick Transform, which provides preset layout parameters for faster and more precise positioning. On tablet devices, this toolbar is triggered by a long press.
In the Object Panel, you can configure detailed settings for the selected asset.
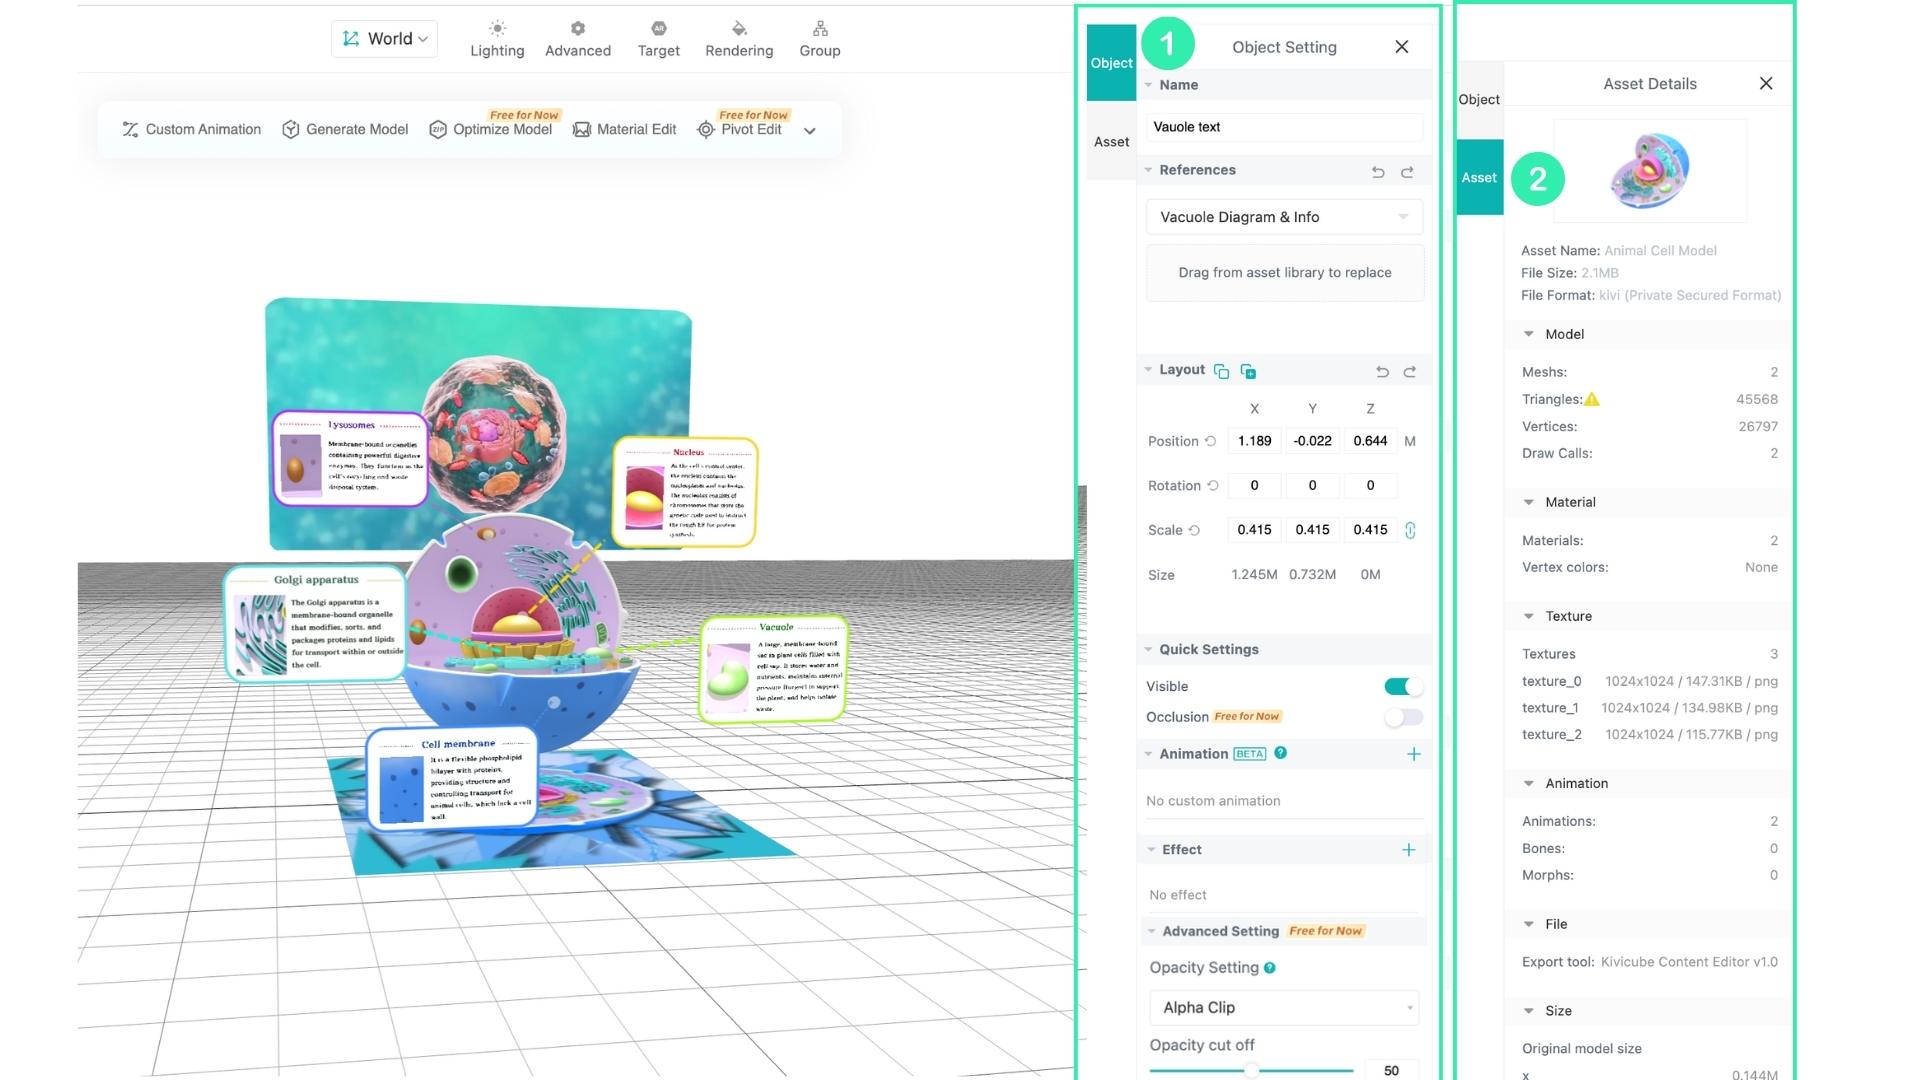
Under Object Setting, the Name field allows you to rename the selected asset at any time.
The References feature lets you drag other assets into this area to perform replacement, reuse interactions, or inherit custom animations. This is especially useful when working with templates, as it enables you to quickly replicate interactions and animations while replacing content with your own.
The Layout section allows you to precisely adjust position, rotation, and scale using numeric inputs. You can also copy these values and paste them onto other assets, and undo parameter changes when needed.
Quick Settings provides fast configuration options such as enabling auto-rotation for models, auto-play for videos, toggling visibility, and quickly applying occlusion. These are shortcut settings intended for quick testing or simple scenes.
Note that the detailed interaction configuration can only be viewed in the Settings Panel after selecting the asset, and will not be displayed in the Layer panel.
In the Animation section, you can click the “+” button to add preset animations to the selected asset.
In the Effect section, clicking the “+” button allows you to apply visual effects such as toon outlines to model assets.
Opacity Settings (images only) allows you to enable Alpha Clip and adjust its parameters to prevent visual artifacts when multiple image layers overlap or intersect.
In Assets Details, you can view technical information about the selected asset, such as polygon count and vertex count for models, or format and file size for videos. Kivicube also performs validation checks on uploaded assets and provides error feedback when necessary.
The Event Panel is where you define interactions within your scene. You can configure trigger conditions for models, videos, audio, and animations, as well as control when external links are opened.
It also allows you to define conditions for showing or hiding assets. This panel is essential for building interactive AR experiences.
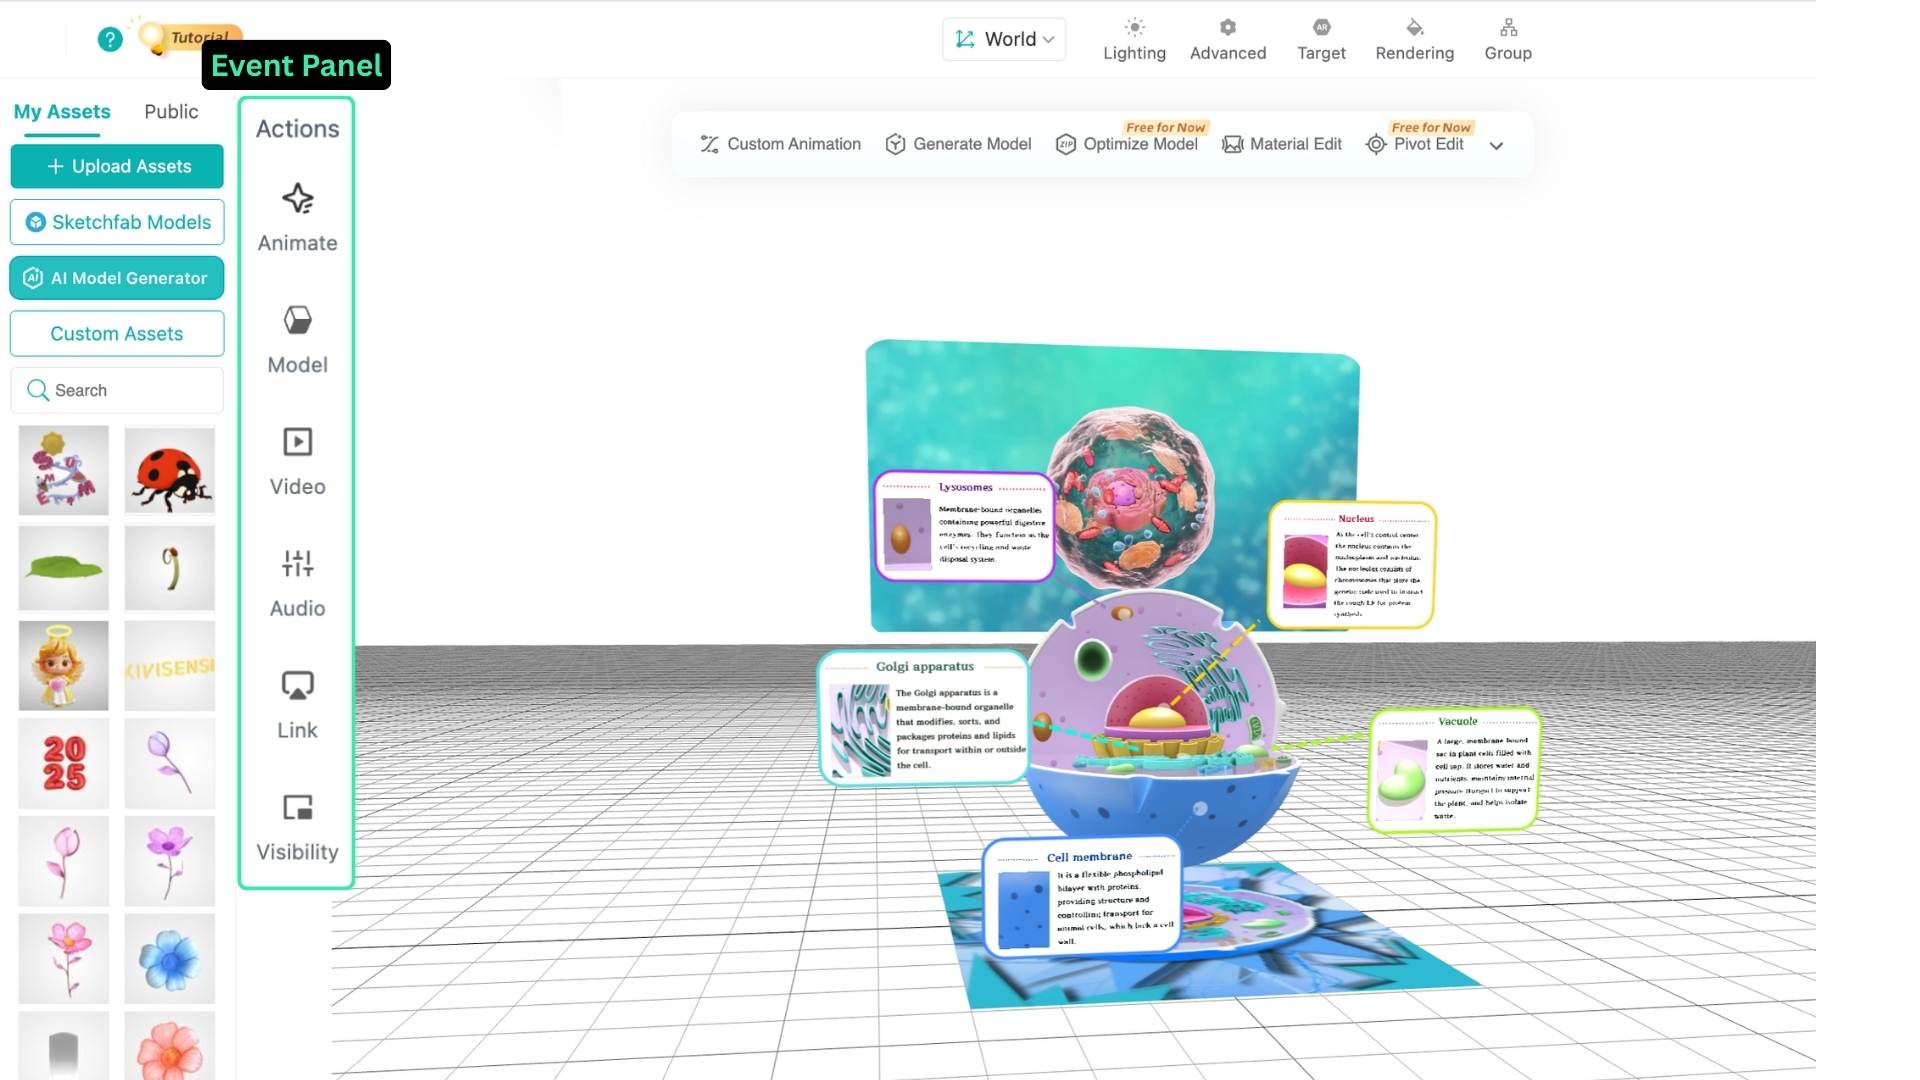
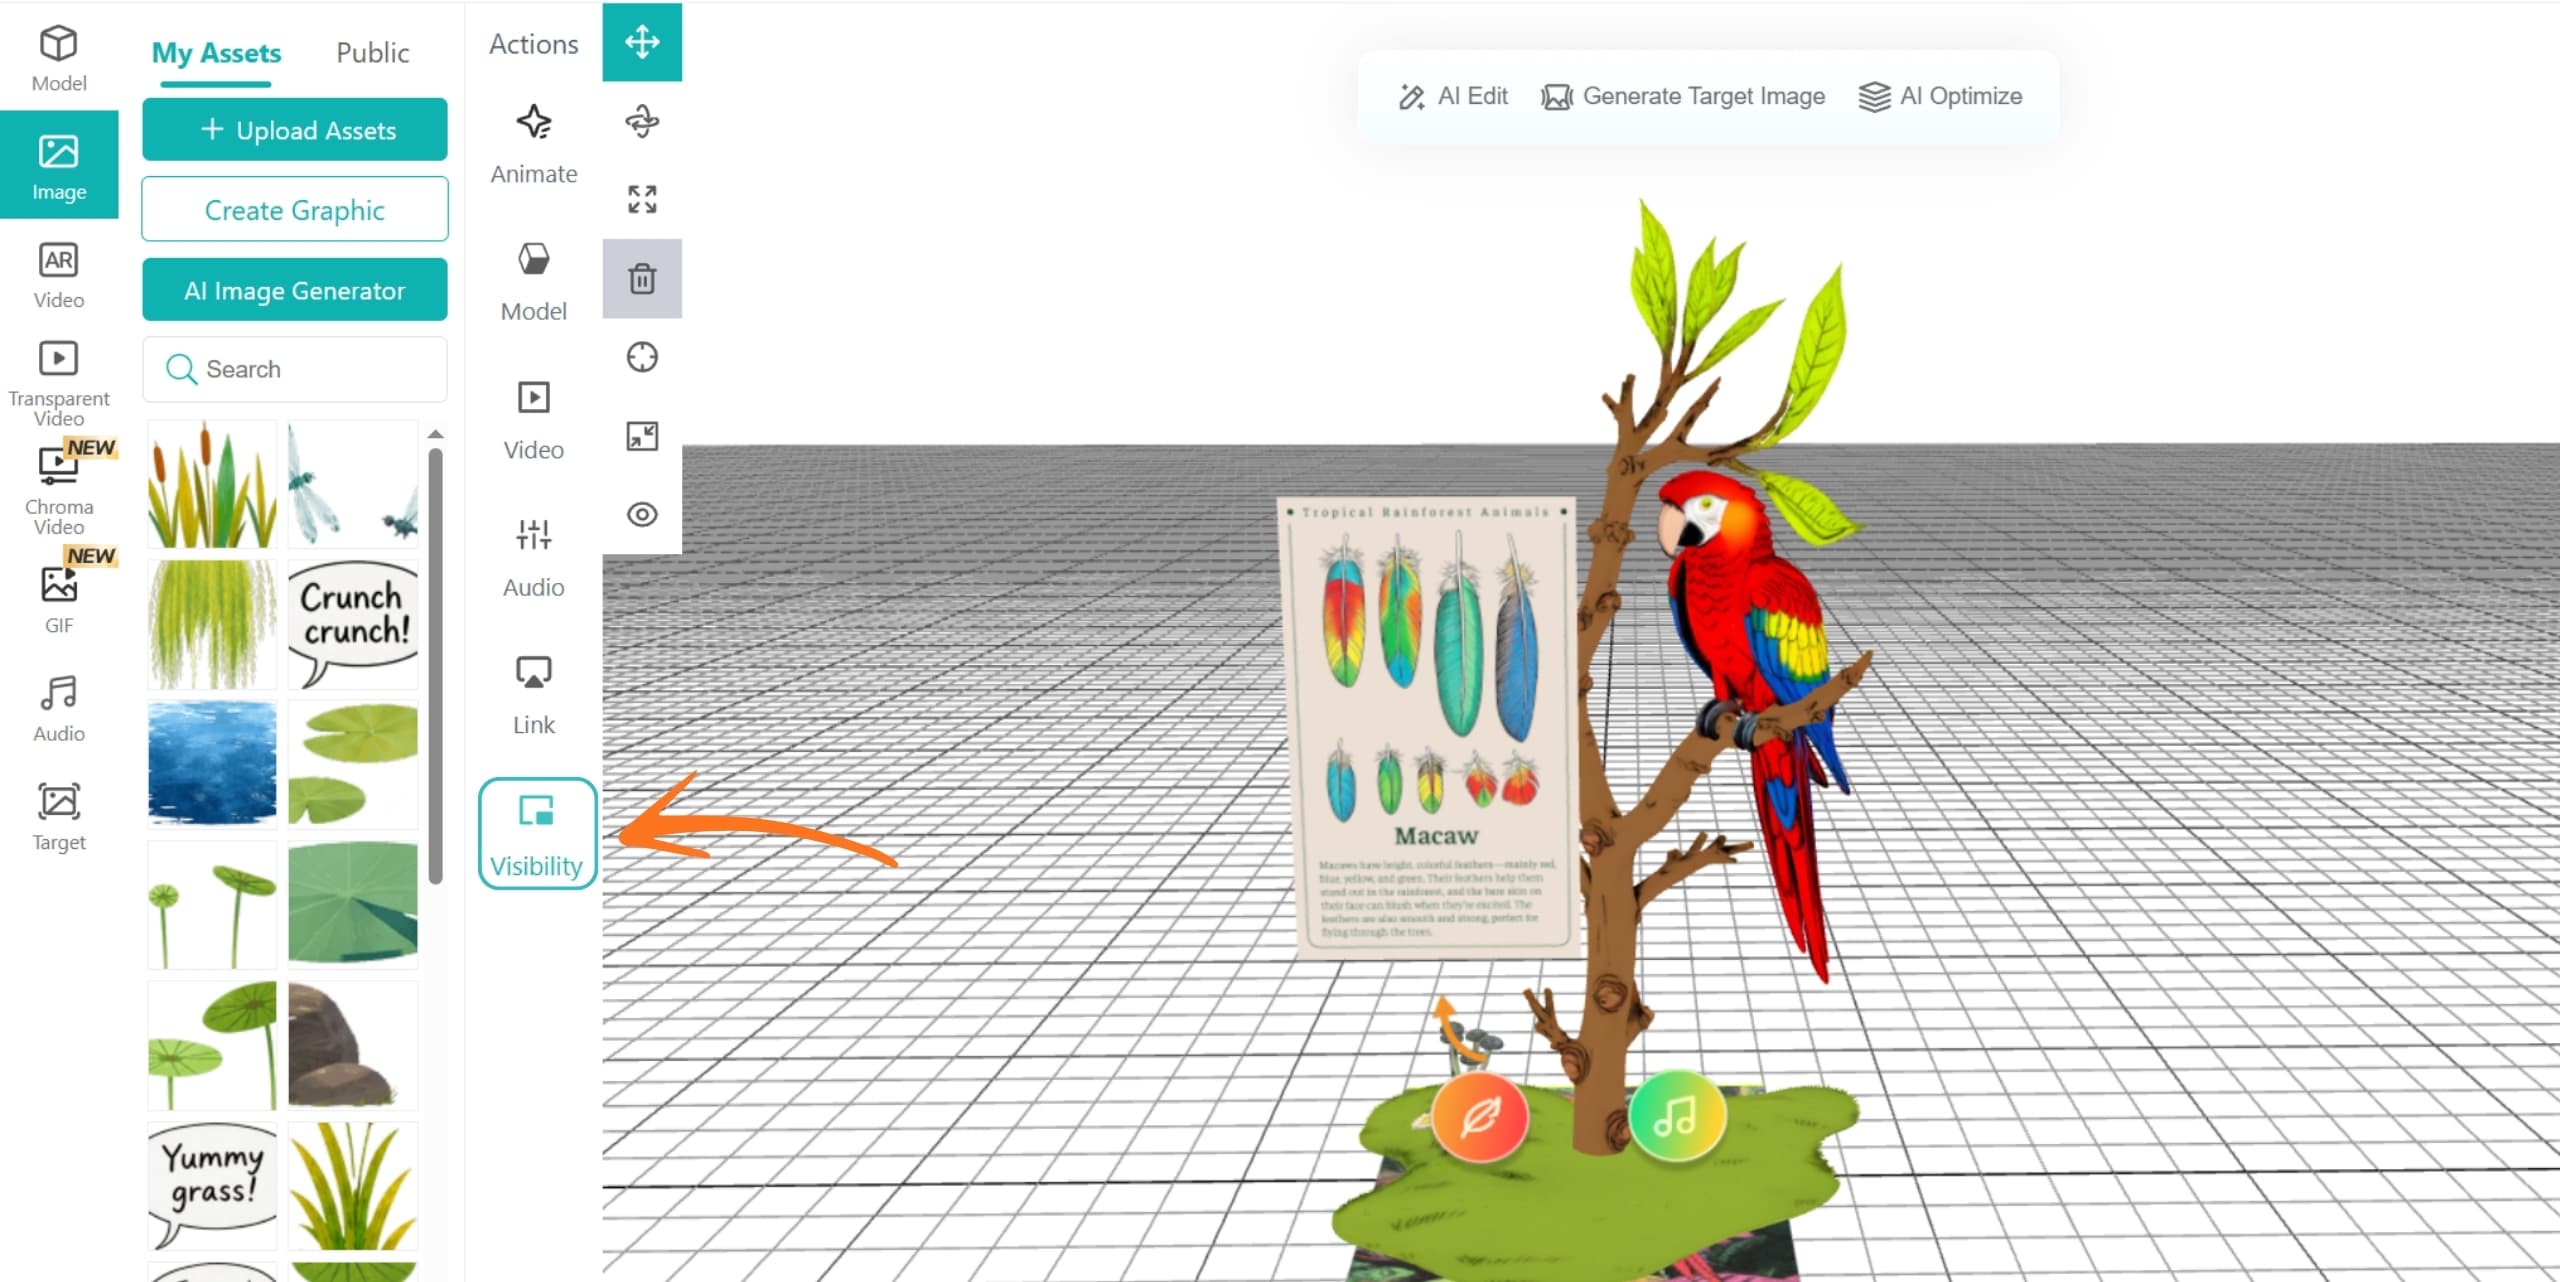
Visibility Control is one of the most frequently used tools when building AR scenes. By using this tool, you can control when assets appear or disappear, allowing you to create richer and more engaging AR experiences.
Here are some commonly used effects:
Set up click interaction events Display video content or image popups by clicking buttons or POIs, or switch between different assets through button clicks.
Create staged asset appearances Control when different assets appear to create a sequential reveal effect, making AR animations more layered and dynamic.
Make assets disappear after appearing Create effects where assets automatically disappear after appearing, such as hiding a video asset after playback is completed.
Next, let’s explore how to use Visibility Control to make your AR creations more engaging and interactive.
By default, after placing assets in Kivicube, all assets will be displayed when you preview the AR experience. If you want certain assets to appear at specific times, you need to configure them using Visibility Control.
Next, let’s take a look at the components of the Visibility Control panel.
Open Visibility Control, and a settings panel will appear. The panel consists of three sections: Action Name, Action Settings, and Trigger.
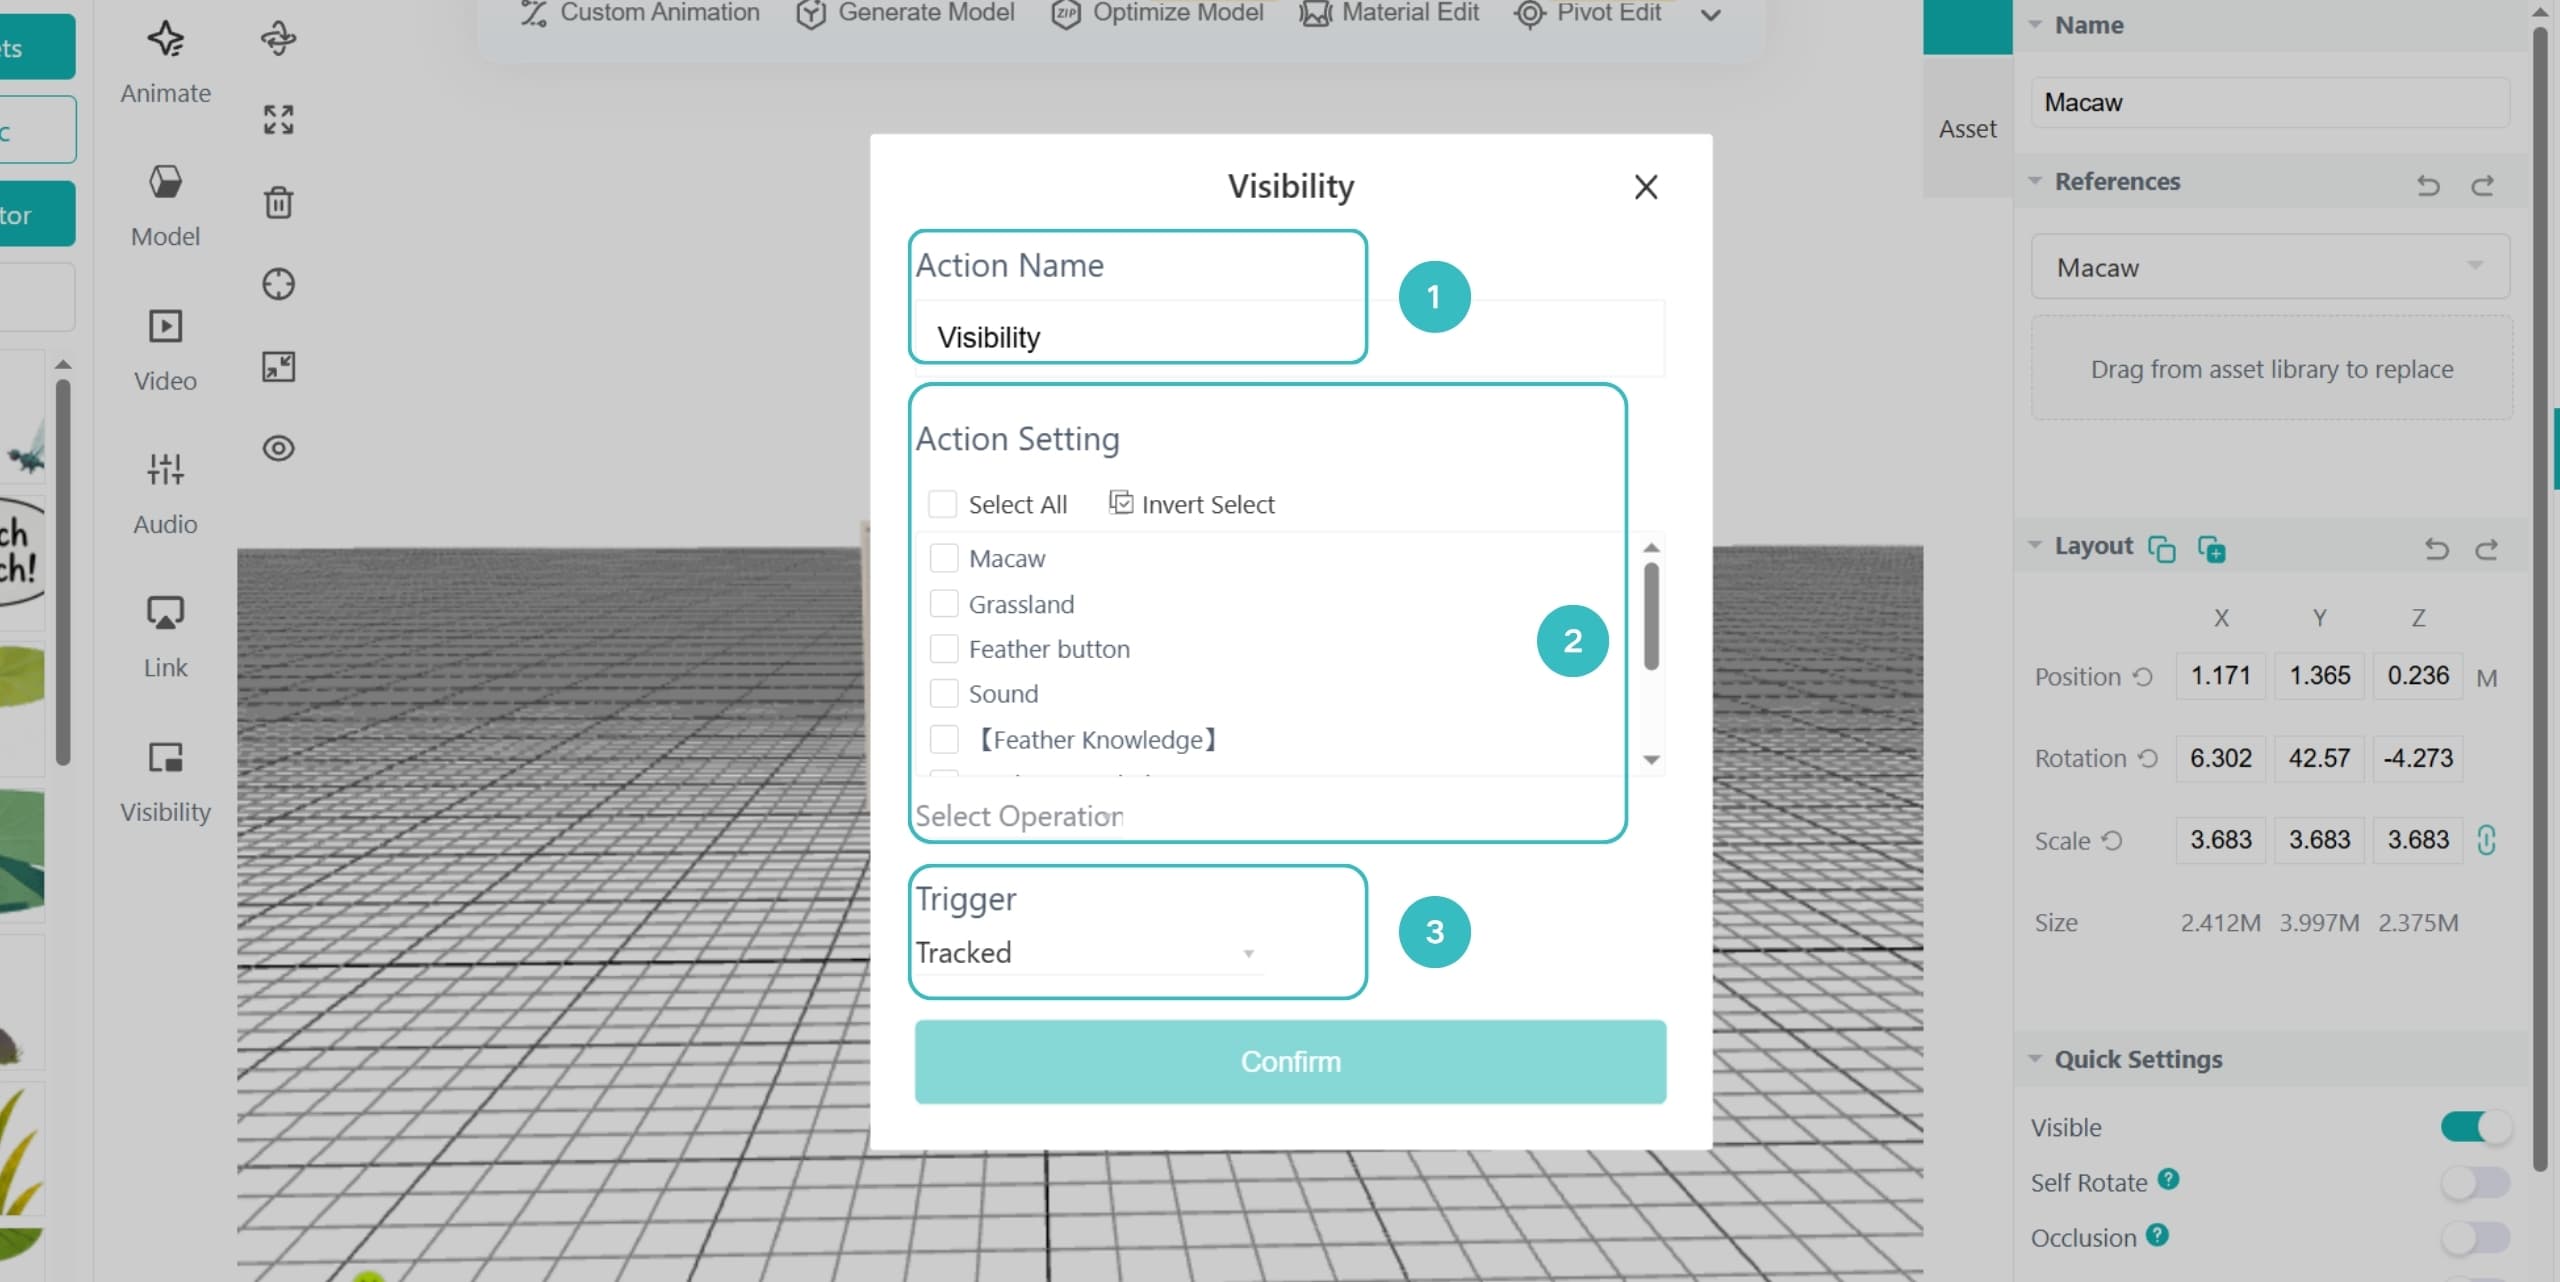
Naming the action is an important step in the setup process. After creating a Visibility Control action, you can quickly find it in the scene hierarchy on the right side and make adjustments. When naming, it is recommended to use a name based on the specific action or effect, making it easier to locate and modify later.
Action Settings are mainly used to select the scene assets you want to control, and then set them to show or hide. When you need to select a large number of assets, you can click Select All to select all assets first, then uncheck the few assets that should remain visible. Similarly, Invert Select can help you quickly select the assets you want to control.
Finally, choose an appropriate trigger for the asset visibility settings. This allows assets to appear or disappear at the desired time.
General workflow for making assets appear under specific conditions:
In the Visibility Control, select all assets that you want to appear at a specific time, and set them to Hide when Tracked. When you preview the AR experience, these assets will remain hidden after tracking starts.
Click Visibility again, select the assets you want to display, and choose the appropriate trigger condition based on your desired effect. The assets hidden in step 1 will then appear when the selected condition is met.
By following this setup workflow, you can successfully control when assets appear and create more dynamic AR experiences.
Different trigger conditions will create completely different effects. By changing the trigger conditions, you can achieve various AR interactions and experiences.
Next, I will use two practical examples to help you understand the real-world applications of Visibility Control.
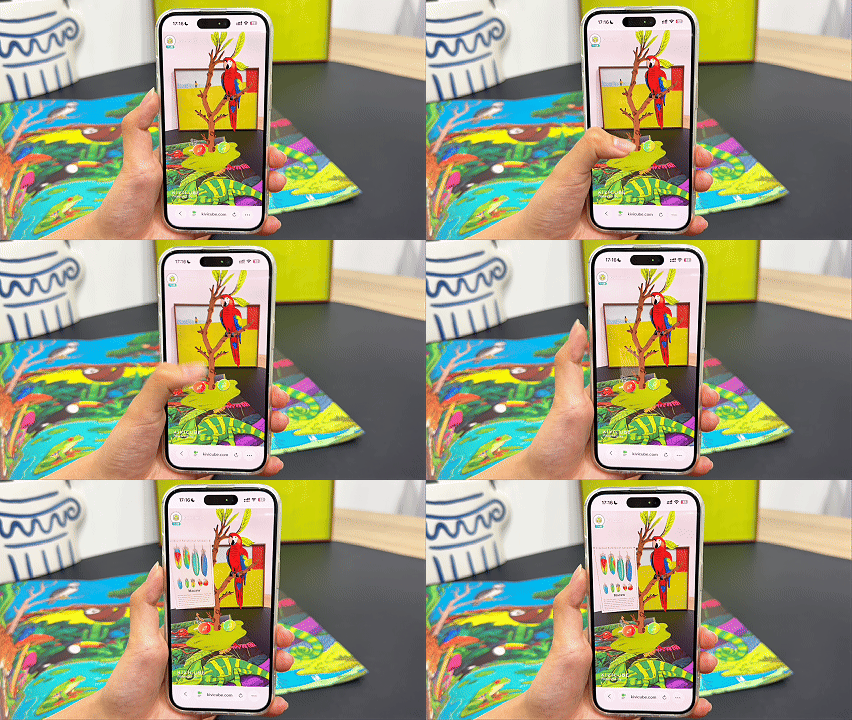
Setting up click interactions is very simple. First, set the asset to be hidden at the beginning, then make the hidden asset appear when a specific asset is clicked.
For example, if you want a feather popup to appear when the feather button is clicked:
First, open Visibility Control and set the feather popup to Hide when Tracked. This ensures that the feather popup will not appear when previewing the AR experience.
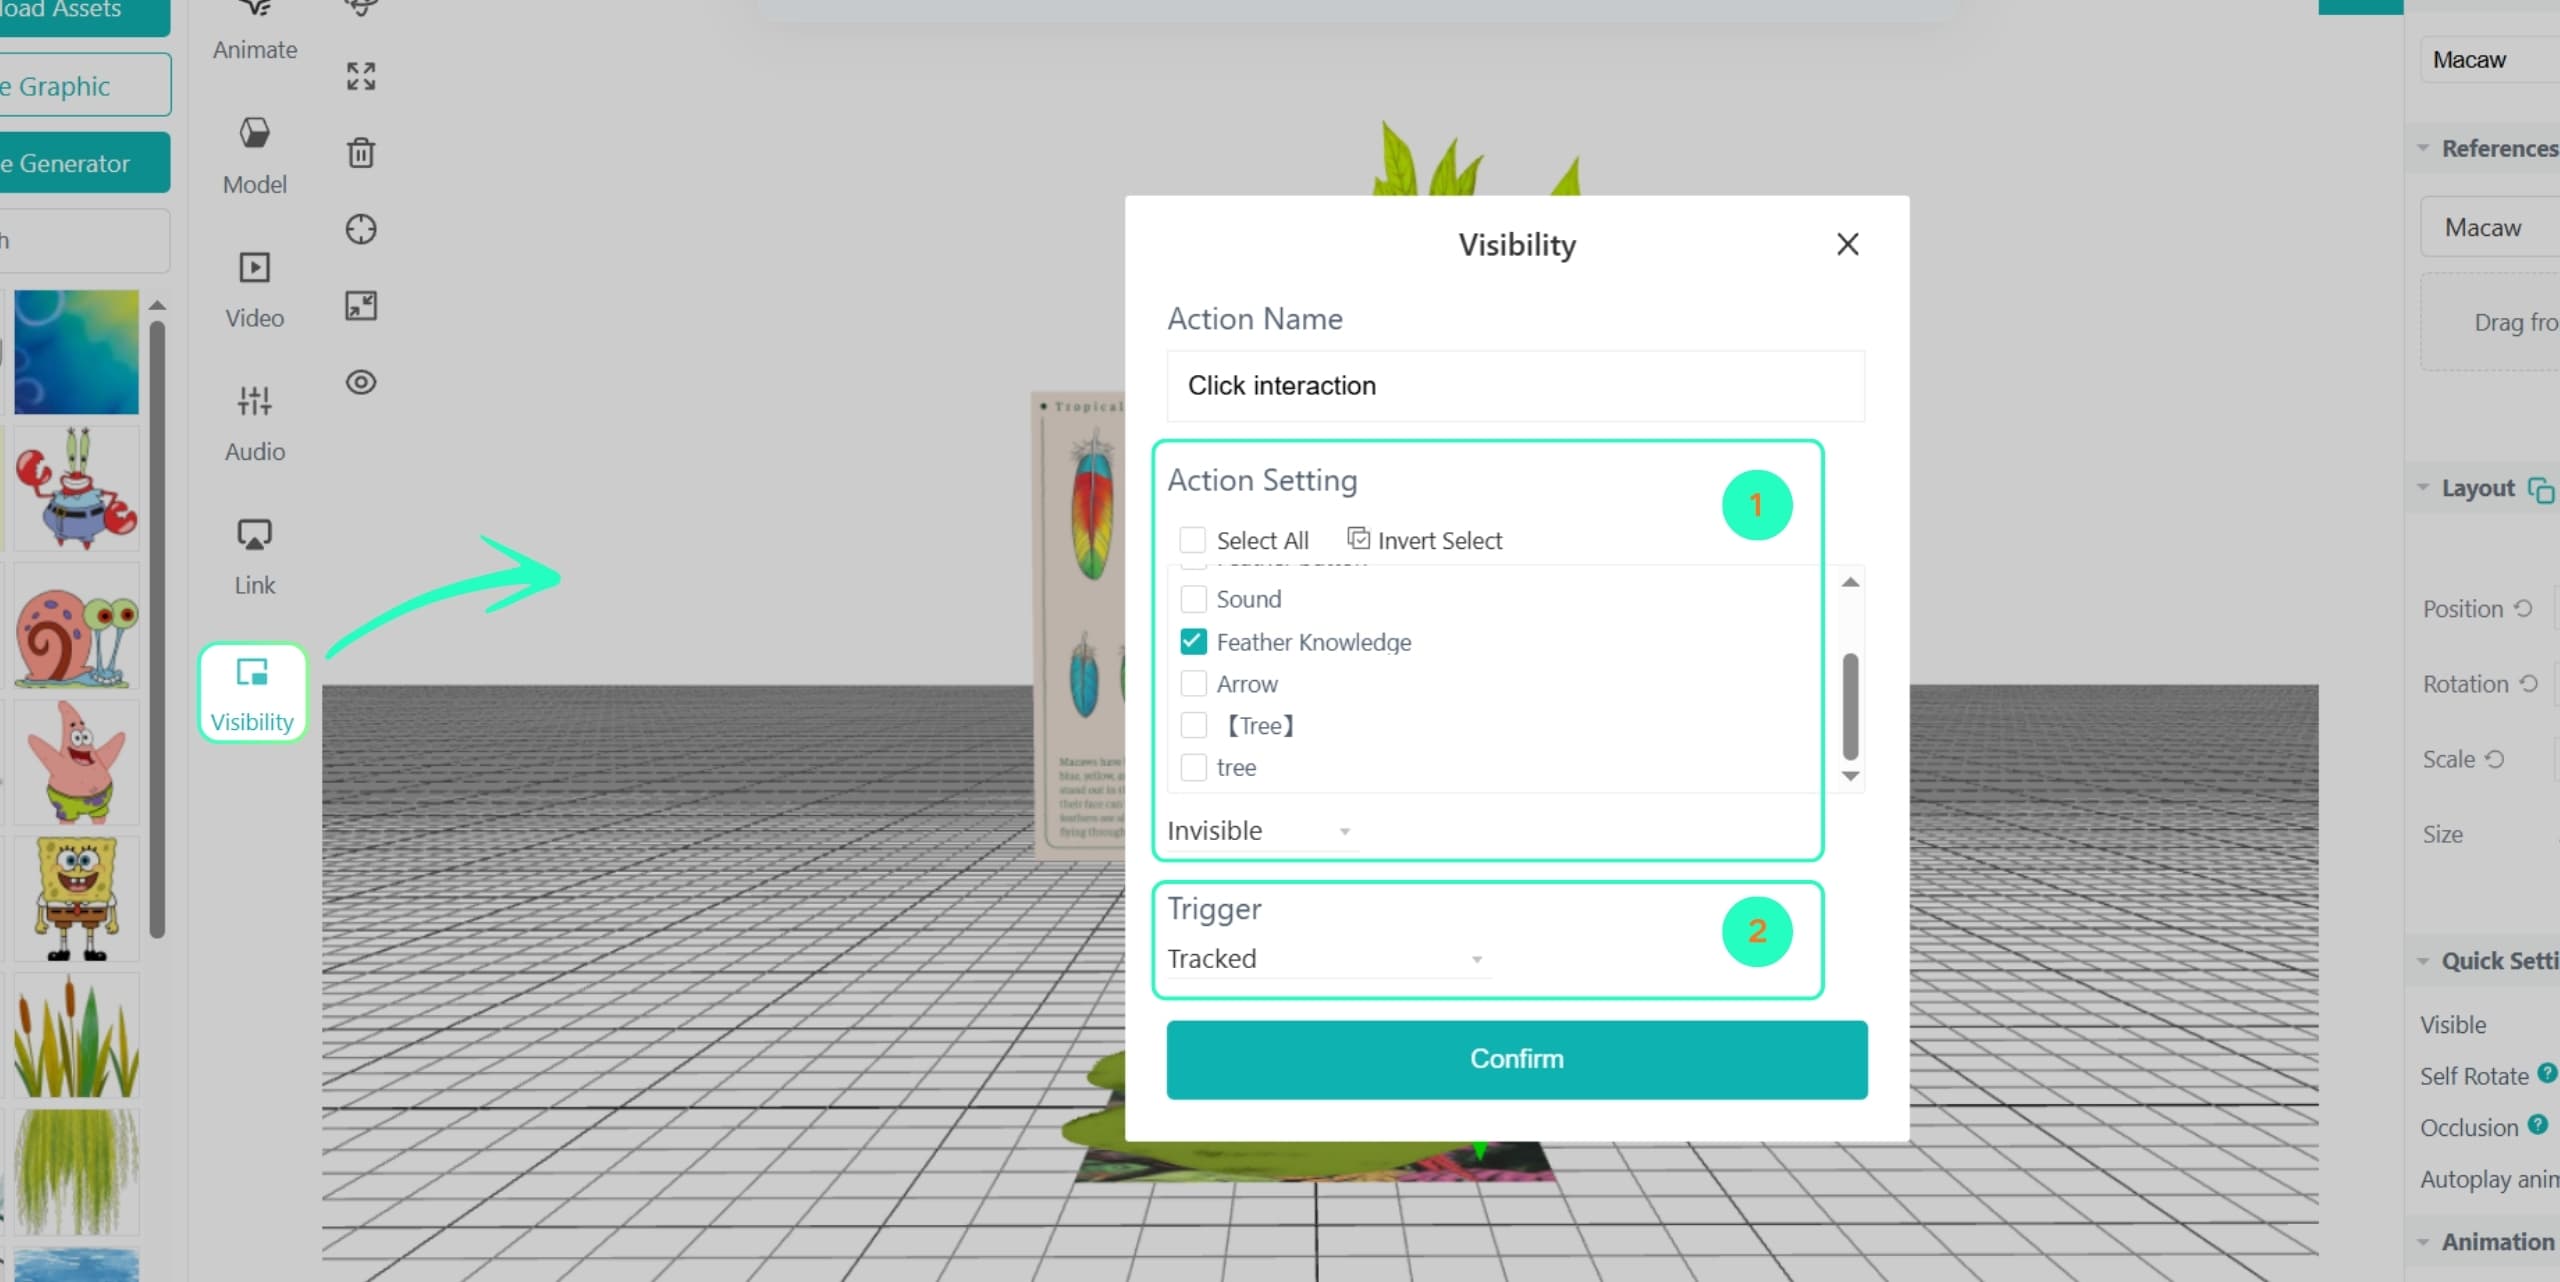
Then, set up the feather popup to appear. Note that the trigger condition should be set to “When the feather button is clicked.”
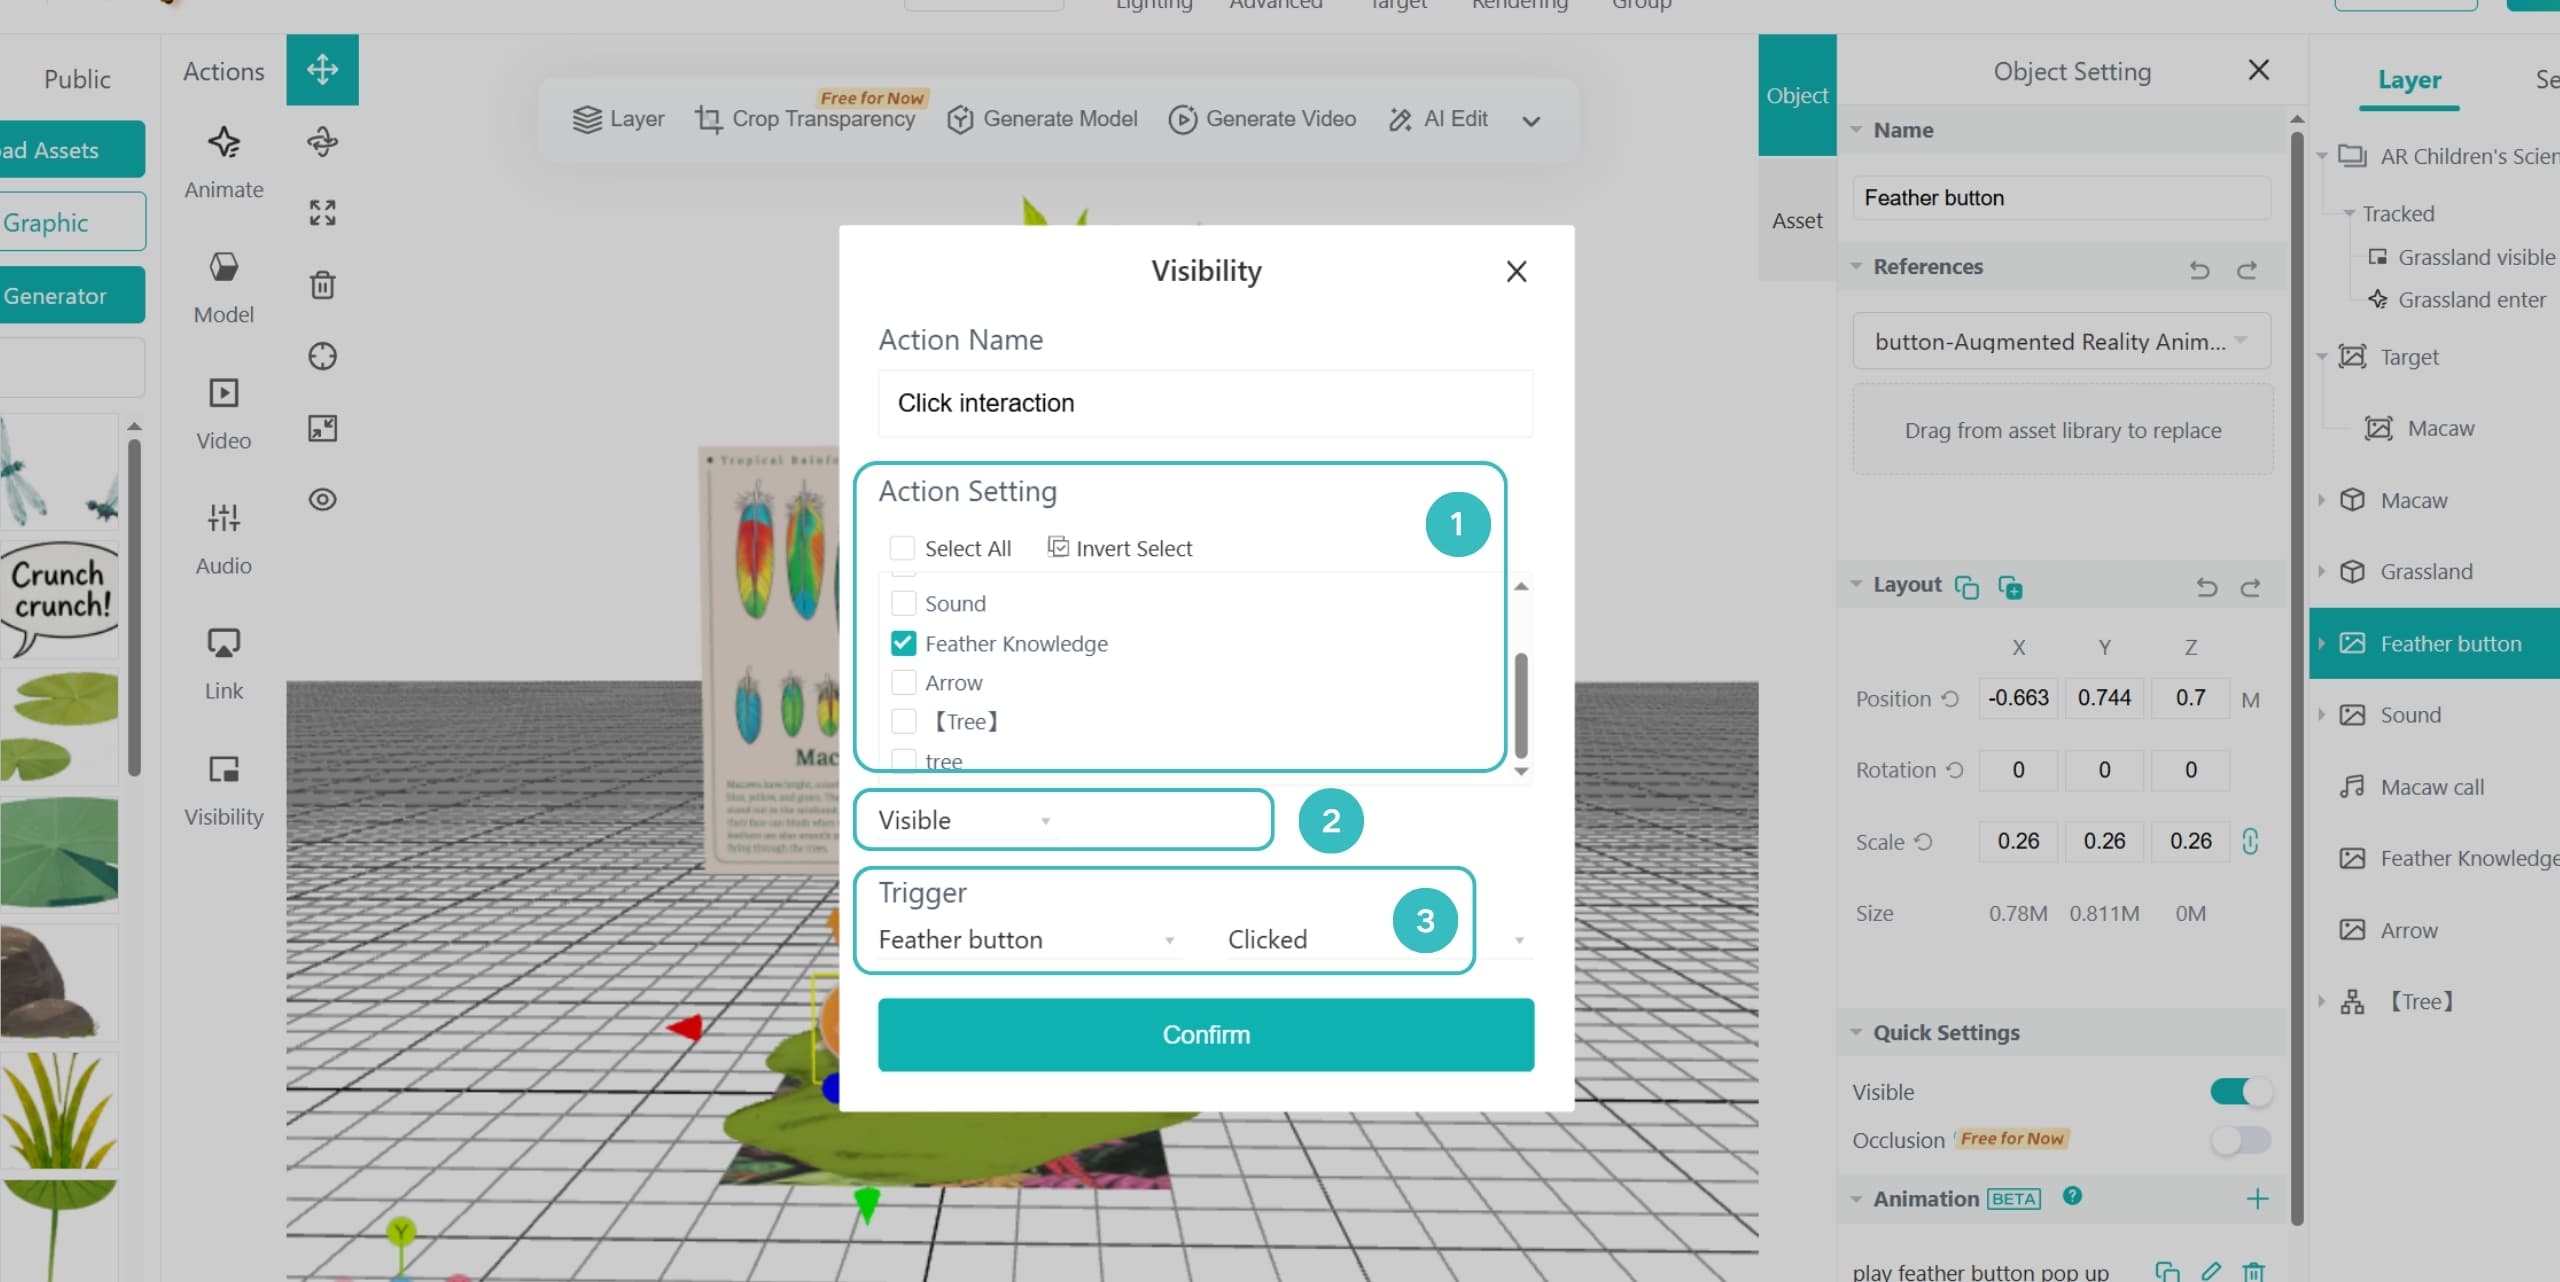
Now, when you preview your AR scene, clicking the feather button will display the feather popup.
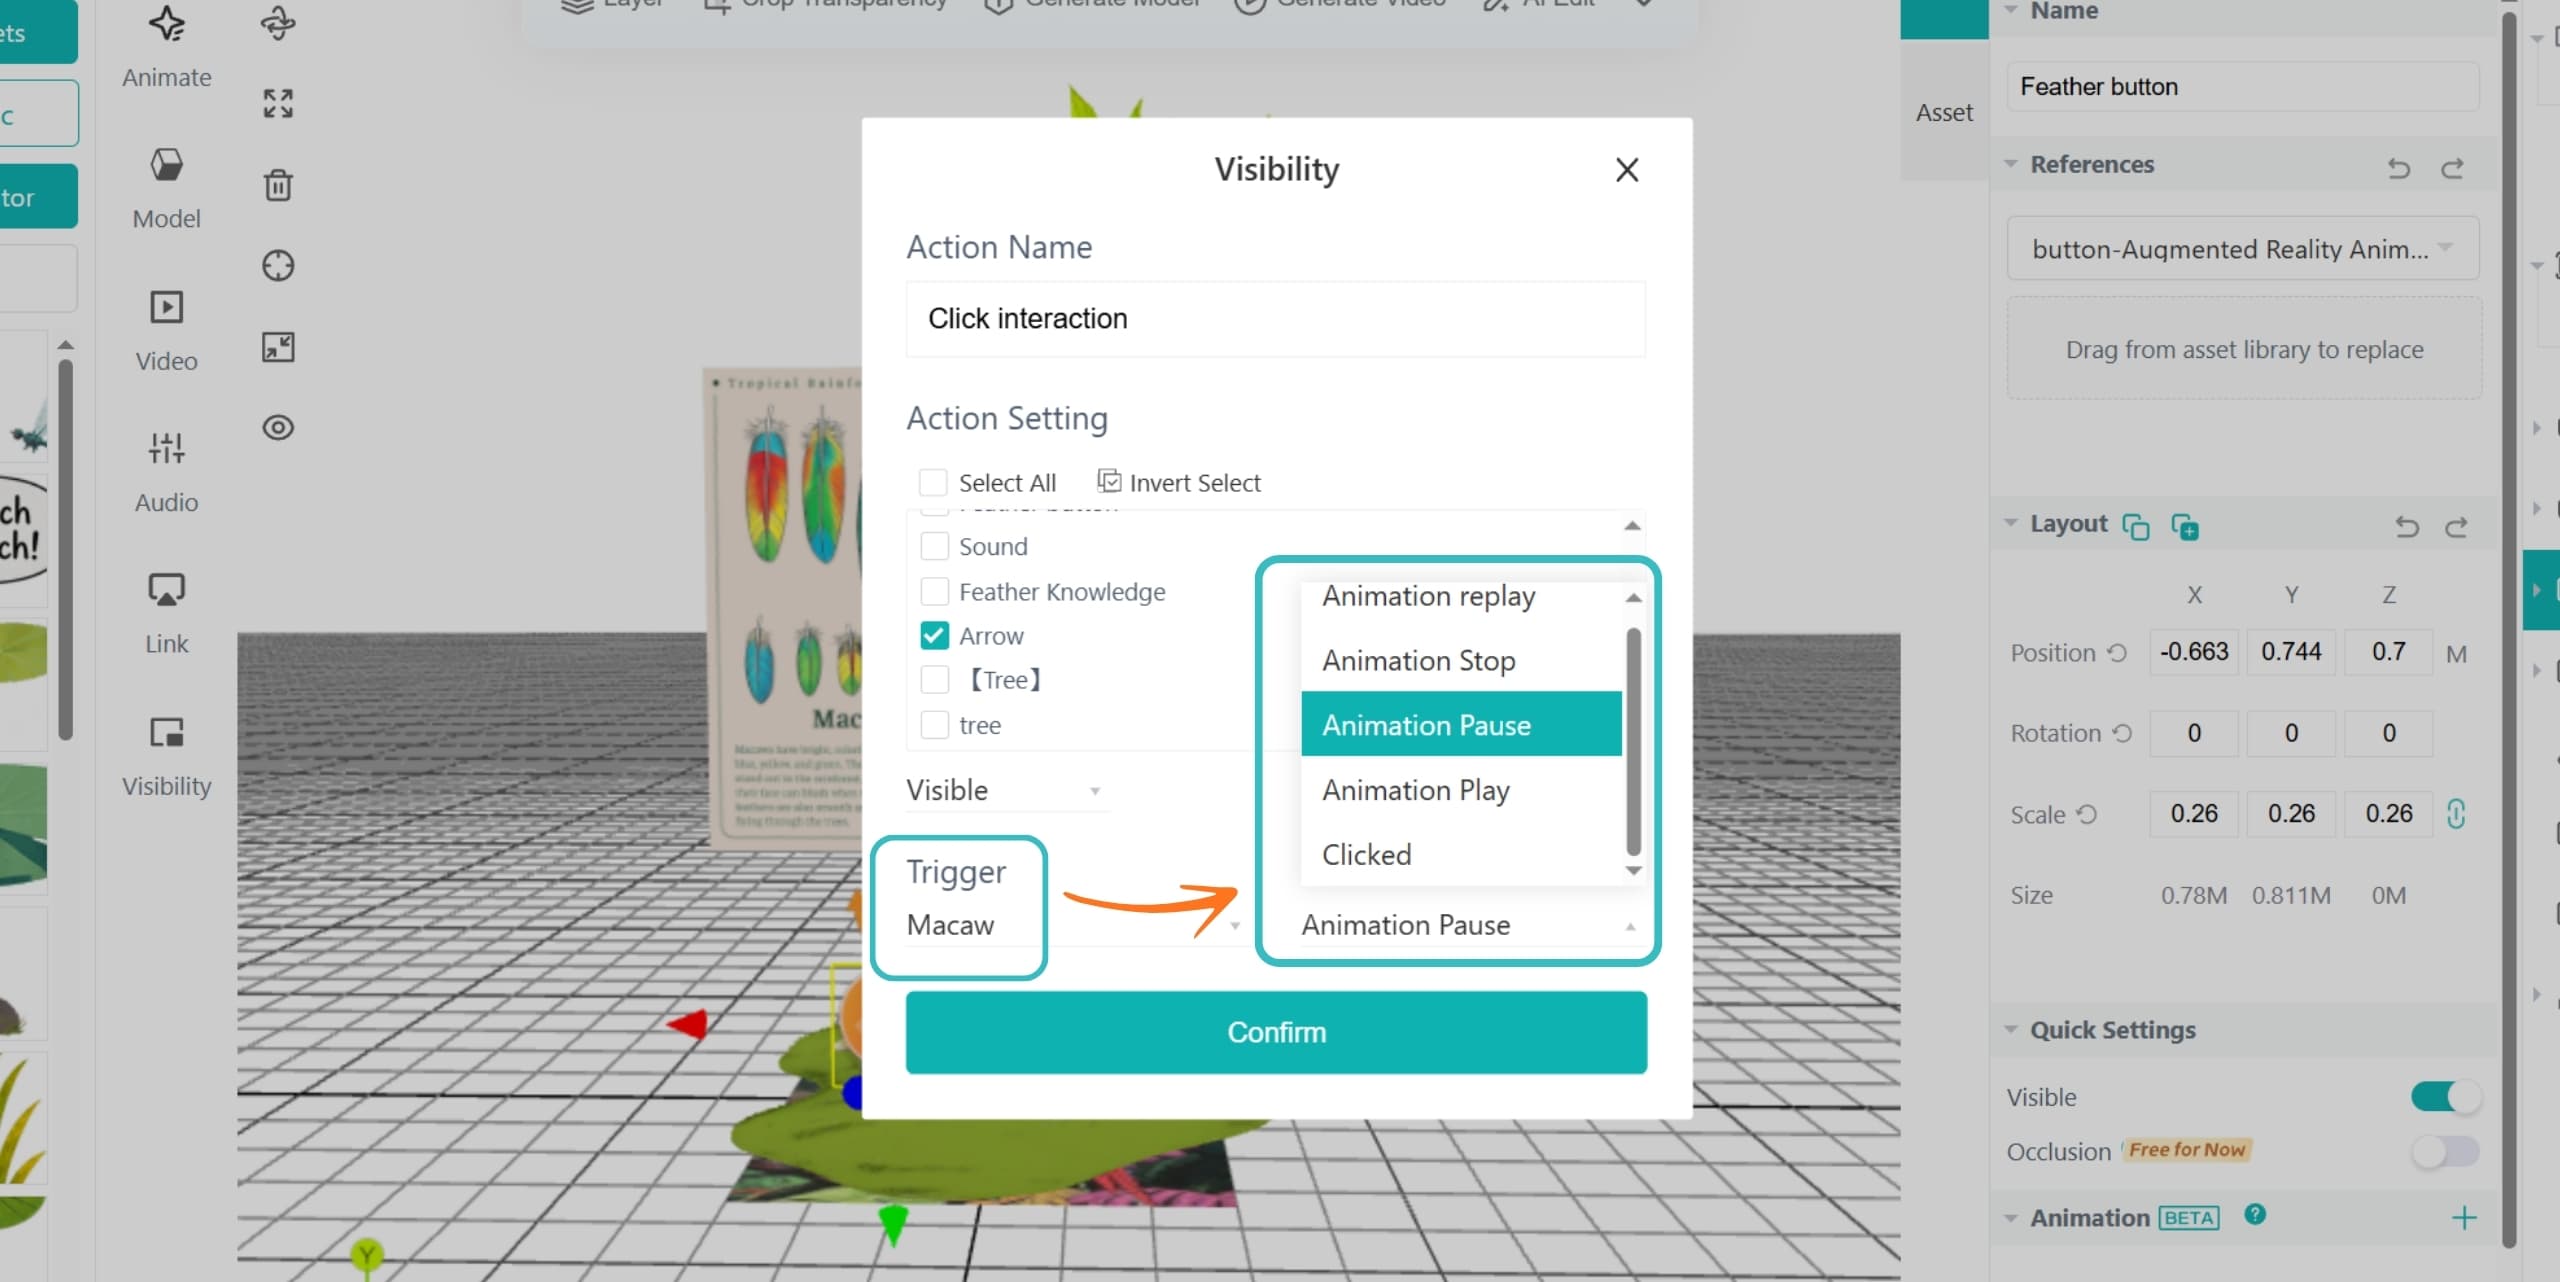
When selecting trigger conditions for asset visibility, you will also see animation states on the right side. You can set the trigger so that hidden assets become visible when a specific animation ends.
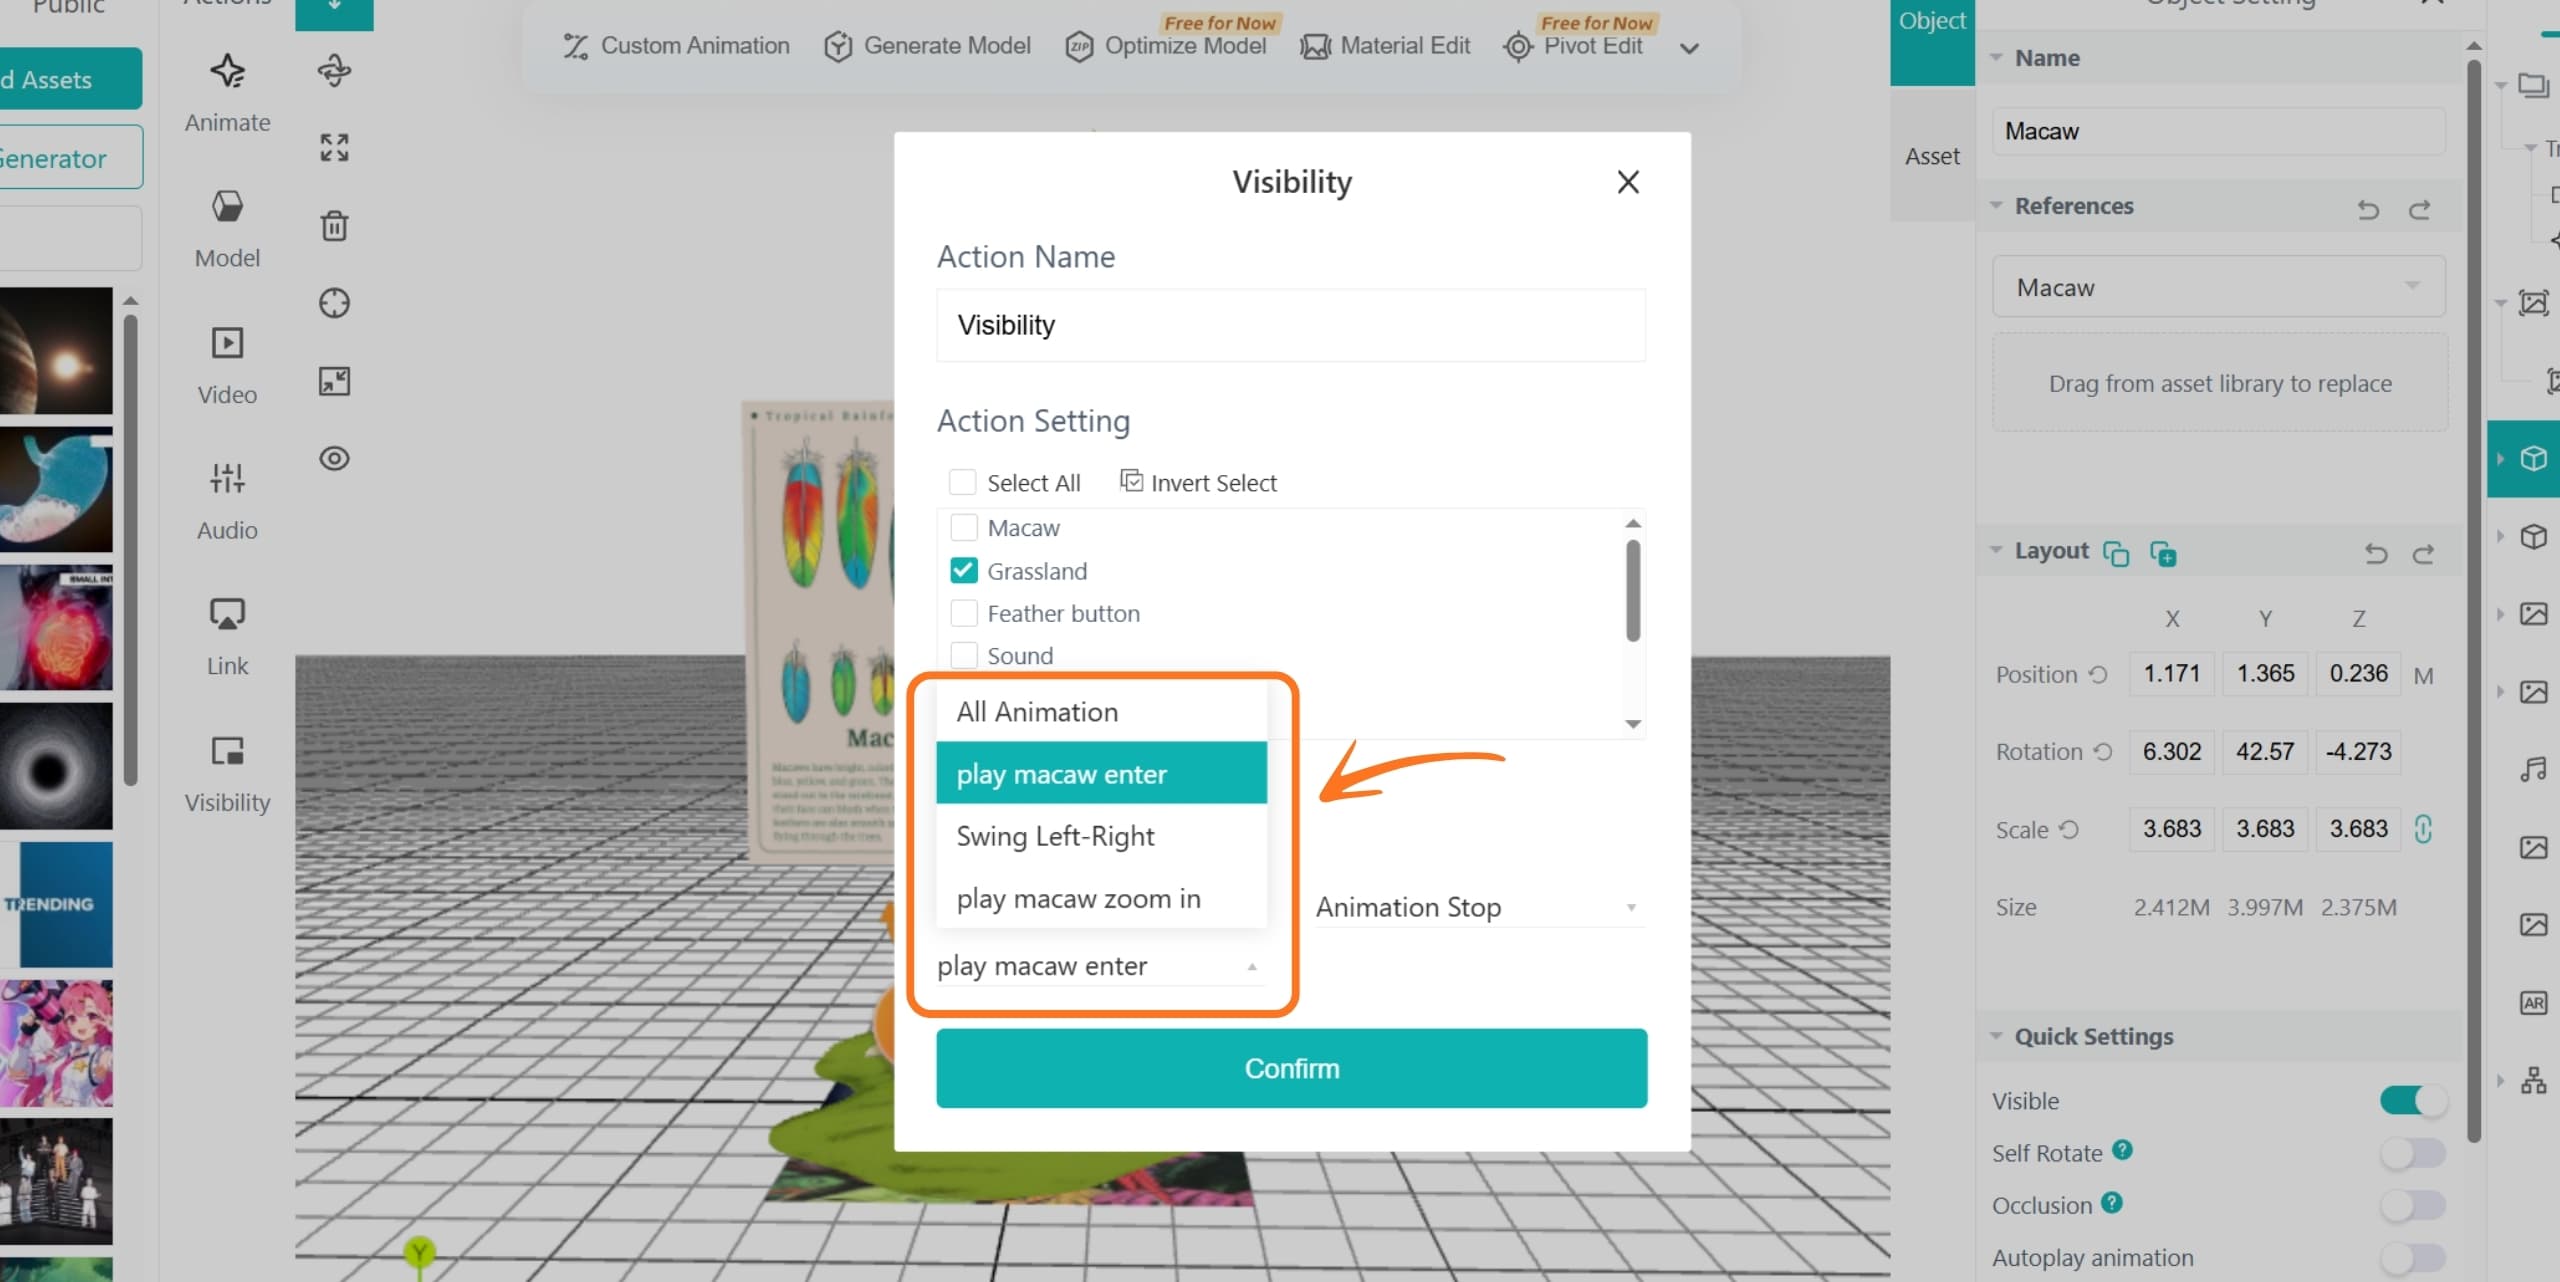
When you set the trigger condition to a specific asset animation ending, you can create a sequential asset reveal effect.
Next, I will use a practical example to demonstrate how to create a sequential asset reveal effect using Visibility Control.
In this example, I want to create an AR effect where the background and phoenix appear first, and then the fairies on both sides and the clouds in the foreground appear after the background entrance animation ends. The assets will appear in two separate stages.
Step 1: Hide the Fairies and Clouds
First, name the action. Then select the Fairy Group and Cloud Group, choose Invisible, and set the trigger condition to Tracked.
Next, add an animation to the background and phoenix.
Now, when you preview the AR experience, the fairies and clouds will remain hidden.
Step 2: Set Up the Fairies and Clouds to Appear
Click Visibility Control, select the Fairy Group and Cloud Group, and set them to Visible. Then set the trigger condition to when the background entrance animation ends.
Next, add animations to the fairies and clouds one by one.
Now, when you preview the AR scene, the fairies and clouds will appear after the background animation ends.
These two examples only demonstrate the basic applications of Visibility Control. By combining Visibility Control with animations, click interactions, and other scene elements, you can create richer and more engaging AR experiences.
For example, dynamic AR product information displays for e-commerce, interactive AR menus, and various popup interactions can all be easily created with Visibility Control, helping you build more immersive and interactive AR experiences.
Continue exploring the different settings of Visibility Control to unlock more possibilities and create AR experiences that are more immersive, interactive, and engaging.
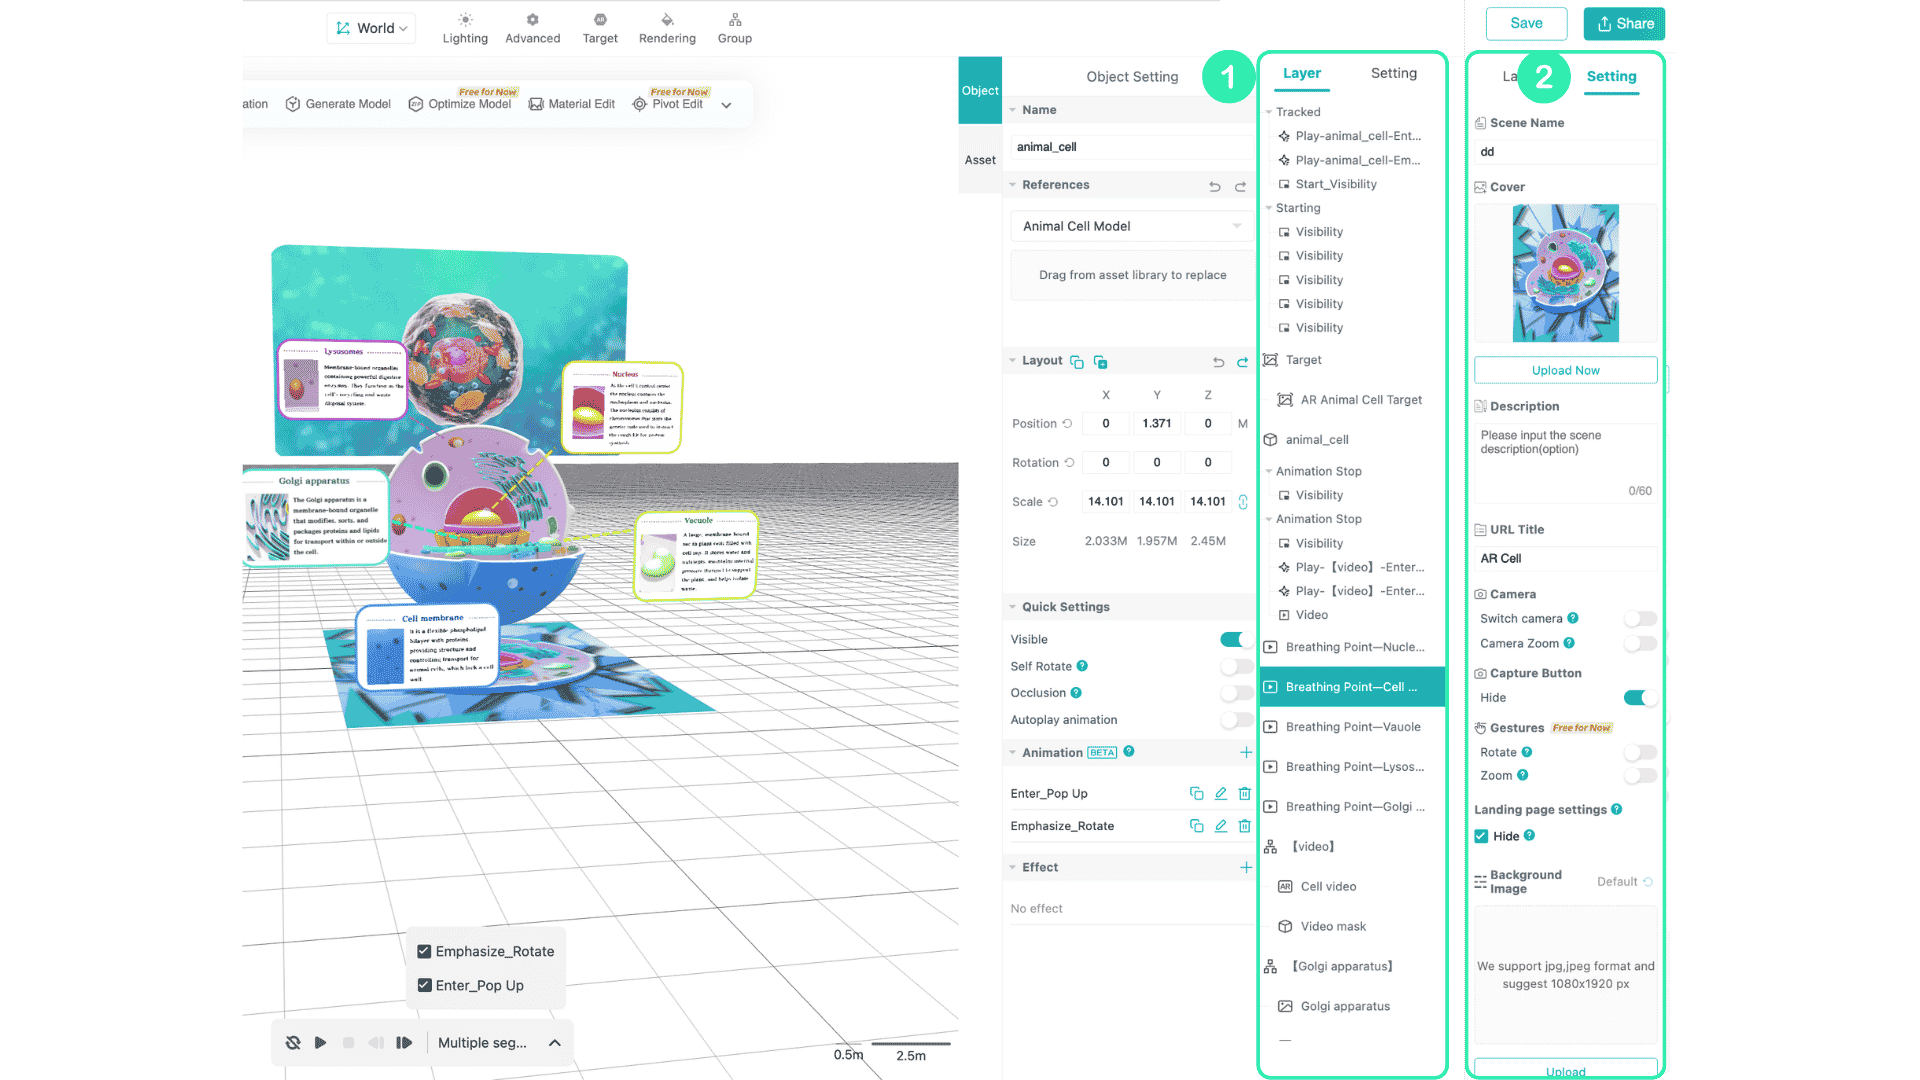
The Layer Panel displays all assets currently present in the 3D Canvas, along with any interactions and animations that have been added (excluding Quick Settings).
It is one of the most commonly used panels for debugging interaction issues. When your scene becomes complex and it is difficult to select objects directly in the canvas, you can use the Layer list to quickly locate and select assets.
In the Setting Panel, you can configure scene-level UI and experience settings. This includes customizing the landing page, setting the scan guide image, switching between front and rear cameras, configuring share text, and enabling gesture interactions.
This panel is where you refine and polish the overall experience.
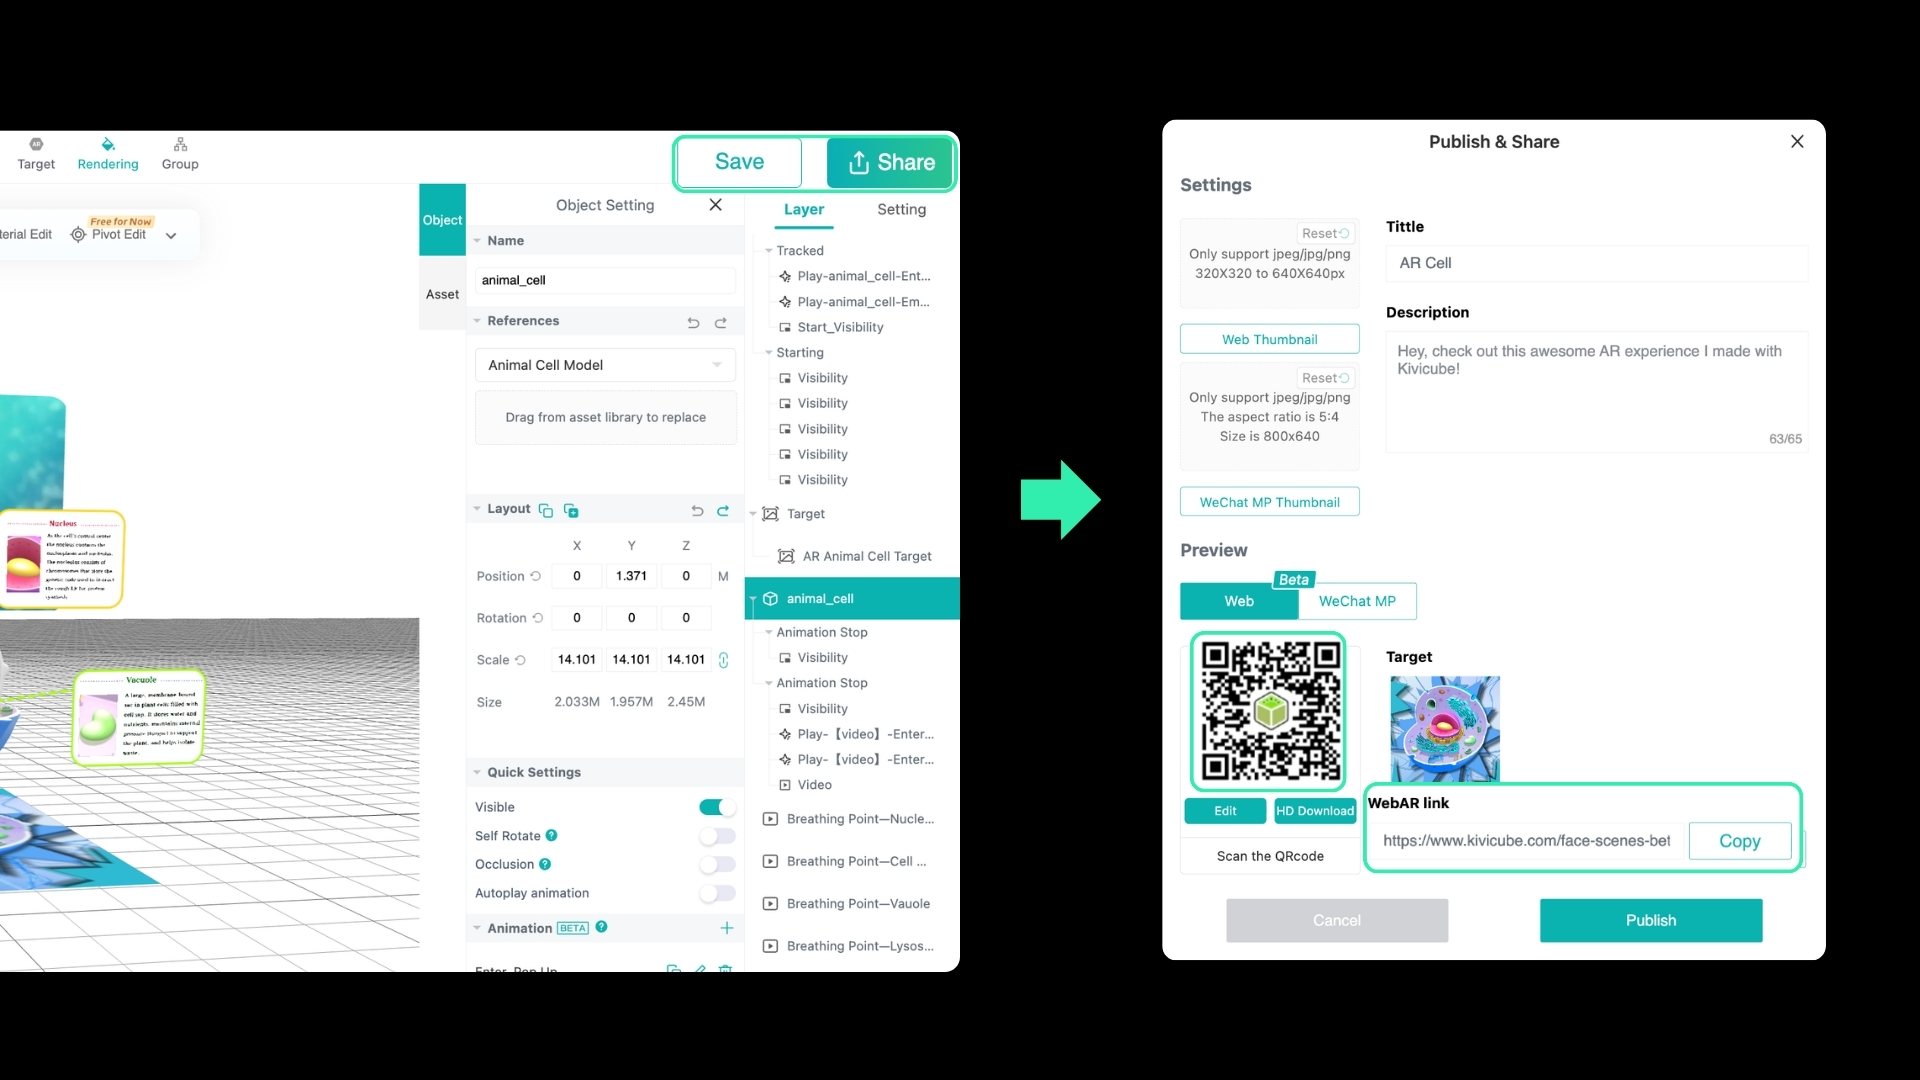
After completing your scene, make sure to click Save first to preserve your changes. Then click Share to generate a WebAR experience link and a QR code for easy access.